Quantcast
Channel: SharePoint Diary
Viewing all 1058 articles
Browse latest View live

Export Import Site Columns with PowerShell

$
0
0
Its a frequent requirement to copy site columns between SharePoint environments, isn't it? Today had a requirement to copy bunch of site columns from development environment to staging environment.

We used to package site columns as a WSP Solution package in such requirements: Create Site Column Feature for SharePoint 2010 ,This time, Lets use PowerShell to Export and Import Site Columns!

PowerShell Script to Export Site columns:
    #Get the Source Web
    $sourceWeb = Get-SPWeb "http://dev.crescent.com"
    #Create a XML File to Export Fields
    $xmlFile = "C:\SiteColumns.xml"
    New-Item $xmlFile -type file -force

    #Wrap Field Schema XML inside <Fields> Element 
    Add-Content $xmlFile "`n<Fields>"
    #Export All Site Columns of specific Group to XML file
    $sourceWeb.Fields | ForEach-Object {
        if ($_.Group -eq "Crescent Travel Request") {
            Add-Content $xmlFile $_.SchemaXml
        }
    }
    #Closing Wrapper
    Add-Content $xmlFile "</Fields>"
    #Dispose the web object
    $sourceWeb.Dispose()

PowerShell Script to Import Site Columns from XML:
  #Get the Target Web
  $TargetWeb = Get-SPWeb "http://test.crescent.com"
 #Get XML file exported
 [xml]$fieldsXML = Get-Content("C:\SiteColumns.xml")
 #Loop Through Each Field
 $fieldsXML.Fields.Field | ForEach-Object {
  #Check if the target web has the field already!
  if ($TargetWeb.Fields.ContainsField( $_.Name) -Eq $false) 
  { 
   #Add Site column to Target Web
   $TargetWeb.fields.AddFieldAsXml($_.OuterXml)
               }
 }
Thanks Phil for the idea: http://get-spscripts.com/2011/01/export-and-importcreate-site-columns-in.html

Configuring BLOB Cache in SharePoint 2010

$
0
0
What is BLOB:
BLOB means Binary Large Object and refers any binary format file that is stored as a single entity  and not converted to text. Usually, BLOB files are of type images, audio/video files.

What is BLOB Cache:
When BLOB types of files are uploaded to a SharePoint site (E.g. Images on a page), they are stored
inside the SQL Server content databases in BLOB data fields. When users request for these files for the first time, SharePoint retrieves them from database, stores the copies in WFEs and from next time, it serves those files from WFEs instead going back to database.

What benefit We'll Get by Enabling BLOB Cache in SharePoint 2010
A file retrieved from Web Front End's File System is much faster, compared with when it retrieved from the database! It helps to improve performance by decreasing the number of requests from SQL Server! It reduces end-user response time too.

Although, it is possible to enable the BLOB cache for all file types, its usually enabled for images, scripts, audio/video media filetypes and its ideal for Public web sites and sites where most of the users will have read-only permissions. (of course, BLOB could also be a document or spreadsheet even!)

Warning: Do not configure blob cache on collaborative file types such as Microsoft Word Documents! Because: The latest version of the document should be always be retrieved from the database and free from and conflicts. That would cause negative effect!!

How to configure the BLOB cache in SharePoint 2010:
The BLOB cache is configured in the web.config file for each Web application. Since BLOB cache is not enabled by default, it must be manually configured. To configure BLOB cache, we need to modify the web.config file of the WFE server(s). Follow this Step by step instruction to setup blob cache in SharePoint 2010.

1. Log on to SharePoint WFE server(s) as a Administrator

2. Go to Internet Information Services (IIS) Manager.

3. Expand the server, Sites node and then select your target the web application

4. Right-click the web application and click Explore to open the file system directory for the web application.sharepoint 2010 blob cache configuration
5. Open the web.config file in any text editor such as Notepad.

sharepoint 2010 blob cache web config
6. Locate the following line in the web.config file:

By default, BLOB Cache configuration in Web.Config file would be:

<BlobCache location="C:\BlobCache\14" 
       path="\.(gif|jpg|jpeg|bmp|tiff|ico|png|css|js|avi|flv|m4v|mov|mp3|mp4|mpeg|mpg|wma|wmv)$" 
            maxSize="10" enabled="false" />

Simply change the enabled property to "true" to enable BLOB cache! SharePoint will  create the folder specified in location parameter and assign folder permissions automatically! To disable BLOB cache in SharePoint 2010, simple revert it back to "false".
sharepoint 2010 blob cache
BLOB Cache Configuration has the following Parameters:
  • location - Is the file system folder where SharePoint server stores cached files.Make sure you select the BLOB cache location on a drive with sufficient disk space!
  • path- Is a lists all file extensions that will be cached. File types are separated by vertical pipe character.
  • maxSize - In GB, disk space that the BLOB cache will occupy. If BLOBs exceeds this limit, SharePoint will delete older items in the cache to make room for newer items.
  • max-Age - In seconds. It tells How long Browser can cache these files without making request to the server. Use it with value: 1814400 (Three Weeks), if you get: HTTP 304 error!
  • enabled - Sets BLOB Cache ON or OFF. Make it "false" to disable BLOB Cache.
XML is case sensitive! so be cautious when making changes to web.config file.

Enable BLOB Cache using PowerShell?
Why not! Web.config file changes can be made with "SPWebConfigModification" class. Lets utilize that to make a web.config change to enable BLOB cache:
Add-PSSnapin Microsoft.SharePoint.PowerShell -ErrorAction SilentlyContinue

#Get the Web Application
$WebApp = Get-SPWebApplication "http://sharepoint.crescent.com" 

#Create a web.config modification
$WebconfigMod = New-Object Microsoft.SharePoint.Administration.SPWebConfigModification
$WebconfigMod.Path = "configuration/SharePoint/BlobCache"
$WebconfigMod.Name = "enabled"
$WebconfigMod.Sequence = 0
$WebconfigMod.Owner = "BlobCacheModification"
$WebconfigMod.Type = 1
$WebconfigMod.Value = "true"
   
#Apply the web.config change
$WebApp.WebConfigModifications.Add($WebconfigMod)
$WebApp.Update()
$WebApp.Parent.ApplyWebConfigModifications()
 
This will enable BLOB Cache. If you want to disable BLOB cache, just change the Parameter "enabled" to "false". Same method applies for additional parameters such as: Location, MaxSize, etc.

See the BLOB Cache in action:
how to enable blob cache sharepoint 2010

How to Flush(Reset/Clear) BLOB cache in SharePoint 2010
Some times, You may notice your changes don’t appear in the site. All you have to do is: Flush the Cache! Here is the PowerShell to flush the BLOB cache (No GUI to do this!).

Add-PSSnapin Microsoft.SharePoint.PowerShell -ErrorAction SilentlyContinue

$webApp = Get-SPWebApplication "http://sharepoint.crescent.com"
[Microsoft.SharePoint.Publishing.PublishingCache]::FlushBlobCache($webApp)
Write-Host "BLOB Cache Flushed for:" $webApp 

Found a CodePlex solution Blob cache manager (haven't tried it but): http://sp2010blobcachemgr.codeplex.com/

Tail: SharePoint 2010 foundation blob cache
BLOB cache is not supported in SharePoint Foundation 2010! This feature is available in SharePoint Server

Package and Delpoy Content Types as Feature Based Solutions in SharePoint 2010

$
0
0
Task: Create a feature based solution package to pack and deploy the content type from DEV environment to STAGING environment in SharePoint 2010.

Although SharePoint 2010 supports content type hub, where content types of one site collection can be used by other site collections/web application/even Farms, we needed an isolation and wanted to pack & deploy content types between different environments.

Solution: Create a Visual Studio project to pack the content type as a feature based solution package (wsp). Lets pack the Content Type "Crescent Travel Request" with Few Columns & Form Template. Here is the step by step guide on Creating Visual Studio Solution for Content Types in SharePoint 2010: 

Create a Visual Studio Project To Package Content Type as a Feature based solution:
1. Create a New Visual Studio 2010 Project of "Empty SharePoint Project" Type, Give it a name, say: "Crescent.TravelRequest.CotentType"
Creating Visual Studio Solution for Content Types in SharePoint 2010
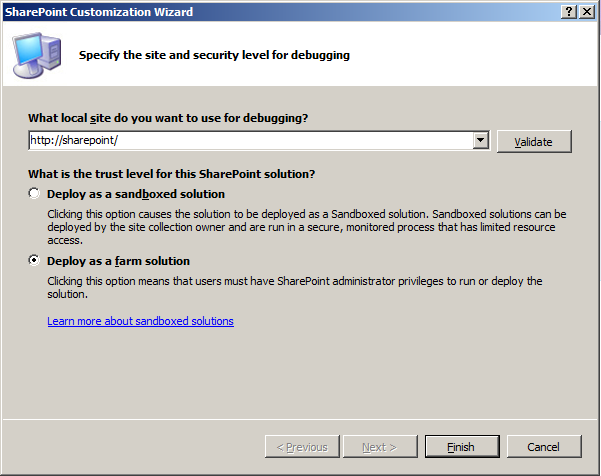
Make it as a Farm Solution and Specify the site for debugging. Click Finish.
Build a deployable Content Type for SharePoint 2010

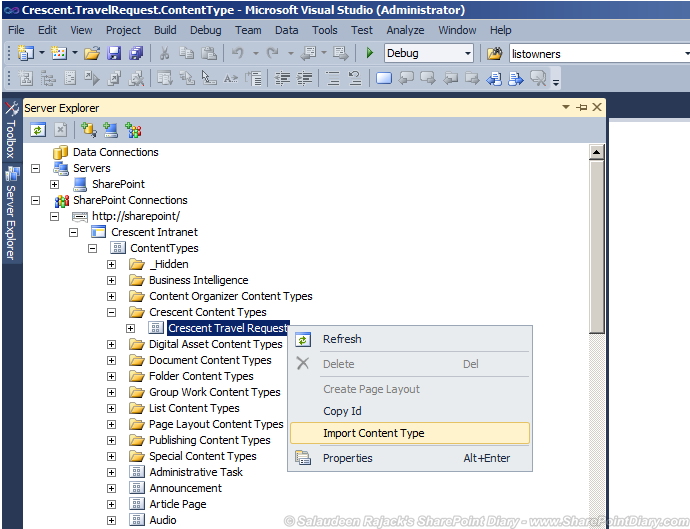
2. Go to Server Explorer from Visual Studio 2010 (View >> Server Explorer), Expand the nodes and Navigate to your desired content type, In our case it is: Crescent Travel Request. Right click and choose "Import Content Type"
How to Deploy Content Types in SharePoint 2010
This will create a feature "Feature1" and a Content Type element with the selected content type's schema XML. Rename the Feature1 to "Travel Request".
sharepoint 2010 content type deployment
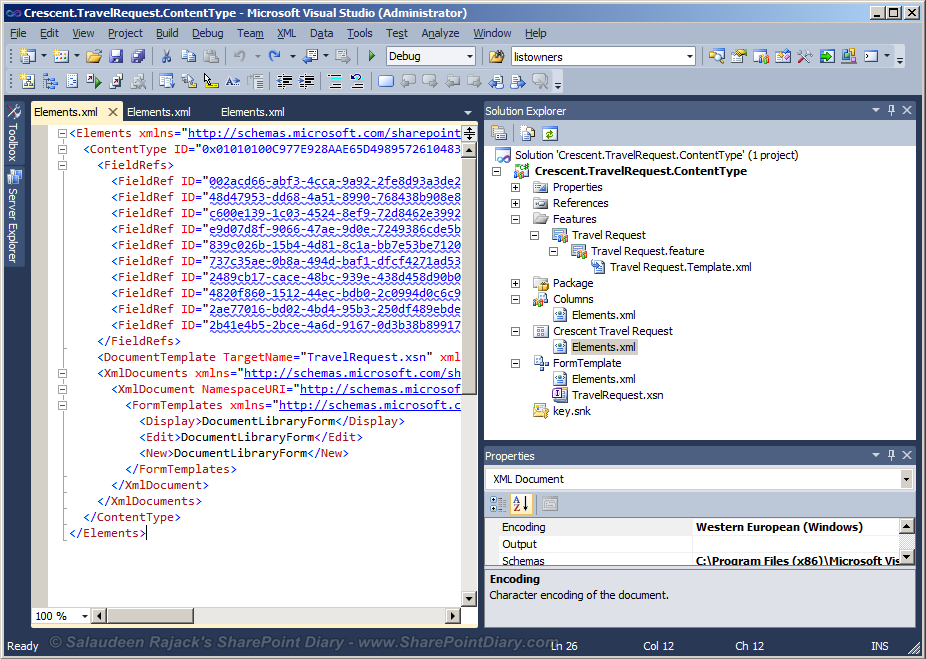
Crescent Content Type's Elements.xml
<Elements xmlns="http://schemas.microsoft.com/sharepoint/"><ContentType ID="0x01010100C977E928AAE65D498957261048306247" Name="Crescent Travel Request" Group="Crescent Content Types" Inherits="true" Hidden="false" ReadOnly="false" Sealed="false"><FieldRefs><FieldRef ID="002acd66-abf3-4cca-9a92-2fe8d93a3de2" Name="Traveller_x0020_Name" DisplayName="Traveller Name" /><FieldRef ID="48d47953-dd68-4a51-8990-768438b908e8" Name="Project_x0020_Manager" DisplayName="Project Manager" /><FieldRef ID="c600e139-1c03-4524-8ef9-72d8462e3992" Name="Travel_x0020_Date" DisplayName="Travel Date" /><FieldRef ID="e9d07d8f-9066-47ae-9d0e-7249386cde5b" Name="Travel_x0020_Coordinator" DisplayName="Travel Coordinator" /><FieldRef ID="839c026b-15b4-4d81-8c1a-bb7e53be7120" Name="Origin_x0020_Country" DisplayName="Origin Country" /><FieldRef ID="737c35ae-0b8a-494d-baf1-dfcf4271ad53" Name="Origin_x0020_City" DisplayName="Origin City" /><FieldRef ID="2489cb17-cace-48bc-939e-438d458d90b0" Name="Destination_x0020_Country" DisplayName="Destination Country" /><FieldRef ID="4820f860-1512-44ec-bdb0-2c0994d0c6c9" Name="Destination_x0020_City" DisplayName="Destination City" /><FieldRef ID="2ae77016-bd02-4bd4-95b3-250df489ebde" Name="Travel_x0020_Desk_x0020_Comments" DisplayName="Travel Desk Comments" /><FieldRef ID="2b41e4b5-2bce-4a6d-9167-0d3b38b89917" Name="Approval_x0020_Status" DisplayName="Approval Status" /></FieldRefs><DocumentTemplate TargetName="TravelRequest.xsn" xmlns="http://schemas.microsoft.com/sharepoint/" /><XmlDocuments xmlns="http://schemas.microsoft.com/sharepoint/"><XmlDocument NamespaceURI="http://schemas.microsoft.com/sharepoint/v3/contenttype/forms"><FormTemplates xmlns="http://schemas.microsoft.com/sharepoint/v3/contenttype/forms"><Display>DocumentLibraryForm</Display><Edit>DocumentLibraryForm</Edit><New>DocumentLibraryForm</New></FormTemplates></XmlDocument></XmlDocuments></ContentType></Elements>

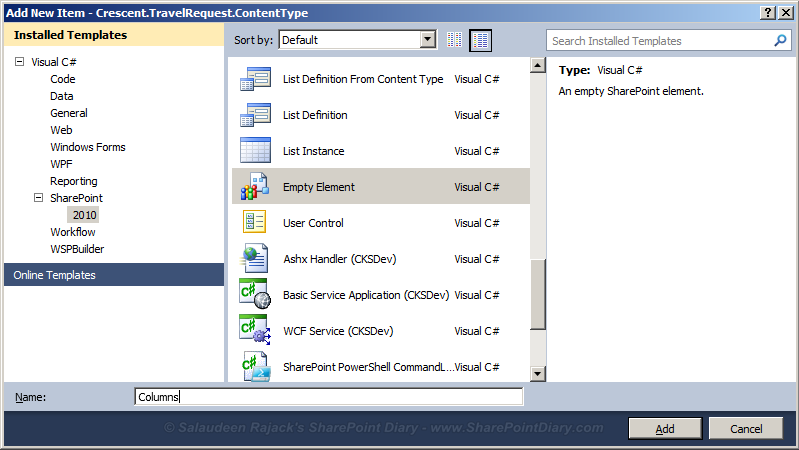
3. Now, We got the content type with the references to Fields and Document Template. Since the columns (or fields) referenced in our content type are not default OOTB site columns, We must package the site columns referenced in the content type. So, Right click the Project from server explorer, Choose Add New Item, and then select "Empty Element"
sharepoint 2010 content type deploy
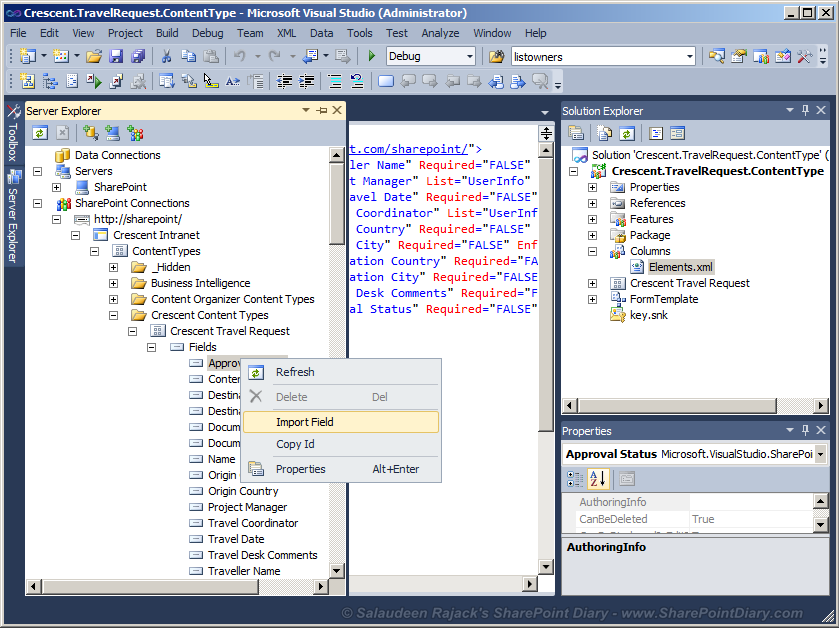
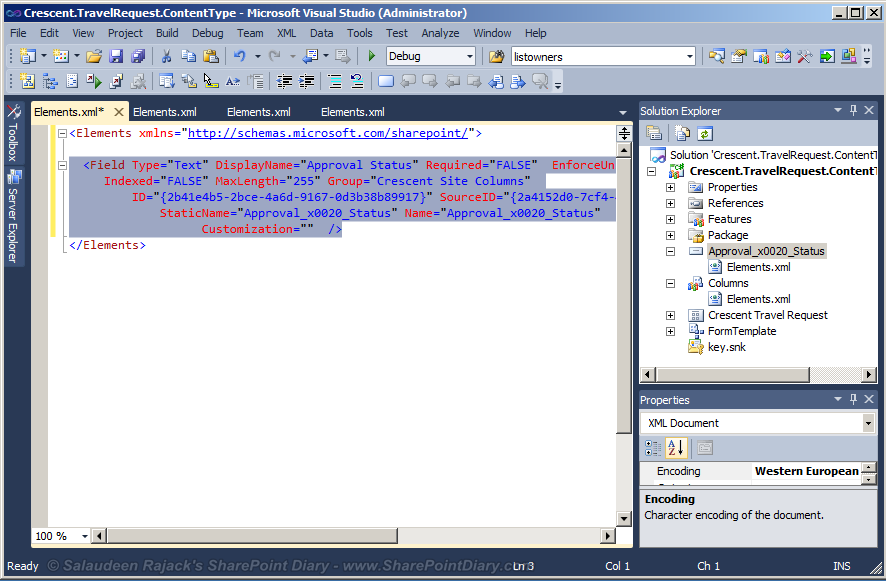
Like the content type, Fields also have schema XML. There are many ways to get Field's XML like using SharePoint Manager, Using PowerShell, etc. Lets use the OOTB way again: Server Explorer.
Deploying Content Types as a Feature
Copy the Field Schema from the Elements.xml of the field object, To the Element.xml file under "Columns" Object, and then delete the newly created Field object from Solution Explorer.

Repeat the above step for all fields referenced in the content type.
Create a Content Type using Features
Finally, the Elements.xml file under "Columns" will look like:
Columns Object's Elements.xml File:
<?xml version="1.0" encoding="utf-8"?><Elements xmlns="http://schemas.microsoft.com/sharepoint/"><Field Type="Text" DisplayName="Traveller Name" Required="FALSE" EnforceUniqueValues="FALSE" Indexed="FALSE" MaxLength="255" Group="Crescent Site Columns" ID="{002acd66-abf3-4cca-9a92-2fe8d93a3de2}" SourceID="{2a4152d0-7cf4-4014-997f-0fce5e803436}" StaticName="Traveller_x0020_Name" Name="Traveller_x0020_Name" Customization="" /><Field Type="User" DisplayName="Project Manager" List="UserInfo" Required="FALSE" EnforceUniqueValues="FALSE" ShowField="ImnName" UserSelectionMode="PeopleOnly" UserSelectionScope="0" Group="Crescent Site Columns" ID="{48d47953-dd68-4a51-8990-768438b908e8}" SourceID="{2a4152d0-7cf4-4014-997f-0fce5e803436}" StaticName="Project_x0020_Manager" Name="Project_x0020_Manager" Customization="" /><Field Type="DateTime" DisplayName="Travel Date" Required="FALSE" EnforceUniqueValues="FALSE" Indexed="FALSE" Format="DateOnly" Group="Crescent Site Columns" ID="{c600e139-1c03-4524-8ef9-72d8462e3992}" SourceID="{2a4152d0-7cf4-4014-997f-0fce5e803436}" StaticName="Travel_x0020_Date" Name="Travel_x0020_Date" Customization="" /><Field Type="User" DisplayName="Travel Coordinator" List="UserInfo" Required="FALSE" EnforceUniqueValues="FALSE" ShowField="ImnName" UserSelectionMode="PeopleOnly" UserSelectionScope="0" Group="Crescent Site Columns" ID="{e9d07d8f-9066-47ae-9d0e-7249386cde5b}" SourceID="{2a4152d0-7cf4-4014-997f-0fce5e803436}" StaticName="Travel_x0020_Coordinator" Name="Travel_x0020_Coordinator" Customization="" /><Field Type="Text" DisplayName="Origin Country" Required="FALSE" EnforceUniqueValues="FALSE" Indexed="FALSE" MaxLength="255" Group="Crescent Site Columns" ID="{839c026b-15b4-4d81-8c1a-bb7e53be7120}" SourceID="{2a4152d0-7cf4-4014-997f-0fce5e803436}" StaticName="Origin_x0020_Country" Name="Origin_x0020_Country" Customization="" /><Field Type="Text" DisplayName="Origin City" Required="FALSE" EnforceUniqueValues="FALSE" Indexed="FALSE" MaxLength="255" Group="Crescent Site Columns" ID="{737c35ae-0b8a-494d-baf1-dfcf4271ad53}" SourceID="{2a4152d0-7cf4-4014-997f-0fce5e803436}" StaticName="Origin_x0020_City" Name="Origin_x0020_City" Customization="" /><Field Type="Text" DisplayName="Destination Country" Required="FALSE" EnforceUniqueValues="FALSE" Indexed="FALSE" MaxLength="255" Group="Crescent Site Columns" ID="{2489cb17-cace-48bc-939e-438d458d90b0}" SourceID="{2a4152d0-7cf4-4014-997f-0fce5e803436}" StaticName="Destination_x0020_Country" Name="Destination_x0020_Country" Customization="" /><Field Type="Text" DisplayName="Destination City" Required="FALSE" EnforceUniqueValues="FALSE" Indexed="FALSE" MaxLength="255" Group="Crescent Site Columns" ID="{4820f860-1512-44ec-bdb0-2c0994d0c6c9}" SourceID="{2a4152d0-7cf4-4014-997f-0fce5e803436}" StaticName="Destination_x0020_City" Name="Destination_x0020_City" Customization="" /><Field Type="Note" DisplayName="Travel Desk Comments" Required="FALSE" EnforceUniqueValues="FALSE" Indexed="FALSE" NumLines="6" RichText="TRUE" RichTextMode="FullHtml" IsolateStyles="TRUE" Sortable="FALSE" Group="Crescent Site Columns" ID="{2ae77016-bd02-4bd4-95b3-250df489ebde}" SourceID="{2a4152d0-7cf4-4014-997f-0fce5e803436}" StaticName="Travel_x0020_Desk_x0020_Comments" Name="Travel_x0020_Desk_x0020_Comments" Customization="" /><Field Type="Text" DisplayName="Approval Status" Required="FALSE" EnforceUniqueValues="FALSE" Indexed="FALSE" MaxLength="255" Group="Crescent Site Columns" ID="{2b41e4b5-2bce-4a6d-9167-0d3b38b89917}" SourceID="{2a4152d0-7cf4-4014-997f-0fce5e803436}" StaticName="Approval_x0020_Status" Name="Approval_x0020_Status" Customization="" /></Elements> 

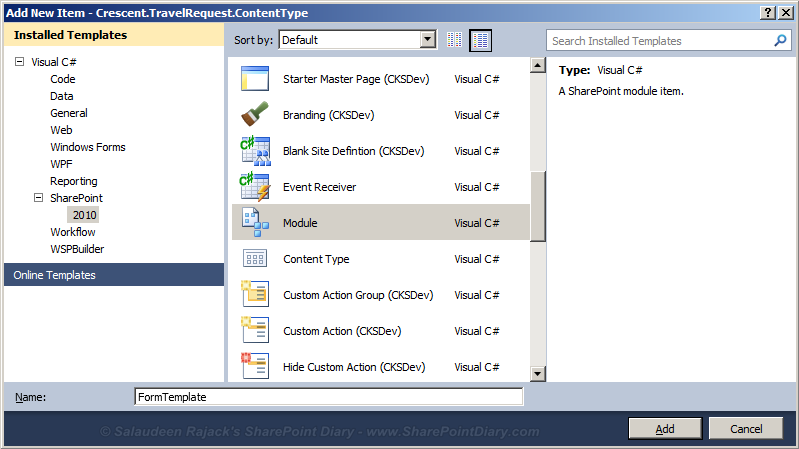
4. The next thing we need to do is: Pack the Document template associated with out content type. Add New Item to the project, Choose "Module" and name it. I've named it as "FormTemplate"
Custom Content Type using Visual Studio
Now from Solution Explorer, Right click the Form Template, Add >> Exising Item >> Specify the Form Template to Add.
Provision Cotent Type with document template in Visual Studio
Update the Elements.xml file under "FormTemplate" as below:
FormTemplate Module's Elements.xml file:
<?xml version="1.0" encoding="utf-8"?><Elements xmlns="http://schemas.microsoft.com/sharepoint/"><Module Name="FormTemplate"><File Path="FormTemplate\TravelRequest.xsn" Url="_cts/Crescent Travel Request/TravelRequest.xsn" Type="Ghostable" /></Module></Elements>

5. Done, We have the Content Type, Columns and the Document templates referenced by the content type. Now the project structure should look like:
sharepoint 2010 content type feature
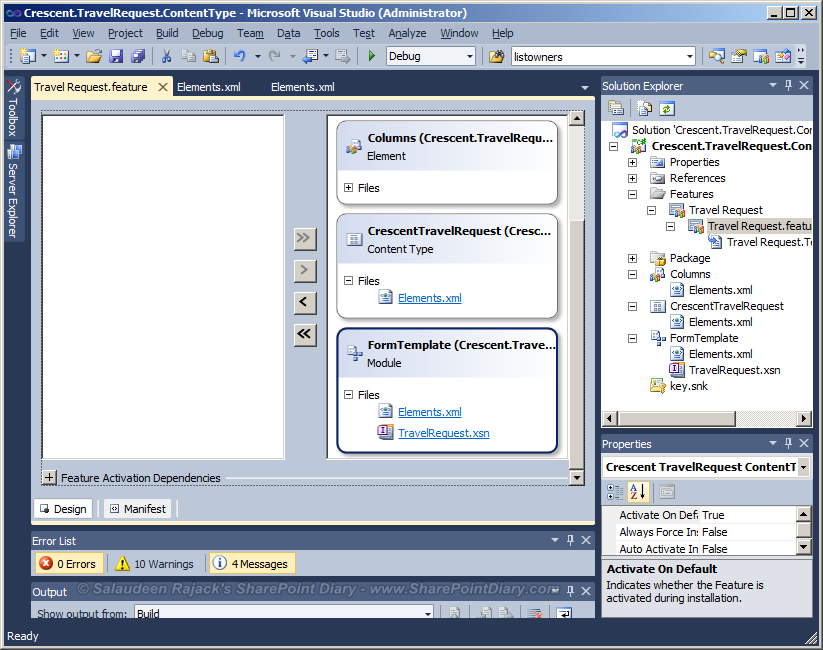
Go to the feature designer, Include above three objects to the feature.
sharepoint 2010 content type wsp
Build, Pack and Deploy the Project! That's all!! We are done packaging and deploying content types with document template using Visual Studio 2010.

While its also possible to have a single Elements.xml file for all these artifacts, I've separated them into three for the sake of simplicity!

In this demo, I've selected "Blank SharePoint Project", But you can choose "Content Type" Project and copy paste the Content Type & Fields Schema XML)
Export Import Content Types using Visual Studio

Export Import Content Types with PowerShell:
Here is my another post on Exporting and Importing Content Types using PowerShell

How to Rename SharePoint Column Programmatically

$
0
0
Here is how we can Rename SharePoint List or Site Field/Column Programmatically with PowerShell and C# Object Model code:

PowerShell Code to  Rename a SharePoint Field:

Add-PSSnapin Microsoft.SharePoint.PowerShell -ErrorAction SilentlyContinue

$Web= Get-SPWeb "http://sharepoint.company.com"

#Get the "Risk Metrics" List
$list= $web.Lists.TryGetList("Risk Metrics")

#Get "Project Name" Field
$field = $list.fields | where {$_.Title -eq "Project Name"}

#Set Field Display Name and Update
$field.Title ="Program Name"
$field.Update()

Rename a SharePoint Field Programmatically (C#):

           using(SPSite site=new SPSite("http://sharepoint.crescent.com"))
            {
                //Get the "Risk Metrics" List
                SPList list = site.RootWeb.Lists["Risk Metrics"];

                //Get "Project Name" Field
                SPField field = list.Fields["Project Name"];

                //Set Field Display Name and Update
                field.Title = "Program Name";
                field.Update();

                //You can also use: list.Fields["Project Name"].Title = "Project Name";
               //list.Update();                 
            } 

Branding SharePoint 2010 Top Navigation Dropdown Menu Bar

$
0
0
By default SharePoint 2010 Top Navigation menu looks like the below screen without branding.
sharepoint 2010 top navigation branding
The Top Navigation Menu is the primary object in SharePoint user interface. We can customize top navigation menu's look and feel by overriding CSS styles. Here, I'm Sharing the CSS code and screens for reference, from my recent project.

SharePoint 2010 Top Navigation & Flyout Menu CSS Style:
/*** Top Navigaion Global Menu Container ***/
 .s4-tn
{
      padding: 0px;
      margin: 0px;
      font-family: 'Calibri' !important;
      font-size: 11pt !important;
      padding-left: 10px;
}

/*** Top Navigaion Static Menu Style ***/
.s4-tn li.static > .menu-item
{
      color: #5A9A18;
      border: 1px solid transparent;
      padding: 4px 10px;
      line-height: 25px;
      height: 25px;
}

/*** Top Navigaion Static Menu Hover ***/
.s4-tn li.static > a:hover
{
      background: url("/_layouts/Images/selbg.png") repeat-x left top;
      background-color: #529610;
      color: #fff;
      text-decoration: none;
}

/*** Top Navigaion Static Menu Selected ***/
.s4-toplinks .s4-tn a.selected
{
      background: url("/_layouts/Images/selbg.png") repeat-x left top;
      background-color: #529610;
      color: #fff;
      text-decoration: none;
      border: 1px transparent solid;
      padding-right: 10px;
      padding-left: 10px;
      margin: 0px;
      border-color: #529610;
}

/*** Top Navigation Flyover/Dynamic Menu Container ***/
.s4-tn ul.dynamic {
 background-color: white;
 border: 1px solid #000;
}

/*** Top Navigation Sub-Menu Items Padding ***/
.s4-tn li.dynamic > .menu-item {
 padding: 10px 20px 10px 20px;
}

/***  Top Navigation Sub-Menu Items (HyperLinks) CSS Style ***/
.s4-tn li.dynamic > a {
 font-weight: normal;
 color: #529610;
}
/*** Top Navigation Sub-Menu Items (HyperLinks) Hover Style ***/
.s4-tn li.dynamic > a:hover {
 font-weight: bold;
 background-color: #AECE8F;
 color: #FFF;
}
Typically, Through CSS styles, we set background color, font, border, etc to apply branding in SharePoint 2010 top navigation menu.

Output of the above CSS:
sharepoint 2010 branding top menu
sharepoint 2010 change menu style
Not just colors, even images can be set in SharePoint 2010 horizontal menu branding customizations.

CSS Style for Branded SharePoint 2010 Top Navigation Menu (a bit variant from above):

/*** Top Navigaion Global Menu Container ***/
 .s4-tn
{
      padding: 0px;
      margin: 0px;
      font-family: 'Calibri' !important;
      font-size: 11pt !important;
      padding-left: 10px;
}

/*** Top Navigaion Static Menu Style ***/
.s4-tn li.static > .menu-item
{
      color: #21374C;
      border: 1px solid #93C2EC;
      padding: 4px 10px;
      line-height: 25px;
      height: 25px;
      background: url("/_layouts/Images/selbg.png") repeat-x left top;
      background-color:#47A4D3;
}

/*** Top Navigaion Static Menu Hover ***/
.s4-tn li.static > a:hover
{
      background: url("/_layouts/Images/selbg.png") repeat-x left top;
      background-color: #0A85C4;
      color: #fff;
      text-decoration: none;
}

/*** Top Navigaion Static Menu Selected ***/
.s4-toplinks .s4-tn a.selected
{
      background: url("/_layouts/Images/selbg.png") repeat-x left top; /* Glass Effect Shade Image */
      background-color: #0A85C4;
      color: #fff;
      text-decoration: none;
      border: 1px transparent solid;
      padding-right: 10px;
      padding-left: 10px;
      margin: 0px;
      border-color: #134072;
}

/*** Top Navigation Flyover/Dynamic Menu Container ***/
.s4-tn ul.dynamic {
 background-color: #D5E4F2;
 border: 1px solid #000;
}

/*** Top Navigation Sub-Menu Items Padding ***/
.s4-tn li.dynamic > .menu-item {
 padding: 10px 20px 10px 20px;
}

/***  Top Navigation Sub-Menu Items (HyperLinks) CSS Style ***/
.s4-tn li.dynamic > a {
 font-weight: normal;
 color: #0189FA;
}
/*** Top Navigation Sub-Menu Items (HyperLinks) Hover Style ***/
.s4-tn li.dynamic > a:hover {
 font-weight: bold;
 background-color: #61CBFD;
 color: #FFF;
}
and the output:
sharepoint 2010 top menu navigation css
The custom CSS can be placed in a Style Sheet and Linked in Master page, or it can be uploaded to SharePoint library/file system and set as Alternate CSS Style sheet under site settings.

MSDN Reference: http://msdn.microsoft.com/en-us/library/gg430141%28v=office.14%29.aspx

An update conflict has occurred, and you must re-try this action

$
0
0
When trying to update some configuration settings in SharePoint 2007 Central Administration, Got the error message:
An update conflict has occurred, and you must re-try this action. The object SPFarm Name=SharePoint_Config is being updated by DOMAIN\username, in the STSADM process, on machine MACHINE-NAME.  View the tracing log for more information about the conflict.
An update conflict has occurred, and you must re-try this action
 
Fix: Clear SharePoint configuration Cache.

1. Go to Services console (Start >> Administrative Tools >> Services or Type: "services.msc" in Run dialog box), Find and Stop "Windows SharePoint Services Timer".

2. Go to "C:\Documents and Settings\All Users\Application Data\Microsoft\SharePoint\Config\{GUID}"

3. Select all XML files and Delete (Don't delete cache.ini file!)

4. Open cache.ini file and enter "1", save and close.

5. Start SharePoint Timer Job again from services console.

6. Verify the cache clear by opening cache.ini file again. It shouldn't be "1".

KB: http://support.microsoft.com/kb/939308

Show or Hide SharePoint List Form Fields based on Another Field's Value using JQuery

$
0
0
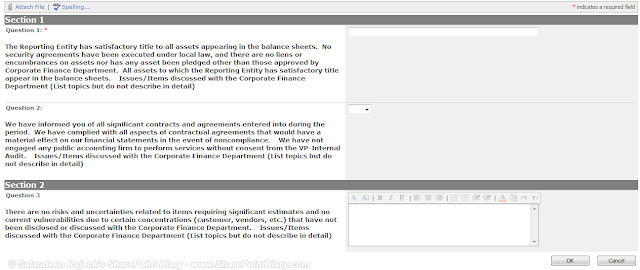
What: Show or Hide a SharePoint list form field based on an another field's value.

How: UsejQuery script to show/hide the dependent field from list form based on current field's value.

Code:
//Place this code just below the place holder "PlaceHolderMain" in Custom List Form. 
<script type="text/javascript" src="/_layouts/1033/jquery-1.4.4.min.js"></script> //Or Get refer it from "http://ajax.googleapis.com/ajax/libs/jquery/1.3/jquery.min.js"<script type="text/javascript">
 $(document).ready(function()
  {
     //alert('jQuery Works');

      //Hide Reason fields initially 
      $("textarea[title$='Question2Reason']").parent('span').parent('td').parent('tr').hide();

     //Associate a function with Drop down change event
  $("select[title$='Question 2:']").change(function()
      {
        if($(this).val()=='Yes')
         {
           $("textarea[title$='Question2Reason']").parent('span').parent('td').parent('tr').show();
         }
        else
         {
   $("textarea[title$='Question2Reason']").parent('span').parent('td').parent('tr').hide();
         }
     });
 });
</script>
and the output: No value selected

Reason filed visible on selecting the drop down value as: Yes
Reason filed is hidden on selecting the drop down value as: No


Instead hide, If you want to Disable/Enable Fields, Use this code:
 if($(this).val()=='Yes')
         {
           $("textarea[title$='Question2Reason']").attr('disabled', false);
         }
        else
         {
   $("textarea[title$='Question2Reason']").attr('disabled', true);
         }

Rename Files / Find and Replace File Names in SharePoint Document Library with PowerShell

$
0
0
Here is the PowerShell script to rename all files in bulk in SharePoint library:
 #Get the Web  
 $Web = Get-SPWeb "http://sharepoint.brightpoint.com"

 #Get the List
 $List = $Web.Lists["Design Documents"]
            
 #Iterate Through All List Items
  foreach($ListItem in $List.Items)
    {
      if($null -ne $ListItem.File) #Exclude Document Sets
        {
              Write-Host "Checking $($ListItem.Name)..."
              #Check out, if Require checkout is enabled
              #$ListItem.File.CheckOut()
              #Replace "Crescent" with "Crescent Inc."
              $ListItem["Name"] = $ListItem["Name"].replace("Crescent","Crescent Inc.")
              #Update the changes
              $ListItem.Update()
              #$ListItem.File.CheckIn("Updated the File Name")
        }
    }

Disable "Save" Button Until User Selects "I Agree"

$
0
0

Requirement is: Don't allow the end user to submit a record until they Agree with the terms and conditions by selecting "I Agree".

So, we've to disable "Save" button until the "I Agree" check box is checked! Here is the jQuery script to achieve the same. Just place this code in your custom list form or in Content Editor Web Part (Place it in a Text file, upload and specify the script in CEWP).

<script src="http://ajax.googleapis.com/ajax/libs/jquery/1.3.1/jquery.min.js" type="text/javascript"></script><script language="javascript">

$(document).ready(function(){
 //Disable the "Save" button initially
  $("input[value$='Save']").attr('disabled', true);  

 //alert('jQuery Works');


 //Enable-Disable "Save" button based on "I Agree" checkbox value!
   $("input[title$='Agree to Delete this site']").click(function(){
        if(this.checked)
           {
            $("input[value$='Save']").attr('disabled', false);
           }      
        else
           {
            $("input[value$='Save']").attr('disabled', true);  
           }
     }); 

  });

</script>
Code in action: If  "I Agree" check box isn't enabled:

After selecting  "I Agree" check box: Save button enabled!

Hide All Responses from End Users in SharePoint Survey

$
0
0
Requirement:  Don't show all responses in a SharePoint survey to End-users! Only the Administrators should get all responses. 

Solution:
Go to Survey Settings>> Advanced Settings>> Set the Item-level Permissions as: Read access & Edit access to:  Only their own. This will hide all responses in SharePoint survey.
sharepoint survey hide results
SharePoint survey hide responses
End-users will get "Contributor" access to respond SharePoint Surveys. So, this setting will restrict them by getting the responses of other users. However this setting will not control Administrators, so they'll get to see all responses.

The above trick is applicable to both SharePoint 2007 and SharePoint 2010 survey to hide responses.

Another Way (for MOSS 2007):
Edit the Survey's overview.aspx (Site Actions >> Edit Page), in List view web part, choose "Modify Shared Web Part" and then set the "Selected View" as "Summary View". This will hide the link "Show a graphical summary of responses" from the page and display only total number of responses.sharepoint survey hide all responses
Revert the above change by changing "Selected view" to get the "Show a graphical summary of responses" link back in survey page. If you want Admin's to get all results in graphical view, create a new view and secure it.
 sharepoint 2007 survey hide results
Related links:

SharePoint Survey Redirect to Thank You Page on Finish

$
0
0
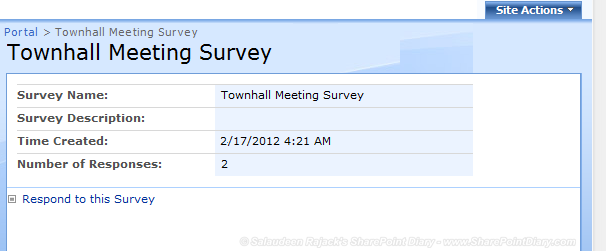
Requirement is to redirect users to Thank You Page in SharePoint Survey on clicking Finish button.

One quick trick comes to my mind is: Appending Source parameter to the Survey's NewForm URL.
E.g.
http://sharepoint.crescent.com/Lists/TownhallMeetingSurvey/NewForm.aspx?source=/SitePages/thankyou.aspx

Not a bad idea, But the problem is: It doesn't matter whether you click on "Finish" or Cancel button, You will be redirected to "Thank You" page! Also, it won't work when you have Branching enabled in SharePoint Survey!

How to Create a Thank You page for SharePoint 2010 Survey:
Lets overcome the above issue with SharePoint designer.

1. Create a new Web Part page (not Wiki page!) and place some descriptive content and/or images in it. I've made the below page. Named it as "thankyou.aspx" under SitePages.
 sharepoint 2010 survey thank you page

2. Open the site in SharePoint Designer, Go to "Forms" section. Create a New Form by clicking on "New Item Form"
sharepoint 2010 survey thank you

 3. Give it a Name,  Choose form type as "New Item Form" and enable "Set as default form for the selected type" and click on "Ok" to create the new form.
sharepoint survey redirect

4.  Edit the New form we've just created. Open the "New.aspx" page in SharePoint Designer. Go to Design view and delete all two "Finish" buttons.

5.  Insert SharePoint Form Action button from "Insert Menu >> SharePoint >> Form Action Button"
sharepoint 2010 survey finish redirect

6. Select the Form Actions "Commit" and "Navigate to Page" and click "OK"
sharepoint survey thank you page

7. Click on the "Form Action" input button and go to code view. Update the code for input button as:
<input type="button" value="Finish" name="btnFormAction" onclick="javascript: {ddwrt:GenFireServerEvent('__commit;__redirect={/sites/marketing/SitePages/thankyou.aspx}')}" style="width: 119px" /> 

8. Save and close the page. That's all!

See the SharePoint 2010 survey thank you page in action:
sharepoint 2010 survey add thank you page

Another method to add thank you page in SharePoint 2010 survey:
If you don't want to use SharePoint designer method as illustrated above, There is an another way. Create an additional question at the end in the survey, as "Thank You for participating in Survey! Click on Finish to complete." of  "Single Line of Text". Add page separator just before this last question. Go to the Survey, Navigate to the last question and Edit the page. Insert a CEWP, place the below code in it.

<script type="text/javascript" src="http://ajax.googleapis.com/ajax/libs/jquery/1.3/jquery.min.js"></script> 
//Or place the jquery.js file in 14 hive and refer it<script type="text/javascript">
 $(document).ready(function()
  {
      //Hide the Text field for Thank you Question
      $("input[title$='Thank You for participating in Survey! Click on Finish to complete.']").parent('span').parent('td').parent('tr').hide();
 });</script>
This code will hide the single line of text input field and give thank you message. See the above code in action:
sharepoint 2010 survey thank you message

"The Content Type is in Use" Error in SharePoint - Find Where and Delete

$
0
0
We don't needed a particular content type anymore and wanted to delete the content type.

Navigated to:
  •     Site Actions >> Site Settings.
  •     Under Galleries click Site content types.
  •     Select the Content type to delete by clicking on its name.
  •     Click "Delete this site content type" link.
Oops!  SharePoint returns an error: Error: "The Content Type is in Use".  
the content type is in use sharepoint
Looks like its a common issue when trying to delete content types. I've seen this "The content type is in use" error in SharePoint 2007 and in SharePoint 2010. The error message clearly indicates that the content type is still in use and cannot be deleted. Yes, We had assigned the content type to some list and libraries. But I dunno where!

How to delete a content type and get rid of "The content type is in use" error in SharePoint? Well, to solve this issue: We've to Find the locations where the particular content type is being used and delete the the associations and items.

Find the locations where our Content type is in use:

Lets use "SharePoint Manager 2010" to find where our content type is being used.
  • Download the SharePoint Manager 2010 from Codeplex
  • Open SPM and Navigate to the target Site Collection where your Content Type is located
  • Go to Content Type >> Usages to find all content type usages
  • Delete all the usages of the Content Typecannot delete content type the content type is in use
Once done, You can delete your content type with out any issues. We can use PowerShell also.


PowerShell Script to find where a specific Content Type is being used:

We can use PowerShell also to find where a specific Content Type is being used:
Add-PSSnapin Microsoft.SharePoint.PowerShell -ErrorAction SilentlyContinue

#Get the site
$site = Get-SPSite "http://sharepoint.crescent.com/sites/marketing"
#Name of the Content Type
$ContentTypeName = "Travel Request"
  
#Loop through all web
 Foreach ($web in $site.AllWebs)
    {
  #Get the Content Type
  $ContentType = $web.ContentTypes[$ContentTypeName]
  
  #Check if content type exists
     if($ContentType -ne $null)
  {
   #Get the Content Type Usage
   $CTypeUsages = [Microsoft.SharePoint.SPContentTypeUsage]::GetUsages($ContentType)

   if ($CTypeUsages.Count -gt 0) 
   {
       foreach ($CTypeUsage in $CTypeUsages) 
    {
            write-host $CTypeUsage.Url
       }
   }
  }
  $web.Dispose();
 }
This will provide list of locations where the specific content type is being utilized. Now, We've to Delete those items or change their content types and remove the content type associations from lists and libraries.

Change Content Type Programmatically:

If you want to delete a content type, You have to make sure No Lists/Library and No List Item/Document is using the content type! In other words, You got to either change the content type of existing items created with the particular content type or delete those items using the specific content type!!

Add-PSSnapin Microsoft.SharePoint.PowerShell -ErrorAction SilentlyContinue

#Get the Web
$site = Get-SPSite "http://sharepoint.crescent.com/sites/marketing"
#Name of the Content Type
$ContentTypeName = "Travel Request"
$NewCTypeName="Travel Request V2"

#Loop through all web
 Foreach ($web in $site.AllWebs)
    {
  #Get the Content Type
  $ContentType = $web.ContentTypes[$ContentTypeName]
  
  #Check if content type exists
     if($ContentType -ne $null)
  {
   #Get the Content Type Usage
   $CTypeUsages = [Microsoft.SharePoint.SPContentTypeUsage]::GetUsages($ContentType)

   if ($CTypeUsages.Count -gt 0) 
   {
       foreach ($CTypeUsage in $CTypeUsages) 
    {
           #Get the list where specific content type in use write-host 
     $list = $web.GetList($CTypeUsage.Url)
     #Check for Items using the content type
     $SPQuery = "<Where><Eq><FieldRef Name='ContentType'/><Value Type='Text'>$($ContentTypeName)</Value></Eq></Where>"
           $ListItems = $list.GetItems($SPQuery)
     #Change the Content Type of All existing Items which are currently using the specific content type
           for($i=$ListItems.Count-1; $i -ge 0; $i--)
           {
      $ListItem= $ListItems[$i]
      write-host "Changing Content Type of List Item with ID: $($ListItem.ID)"
               $ListItem["ContentTypeId"]= $list.ContentTypes[$NewCTypeName].id
      $ListItem.Update()
           }
     #Delete the content type from list
     $list.ContentTypes.Delete($list.ContentTypes[$ContentTypeName].id)
           write-host "Deleted the Content type from:$($CTypeUsage.Url)" 
    }
   }
  #Delete the Content Type now!
  $ContentType.Delete()
  write-host "Content Type $($ContentTypeName) Deleted!"
  }
  $web.Dispose();
 }


Deleting a Particular Content Type including all items based on the content type:

Delete All Items which are currently using the specific content type
Add-PSSnapin Microsoft.SharePoint.PowerShell -ErrorAction SilentlyContinue

#Get the Web
$site = Get-SPSite "http://sharepoint.crescent.com/sites/marketing"
#Name of the Content Type
$ContentTypeName = "Travel Request"
  
#Loop through all web
 Foreach ($web in $site.AllWebs)
    {
  #Get the Content Type
  $ContentType = $web.ContentTypes[$ContentTypeName]
  
     #Check if content type exists
     if($ContentType -ne $null)
  {
   #Get the Content Type Usage
   $CTypeUsages = [Microsoft.SharePoint.SPContentTypeUsage]::GetUsages($ContentType)

   if ($CTypeUsages.Count -gt 0) 
   {
       foreach ($CTypeUsage in $CTypeUsages) 
    {
           #Get the list where specific content type in use
     $list = $web.GetList($CTypeUsage.Url)
     #Check for Items using the content type
     $SPQuery = "<Where><Eq><FieldRef Name='ContentType'/><Value Type='Text'>$($ContentTypeName)</Value></Eq></Where>"
           $ListItems = $list.GetItems($SPQuery)
           for($i=$ListItems.Count-1; $i -ge 0; $i--)
           {
                   write-host "Deleted List Item with ID: $($ListItems[$i].ID)"
                   $DeletedItem= $ListItems[$i].recycle()
           }
     #Delete the content type from list
     $list.ContentTypes.Delete($list.ContentTypes[$ContentTypeName].id)
                   write-host "Deleted the Content type from:$($CTypeUsage.Url)" 
    }
   }
  #Delete the Content Type now!
  $ContentType.Delete()
  write-host "Content Type $($ContentTypeName) Deleted!"
  }
  $web.Dispose();
 }

BTW, I read somewhere, To fix "the content type is in use" error in SharePoint 2010, we must delete the list items of particular content type from both End-user Recycle bin & Admin Recycle bin! But I didn't delete them from recycle bin and still I'm able to delete the content types. I didn't face any issue so far.

How to Add Users to SharePoint

$
0
0
Adding users to SharePoint site is a frequent activity for SharePoint site owners. Users can be added either to any existing SharePoint group or directly under site permissions. Lets see how to add users in SharePoint site.

How to Add Users to SharePoint 

1. To add users to SharePoint 2010 site, Log-in to your SharePoint site with Site owner (or with more) permission.

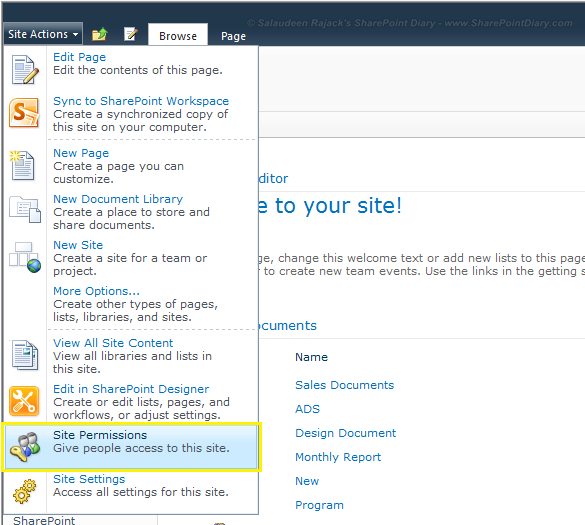
2. Click on Site Actions> Site Permissions
add users to sharepoint

3. Select the SharePoint Group to which you want to add users. By default, SharePoint sites comes with these user groups:
    • Owners with Full Control Permissions.
    • Members with Contribute Permissions
    • Visitors with with Read Only
    add users to sharepoint 2010 
    4. Click on New and Select Add Users ADS\username) or ADS group names of the people or groups you want to add (separated by semicolons). You can use "Browse" button to search and select the user names.
    add users to sharepoint 2010 group
    5. To check the accuracy of the user names you added, click the Check Names icon.
    how to add users to sharepoint 2010
    6. Now after clicking Ok, you could able to see user name added with the permission, we specified. This is how we add users to SharePoint group.

    Adding Users Directly to Site Permissions
    Its a best practice to add users to a group instead of adding them directly. However, if needed you can grant access to SharePoint users directly.

    1. To add users to SharePoint 2010 site directly: Under the Edit tab, click on Grant Permissions from the ribbon.
    how to add users to sharepoint
    2. In the Users/group field, enter the user's Account name or email address

    3. Choose the permissions you wish the user to have under Give Permission, and then click on OK.
    how to add users to sharepoint 2010 site
    Users will receive a welcome mail based on the selection.

    Import From CSV File into SharePoint List using Powershell

    $
    0
    0
    Periodically, We needed the data from a CSV file, which is generated by an external Third-party application, to be imported to SharePoint 2010 List. To fulfill this requirement,  I wrote a quick PowerShell script which will read the CSV file and import the data into SharePoint list using PowerShell.

    Powershell Script to import from CSV file to SharePoint 2010 list

    Add-PSSnapin Microsoft.SharePoint.PowerShell -ErrorAction SilentlyContinue
    
    #Read the CSV file - Map the Columns to Named Header (CSV File doesn't has Column Header)
    $CSVData = Import-CSV -path "C:\Data.csv" -Header("Title", "Description", "Priority", "AssignedTo", "DueDate", "Status")
    
    #Get the Web
    $web = Get-SPWeb -identity "http://sharepoint.crescent.com/sites/Marketing/"
    
    #Get the Target List
    $list = $web.Lists["Log"]
    
    #Iterate through each Row in the CSV
    foreach ($row in $CSVData) 
     {
       $item = $list.Items.Add();
       
       $item["Title"] = $row.Title
       $item["Description"] = $row.Description
       $item["Priority"] = $row.Priority
    
       #Set the People Picker Field value
       $item["Assigned To"] = Get-SPUser -Identity $row.AssignedTo -web "http://sharepoint.crescent.com/sites/Marketing/"
        
       #Set the Date Field value
       $item["Due Date"] = Get-Date $row.DueDate
    
       $item["Status"] = $row.Status
       $item.Update()
     }

    We scheduled this script through Windows Task Scheduler: How to schedule a powershell script using windows task scheduler

    In an another case, before importing a list item from CSV file, I had to check whether the item which is being added, is already exists in the List. If It doesn't exists, let the script add new item from CSV file.
    $ListItems = $reconciliationList.Items | Where-Object { $_.Item("Title") -eq $row.Title}
    
      if ($ListItems -eq $null)
        { 
          #ADD Item to the List
        }
    

    Update Lookup values in PowerShell:
    Unlike other fields, SharePoint look-up fields can'tbe set directly. We have to get the lookup parent id, to update the lookup field values.
     #For Lookup values: Lookup Parent List
     $DepartmentList=$web.Lists["Department"]
    
        #Get the Lookup Item from Parent List
        $LookupItem = $departmentList.Items | Where-Object { $_.Item("Title") -eq $row.Department}
    
    	if($LookupItem -ne $null)
    	{
           	  $deptLookup = New-Object Microsoft.Sharepoint.SPFieldLookupValue($LookupItem.ID,$row.Department)
    	}
    
          #Set the Lookup field value
          $item["Department"] = $deptLookup
       
        $item.Update() 

    How to Add User To SharePoint Site Group Programmatically

    $
    0
    0
    Apart from SharePoint User Interface, We can programmatically add users to SharePoint group or site in these ways:
    • Using STSADM command line tool to add users 
    • Add users to Sharepoint site/group using C# Object Model
    • Add users to SharePoint Group using PowerShell

    1. Using STSADM command line tool to add users:
    To add user to the SharePoint site, we can use stsadm classic command line tool.  bulk users to add from a CSV file:
    • Add user to a SharePoint group:
      stsadm -o adduser -url "http://sharepoint.crescent.com/sites/marketing" -userlogin crescent\UserName -useremail UserName@crescent.com -group "Marketing Members" -username "User Name"
    • To Add a User directly user under "Site Permissions"
      stsadm -o adduser -url "http://sharepoint.crescent.com/sites/marketing" -userlogin crescent\UserName -useremail UserName@crescent.com -role "Full Control" -username "User Name"
    • To Add a user as Site collection Administrator:
      stsadm -o adduser -url "http://sharepoint.crescent.com/sites/marketing" -userlogin crescent\UserName -useremail UserName@crescent.com -group "Marketing Owners" -username "User Name" -siteadmin
    Stsadm -o Adduser operation Technet reference: http://technet.microsoft.com/en-us/library/cc262627.aspx


    2. Add Users to SharePoint Programmatically using C# :

    Adding users to SharePoint site programmatically: Here is how we can add users to SharePoint site With .Net Object Model C# Code. (This works both in SharePoint 2007 and SharePoint 2010)
        using(SPSite site=new SPSite("http://sharepoint.crescent.com"))
           {
                using (SPWeb web = site.RootWeb)
                       {
                     string GroupName="SharePoint Members";
                     SPGroup group = web.Groups[GroupName];
                            //To Get the Default Members group
                            //SPGroup group = web.SiteGroups.Web.AssociatedMemberGroup;
                     SPUser user = web.EnsureUser("Crescent\\Salaudeen");
                     group.AddUser(user);
                     web.Update();
                        }
     }

    3. Add User to SharePoint 2010 using PowerShell Cmd-lets:
    New-SPUser:
    New-SPUser -UserAlias "domain\user" -Web "http://sharepoint.crescent.com/sites/marketing" -Group "Marketing Owners"
    This will create a add a new User to SharePoint site to the particular group. If you execute this command for the next time, (without deleting the user from site collection) this command has no effect!

    Set-SPUser:
    Set-SPUser -Identity "domain\user" -Web "http://sharepoint.crescent.com/sites/marketing" -Group "Marketing Owners"
    This will add existing SharePoint users account to the provided group, but will give error when you try add a new user to SharePoint site. (which is obvious! We can't set the user property, if the user doesn't exists in SharePoint site, isn't it?)

    Add User to SharePoint Group using PowerShell

    #Get the Web
    $web=Get-SPWeb "http://sharepoint.crescent.com/sites/marketing"
    #Get the Group
    $Group= $web.Groups["Marketing Owners"]
    $userName = "domain\userName"
    
    #Add User to the site collection
    $user = $web.EnsureUser($UserName)
    
    #Add User to the Group
    $group.AddUser($user)


    Import Bulk Users to SharePoint site from CSV file using PowerShell:

    Got bunch of users and want to add them in to SharePoint? My CSV file has AccountName (in the format of: Domain\UserName and GroupName).  To bulk add users to SharePoint group programmatically using PowerShell, use the below script:
    add user to group powershell sharepoint 2010
    Powershell script to add user to SharePoint group:
    Add-PSSnapin Microsoft.SharePoint.PowerShell -ErrorAction SilentlyContinue
    
    #Import the List of Users from a .csv file,
    $UserList= Import-CSV "C:\UserList.csv"
     
    #Get the Web
    $web = Get-SPWeb "http://sharepoint.crescent.com/sites/marketing"
     
    foreach ($Row in $UserList)
    {
      #Get the Group
       $Group = $web.Groups[$Row.GroupName]
     
     #Validate the user name
     try
       {
            $user = $web.Site.RootWeb.EnsureUser($Row.AccountName)
       }
       catch [system.exception]
       {
         write-host $_.Exception.Message
       }
     
       #Add user if valid user name is provided
        if($user -ne $null)
        {
           $Group.AddUser($user)
           write-host $user.AccountName
        }
    }
    
    #Dispose the web object
    $Web.Dispose()

    SharePoint "NT AUTHORITY\Authenticated Users" - FAQs

    $
    0
    0
    Who are AUTHORITY\Authenticated Users in SharePoint?
    Every user Account that can logon to your network! So, If you want all of your AD users to access a SharePoint site, Grant access to "NT AUTHORITY\Authenticated Users" to the relevant SharePoint group. 'NT Authority\Authenticated Users' can also be used to grant access to users from multiple domains of your network.

    Adding NT Authority\Authenticated Users to SharePoint

    In SharePoint 2007, There was an easy way to add "NT AUTHORITY\Authenticated Users" by clicking "Add All Authenticated Users" link. But its removed in SharePoint 2010.

    SharePoint 2010 "NT Authority\Authenticated Users" Missing
    SharePoint 2010 "NT Authority\Authenticated Users" is not available from Address Book.
    SharePoint 2010 "NT Authority\Authenticated Users" Missing
    In SharePoint 2010, Microsoft Removed the NT AUTHORITY\Authenticated Users from Global Address book, so you will not find it there. But you have to type it MANUALLY into the names box and then hit resolve icon next to it. To Add all users to SharePoint site:
    • Click Site Actions >>  Site Permissions.
    • Click Grant Permissions.
    • In Select Users, enter "NT AUTHORITY\Authenticated Users"
    • Select the relevant SharePoint group and Click "OK"
    Its also possible to Add under Web Application Policy with permission levels like Full control, contribute, Read, etc.
    Add NT Authority\Authenticated Users to SharePoint
    Remove "NT Authority\Authenticated Users" from SharePoint
    Like any other user account, you can delete "NT Authority\Authenticated Users" from SharePoint.
    • Go to Site Actions 
    • Site Settings 
    • Click on "More..." from Quick Launch 
    • Select the "NT AUTHORITY\authenticated users" user 
    • Click on "Delete User from Site Collection" to disable "NT Authority\Authenticated Users" from SharePoint site collection.
    Add "NT Authority\Authenticated Users" programmatically in SharePoint:
    How to add programmatically “every user” group to a Sharepoint Site
        //Get the Reader Permission Level
        SPRoleDefinition readerRole = web.RoleDefinitions.GetByType(SPRoleType.Reader);
    
        SPUser allusers = web.EnsureUser("NT AUTHORITY\\Authenticated Users");
    
        SPRoleAssignment spRoleAssignment = new SPRoleAssignment(allUsers);
        spRoleAssignment.RoleDefinitionBindings.Add(readerRole);
    
        web.RoleAssignments.Add(roleAssignment); 
        web.Update();

    Export SharePoint List Items to CSV using PowerShell

    $
    0
    0
    Requirement: Export SharePoint List items to a CSV file.

    Export SharePoint list data to CSV using PowerShell:
    This script exports SharePoint list to csv using powershell. It retrieves all list items, Filters it based on the provided column value and then creates a property to hold the list item values and then appends the objects which holds the list item values to an array.

    Finally, using the Export-CSV Cmdlet, we are exporting the data to CSV file.

    Add-PSSnapin Microsoft.SharePoint.PowerShell -ErrorAction SilentlyContinue
    
    #Get the Web
    $web = Get-SPWeb -identity "http://sharepoint.crescent.com/sites/Operations/"
    
    #Get the Target List
    $list = $web.Lists["Monthly Schedule Log"]
    
    #Array to Hold Result - PSObjects
    $ListItemCollection = @()
    
     #Get All List items where Status is "In Progress"
     $list.Items |  Where-Object { $_["Status"] -eq "In Progress"} | foreach {
     $ExportItem = New-Object PSObject 
     $ExportItem | Add-Member -MemberType NoteProperty -name "Title" -value $_["Title"]
     $ExportItem | Add-Member -MemberType NoteProperty -Name "Department" -value $_["Department"]
     $ExportItem | Add-Member -MemberType NoteProperty -name "Status" -value $_["Status"]
     $ExportItem | Add-Member -MemberType NoteProperty -name "Priority" -value $_["Priority"]
    
     #Add the object with property to an Array
     $ListItemCollection += $ExportItem
     }
     #Export the result Array to CSV file
     $ListItemCollection | Export-CSV "c:\ListData.txt" -NoTypeInformation                        
    
    #Dispose the web Object
    $web.Dispose()


    SharePoint Sign in as Different User - Caching Problem

    $
    0
    0
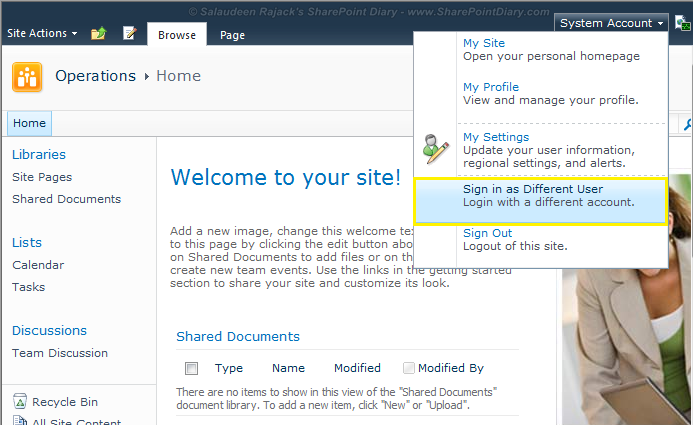
    There is a weird issue when SharePoint users try to sign in as different user. Here is the scenario:
    1. User "A" logged in with his account in his PC.
    2. User "B" wants to login on SharePoint 2010 site with his credentials on user "A" machine by selecting "Sign in as Different User"
    3. User "B" will successfully logged in. Once user "B" sign out and user "A" opens the IE browser, he will still see SharePoint uses user "B" credentials and automatically logged with User "B" Login details, even if he tries to close all browsers and re-open same issue, unless we have to re-login again by Signing in with Different User i.e. user "A"
    sharepoint sign in as different user problem
    They tried clearing the saved passwords from Browser by: Going to Internet Explorer >> Tools menu  >> Internet Options >> General >> Delete >> Select "Passwords" and clicking OK. But no luck!

    Root Cause: This is due to Cached Credentials! Here is the solution:
    • Go to Start >> Administrative Tools
    • Local Security Policy >> Local Policies >> Security Option 
    • "Interactive logon: Number of previous logons to cache (in case domain controller is not available)" >> Change it to 0. (It is set to "10" by default).sharepoint 2010 sign in as different user not working
    Ideally we have to make this change in AD group policies! But I've made this change in Client machine for the immediate effect. This fix also resolves the issue: sign in as different user not switching user! it just refreshes the user credentials.

    Don't want User to be logged in Automatically?
    If you don't want a particular account to be logged in by default, Remove the stored credentials from "Credential Manager". Go to:
    • Control Panel >> Credential Manager 
    • Locate the Domain and Account and Remove from Vault.
    Another factor impacting this behavior is: Browser Setting. Go to IE >> Tools >> Internet Options >> Security >> Custom Level >> Change it to " Prompt for User name and Password."

    SharePoint 2010 Permission Levels

    $
    0
    0
    Users and groups must be granted some level of permission to get access to SharePoint sites. Which can be in one of two ways:
    1. Add the user directly to the SharePoint site/list/list item with specific permission level
    2. Add the user or security group to a SharePoint group (which is already assigned with a particular permission level)
    What is permission levels in SharePoint?
    Permission levels are set of permissions that a particular user or group is allowed to perform specific actions. Each permission levels consist of a number of detailed permissions (such as: Create Alerts, Delete Items, etc). SharePoint Server 2010 provides these default permission levels:  Full Control, Design, Contribute, Read (Sorted highest permission level to the lowest).

    Why we need permission levels in SharePoint? Security! It defines who can do what. The level of access is controlled by the permission level, which you can think of as a security role.

    SharePoint 2010 default permission levels:
    • Read - Users Can Open & view SharePoint content including documents, pictures and lists. They'll not be able to create, modify, or delete.
    • Contribute - Allows the user to view, add, update, and delete content
    • Designer - Can do everything contributors do. Plus create new document libraries, columns, views, as well as change the layout of the website by adding or moving web parts.
    • Full Control - Users can perform any action in the site, including adding/deleting members and changing their access.
    • View Only: Users can view web pages, lists, and list items but can't download.
    In addition with above permission levels for Team Sites template,  we get three more with Publishing site templates,:
    • Approve - Users may approve pages, list items, or documents submitted by others.
    • Manage Hierarchy - Users may edit pages, list items, and documents. Manage Hierarchy permissions also allow the users to create sites.
    • Restricted Read - Users may view pages and documents; however, historical versions are not available.


    SharePoint 2010 Permission Level FAQs:


    What is limited access permission level in SharePoint?
    Limited Access is a special type of security role that a user or group is automatically granted when
    getting access to a specific list/library/item, but not to the site itself.

    E.g. When we grant access to a specific list, but not the site, users will get read access to the list and limited access to the site. Because user must get access to the site in order to access the list, isn't it?


    SharePoint permission level scope: Permission Level are scoped at Site Collection (You can't define it at web level) . add a permission level ribbon button is missing SharePoint 2010. If you Break the Inheritance, will get Permission levels but will not be able to customize it at subsite level as permission levels greyed out in subsites.

    SharePoint permission level inheritance: Permission levels are created at CA/site collection level (in RootWeb) and inherited by its subsites. Each site collection has its own set of default permission levels. When you change or add new permission levels, they will be automatically replicated to all subsites in the site collection.

    To Get all permission levels in SharePoint 2010:
    • Log on to your SharePoint site collection as a site owner
    • From Site Settings, click on Site Permissions under Users and Permissions. 
    • In the ribbon click on Permission Levels. You will see all the different permission levels for the site collection.
    SharePoint 2010 Permission Levels

    How to add new permission level in SharePoint 2010:
    Refer my another post to add new permission level in SharePoint How to Create Custom Permission Level in SharePoint 2010 Its a best practice: Not to change the out-of-the-box permission levels. Always Create a permission level by copying existing permission level and add/remove the base permissions.

    MSDN Reference to Edit, create, and delete permission levels: http://office.microsoft.com/en-001/sharepoint-server-help/edit-create-and-delete-permission-levels-HA101805381.aspx

    Sharepoint 2010 Farm Administrator Gets Access Denied

    $
    0
    0
    Its a common misconception that SharePoint Farm Administrator will get access to all SharePoint sites in the farm automatically! Farm administrator get access denied error in SharePoint 2010 site collection when trying to browse.
    sharepoint 2010 farm administrator access denied
    Farm Administrators gets control over SharePoint Central Administration, but not all sites. So, we have to explicitly grant access to required web applications to the Farm Administrator through web application user policies by navigating to:
    • Central Administration  >>
    • Security >>
    • Specify web application user policy >>
    sharepoint farm administrator permissions
    Add web application user policy in SharePoint 2010 with PowerShell 
    Above step can be automated for all web applications using PowerShell.  
    Add-PSSnapin Microsoft.SharePoint.PowerShell -ErrorAction SilentlyContinue
    
    #User to Add
    $UserID="Global\SPAdmin"
    
    #Add user to Web App user Policy
    
    #Get All Web Applications and Iterate through
       Get-SPWebApplication | foreach-object {
                    $WebAppPolicy = $_.Policies.Add($UserID, $UserID)
                    #Set Full Access 
                    $PolicyRole = $_.PolicyRoles.GetSpecialRole([Microsoft.SharePoint.Administration.SPPolicyRoleType]::FullControl)
                    $WebAppPolicy.PolicyRoleBindings.Add($PolicyRole)
                    $_.Update()
      Write-Host "Added user to $($_.URL)"
                    } 
    Viewing all 1058 articles
    Browse latest View live


    <script src="https://jsc.adskeeper.com/r/s/rssing.com.1596347.js" async> </script>