Quantcast
Channel: SharePoint Diary
Viewing all 1058 articles
Browse latest View live

Add User to Farm Administrator Group in SharePoint 2010

$
0
0
By default, the account which was used (logged in) to install SharePoint becomes the SharePoint Farm Administrator. There are situations, where we need to add additional Farm Administrators to our SharePoint farm in order to delegate the tasks. Follow these three steps to add a farm administrator in SharePoint.
  1. Add user to Central Administration Farm Administrator Group
  2. Add user to Web Application Policy with FULL control
  3. Add user as a ShellAdmin for all SharePoint databases.


1. SharePoint 2010 add new user to farm administrator group from Central Administration:

To add farm administrator in SharePoint 2010, Navigate to Central Administration>> Security>> Manage the farm administrator group>> Add the user by clicking New>> Add Users
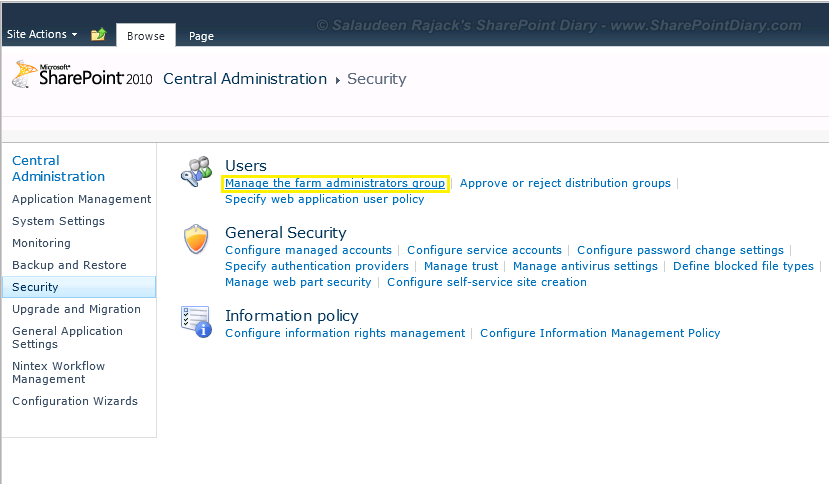
how to add sharepoint farm administrator
SharePoint Farm Administrators group by default consists of Local server administrators. So, You can see (BUILTIN\Administrators) group is already referenced in the Farm Administrators group in Central Administration.

Add user to SharePoint 2010 farm administrators group using PowerShell: 
Adding farm admin in SharePoint 2010 can be done in PowerShell also. Here is the PowerShell script to add new farm admin.
Add-PSSnapin Microsoft.SharePoint.PowerShell -ErrorAction SilentlyContinue

#User to Add
$UserID="domain\userID"

#Get Central Admin Web App
$CAWebApp = Get-SPWebApplication -IncludeCentralAdministration | where-object {$_.DisplayName -eq "SharePoint Central Administration v4"} 

#Get Central Admin site
$CAWeb = Get-SPweb($CAWebApp.Url) 
#Get Farm Administrators Group
$FarmAdminGroup = $CAWeb.SiteGroups["Farm Administrators"] 
#Add user to the Group
$FarmAdminGroup.AddUser($UserID,"",$UserID , "")
Write-Host "User: $($UserID) has been added to Farm Administrators Group!"
$CAWeb.Dispose()
    Create a new SharePoint farm administrator with STSADM command line:
    The Equallent STSADM command for the above:
    stsadm -o adduser -url <Central Admin URL> -userlogin "Global\FarmAdmin" -useremail "FarmAdmin@domain.com" -group "Farm Administrators" -username "Farm Administrator"


    2. Add user to Web Application Policy with FULL control

    Just adding user to SharePoint Farm administrators group will not serve the purpose. If users are only added to central administration farm administrators group (and below two steps are skipped!), they will get "Access denied" error when they try to invoke STSADM command.

    They will get: "The local farm is not accessible. Cmdlets with FeatureDependencyId are not registered." Error if they try to use SharePoint PowerShell cmdlets.
    sharepoint farm administrator gets access denied
    So the solution is: To add a web application policy for SharePoint 2010 farm administrator account on the selected/all web application(s).  Follow SharePoint 2010 user policy for web application. We can also use PowerShell to create web application user policy which is explained in the provided link.

    Once granted FULL control via web application policy, SharePoint Farm administrators group gets full control as site collection administrator access to all site collections of a particular web application.


    3. Add user as a ShellAdmin for all SharePoint databases

    The next step is to grant "Shell Admin" Access to the user, via PowerShell.
    You must run this cmdlet from an existing Farm Administrator account's context, otherwise you'll get an error!
    Add-SPShellAdmin -UserName "domain\user' -database (Get-SPContentDatabase -Identity "SharePoint_Database_Name)

    This cmdlet grants Farm Administrators necessary SQL permissions and adds the account to a local server group WSS_ADMIN_WPG group in local windows server. We can verify the access by Log on to the SQL Server > SQL Server Management Studio > verify the new login created for the new user.
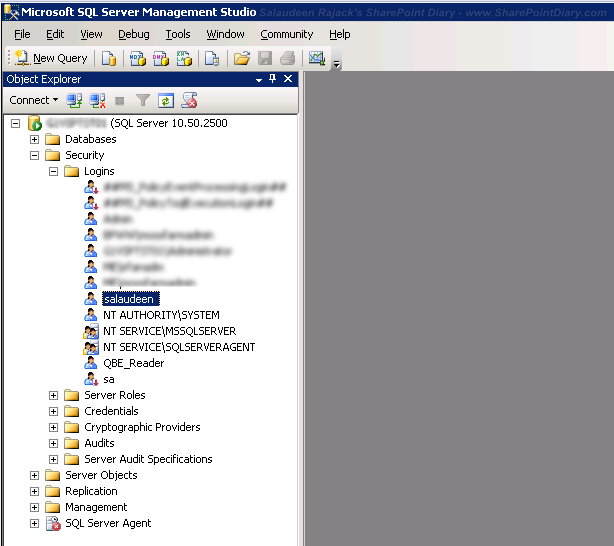
    sharepoint farm administrator sql permissions
    and the user is mapped to SharePoint databases with This will add the user to SharePoint 2010 farm administrator SQL permissions: db_owner, public and SharePoint_Shell_Access Roles for all SharePoint databases in the server farm. This gives user permission to do things that require changes to the database.
    sharepoint farm administrator sql permissions


    So, the complete Script to Add user to Farm Administrator Group in SharePoint:
    Add-PSSnapin Microsoft.SharePoint.PowerShell -ErrorAction SilentlyContinue
    
    #User to Add
    $UserID="domian\user
    
    #*** Add User to SharePoint 2010 Farm Administrator Group ***
    #Get Central Admin Web App
    $CAWebApp = Get-SPWebApplication -IncludeCentralAdministration | where-object {$_.DisplayName -eq "SharePoint Central Administration v4"} 
    #Get Central Admin site
    $CAWeb = Get-SPweb($CAWebApp.Url) 
    #Get Farm Administrators Group
    $FarmAdminGroup = $CAWeb.SiteGroups["Farm Administrators"] 
    #Add user to the Group
    $FarmAdminGroup.AddUser($UserID,"",$UserID , "")
    Write-Host "User: $($UserID) has been added to Farm Administrators Group!"
    $CAWeb.Dispose()
    
    #***Add user to Web App Policy ***
       Get-SPWebApplication | foreach-object {
                    $WebAppPolicy = $_.Policies.Add($UserID, $UserID)
                    $PolicyRole = $_.PolicyRoles.GetSpecialRole([Microsoft.SharePoint.Administration.SPPolicyRoleType]::FullControl)
                    $WebAppPolicy.PolicyRoleBindings.Add($PolicyRole)
                    $_.Update()
        Write-Host "Added user to $($_.URL)"
                    } 
    
    #*** Grant Shell Admin Access *** 
    #Get All Content Databases and Add user into Shell Admin access
    Get-SPDatabase | Add-SPShellAdmin -Username $UserID
    
    Now the Members of this group can perform tasks from SharePoint Central Administration.
    If you planned to use this account as: Server Farm Account, then grant these server roles in SQL Server: dbcreator & securityadmin.

    Tail: SharePoint 2010 find farm administrators
    You may want to check if SharePoint user is a farm administrator.To check SharePoint farm administrator below code can help:
    Add-PSSnapin Microsoft.SharePoint.PowerShell -ErrorAction SilentlyContinue
    
    #Get Central Admin Web App
    $CAWebApp = Get-SPWebApplication -IncludeCentralAdministration | where-object {$_.DisplayName -eq "SharePoint Central Administration v4"} 
    
    #Get Central Admin site
    $CAWeb = Get-SPweb($CAWebApp.Url) 
    
    $FarmAdminGroup = $CAWeb.SiteGroups["Farm Administrators"] 
      foreach ($Admin in $FarmAdminGroup.users) 
          { 
           write-host $Admin.LoginName
          }


    How to Create New Permission Level in SharePoint 2010

    $
    0
    0
    There are scenarios where requirements couldn't be fulfilled by OOTB permission levels. Here is one among them: User who has contribute permissions can add, edit, open, view and delete an item. What we want is to permit a user to add, edit, view but not delete an item. So, I needed to create a custom level permission to restrict a group of users from deleting items.

    Create Permission Level by Copying existing Permission Level in SharePoint 2010
    Lets take an existing permission level "Contribute",  Copy and remove the ability to "Delete Items" from it.
    1. Open your SharePoint site collection (Root Web) in browser as a site owner.
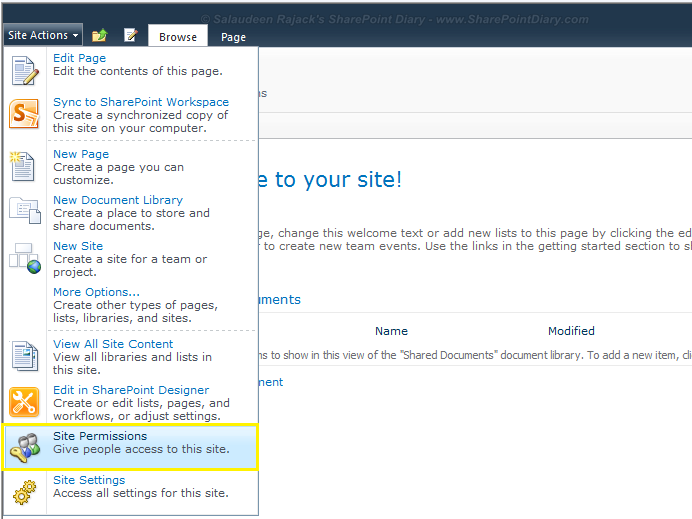
    2. Click on Site Actions >> Site Permissions 
    3. Click on Permission Levels from the Ribbon to open the Permissions page.
    4. Because we planned to copy Contribute permission level, click on it to open its detailed permissions.
      sharepoint 2010 permission levels
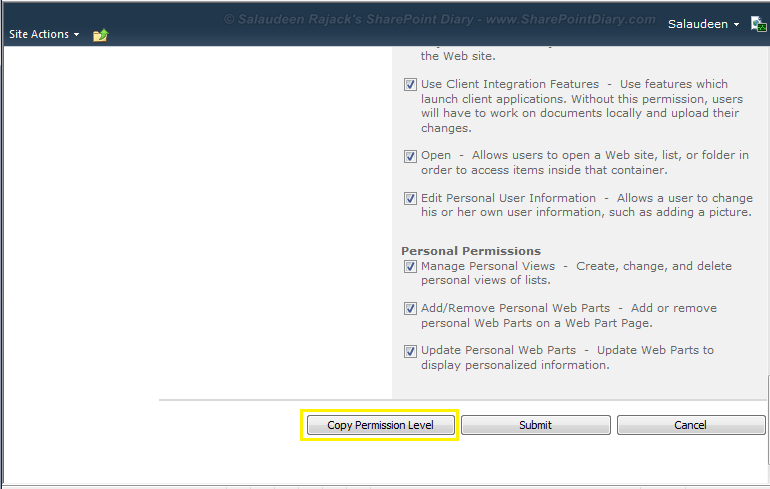
    5. Scroll to the end of this form and click Copy Permission Level. This gives you a new, unnamed form with the exact same permissions as Contribute.
      sharepoint 2010 copy permission level
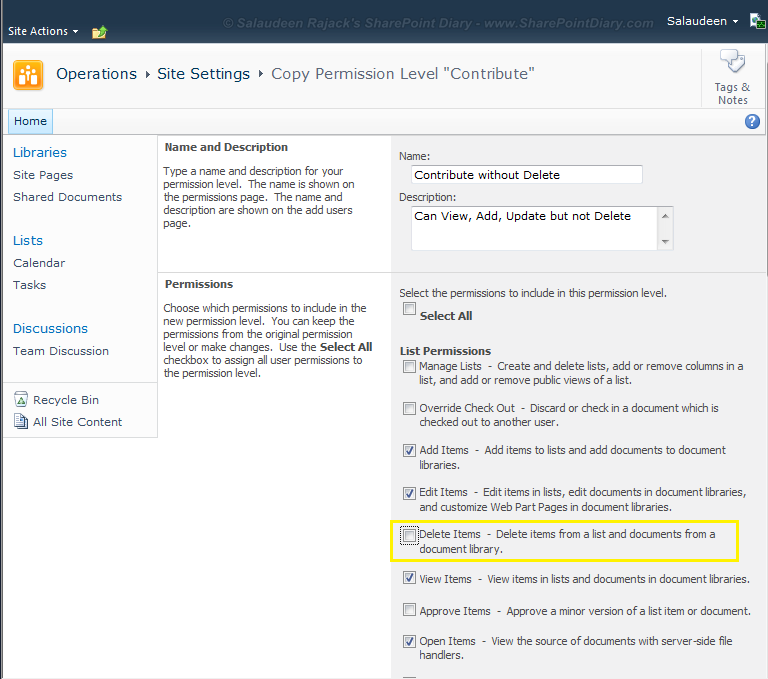
    6. Enter a name for this new level; Lets name it as "Contribute Without Delete" , and a description: 
    7. In List Permissions Uncheck the "Delete items - Delete items from a list and documents from a document library"
      sharepoint 2010 change permission level
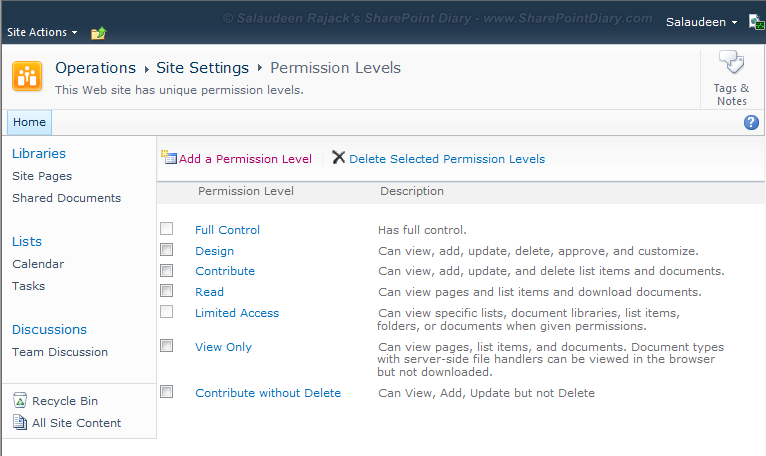
    8. Click OK to save and close.
    sharepoint 2010 custom permission level
    Now we've got the newly added Permission level Contribute without delete, we can assign this new permission level to users and group.


    How to Create a Custom  Permission level from SharePoint UI from the scratch:
    Instead of copying existing permission level, To create your own custom permission level from the scratch, follow these steps:
    1. Log on to your SharePoint site collection as a site owner on which you want to create the custom permission level
    2. Select Site Actions >> Site Permissions
    3. Click to Permission Levels button in the Manage section of the Ribbon.
    4. Click to Add Permission Level.
    5. Enter the Name and Description values.
    6. In the Permissions section, select the permissions to include in the new permission level.
    7. Click Create to create the new permission level.

    Grant access to User or Group with the Permission Level
    Follow these steps to Assign Permission Level to a User or Group:
    1. Open the site (top level site) as a site owner.
    2. Click Site Actions >> Site Permissions and click Grant Permissions on the Ribbon.
      sharepoint 2010 add permission level
    3. In the Grant Permission form that appears, enter the user account (or security group) in the users/Groups box, then select Grant Users Permissions Directly, and select Read - Can View
    4. Pages and List Items and Download Documents.
    5. Click OK to save and close.
    Its a best practice to add users to SharePoint group instead directly granting them through permission levels. 


    Assign Permission Level to a User on a List or Document Library: E.g. "Shared Documents"
    So we've the custom permission level created and have to grant access to users and groups.
    1. Click on Shared Documents to open this library.
    2. Switch to the Library tab on the ribbon.
    3. Click on the Library Permissions button
    4. To Grant permission to a Library , we must break the inherited permissions and switch to unique permissions. Click Stop Inheriting Permissions, and then click OK to confirm.
    5. Click Grant Permissions.
    6. Enter the Users/Groups field, and click Check Names.
    7. Select the "Grant users permission directly" option, and select Contribute.
      sharepoint 2010 change permission level group
    8. Click OK to save and close. 
    now users/groups have Contribute permissions to this document library and all its content.


    SharePoint Check group/User permission level:
    In SharePoint Server 2010, you can easily check the permission assigned to a user or group from within Site Settings. Access Site Setting from the root of the site collection and then open Site Permissions >>  from there you can pick the required group >> Select Settings >> View Group Permissions to see the applicable permissions for the currently selected group as shown in below screen.
    sharepoint check group permission level


    SharePoint 2010 change permission level for a group
    To change permission level for an existing user or group follow these steps:
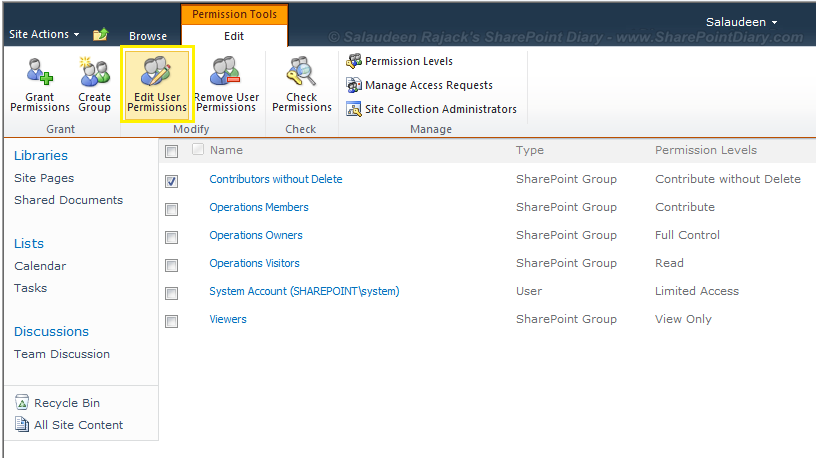
    • Open your SharePoint site. Go to: Site Actions > Site Permissions
    • Check the box next to the person or group you want to modify
    • Select the Edit User Permissions button
      sharepoint 2010 change permission level for a group
    • Choose any additional permission level for the selected group.
      sharepoint 2010 assign permission level to group
    • Click OK to save changes.

    SharePoint 2010 Create Permission Level Programmatically

    $
    0
    0
    While its relatively easy to create permission levels from SharePoint 2010 UI, We had 2000+ site collections in a web applications and scripting/programmatic way to create permission level would be the best choice.

    We wanted to do a SharePoint permission level customization by eliminating delete capability from contributor permission level. Lets copy the contributor permission and remove the "Delete" capability from it.

    Copy Existing Permission level and change permission level Permissions:
              using (SPSite site = new SPSite("http://sharepoint.crescent.com"))
                {
                    using (SPWeb web = site.OpenWeb())
                    {
    
                                //Get the Contributor permission level
                                SPRoleDefinition roleDefContributor = web.RoleDefinitions.GetByType(SPRoleType.Contributor);
                                
                                //copy Contributor permission level
                                SPRoleDefinition roleDefContributorNoDelete = new SPRoleDefinition(roleDefContributor);
    
                                //Retain all permissions but Remove the DeleteItems rights from the  permission level (You can use: | to Add, & to remove all but the specified permission)
                                roleDefContributorNoDelete.BasePermissions ^= SPBasePermissions.DeleteListItems;
    
                                roleDefContributorNoDelete.Name = "Contributor without Delete";
    
                                roleDefContributorNoDelete.Description = "Contributor without Delete";
    
                                web.RoleDefinitions.Add(roleDefContributorNoDelete);
    
                        }
    
                    }
    
    For complete SharePoint 2010 permission levels and permissions definition, Refer this SharePoint 2010 permission levels matrix: http://office.microsoft.com/en-us/templates/sharepoint-server-2010-groups-and-permissions-reference-chart-TC101977256.aspx

    Create permission level programmatically object model c#
    Alternatively, you can create a permission level from the scratch. Here is how:
     using (SPSite site = new SPSite("http://sharepoint.crescent.com"))
                {
                    using (SPWeb web = site.OpenWeb())
                    {
                        //Get all Permission Levels
                        web.AllowUnsafeUpdates = true;
                        //Create New Permission Level
                        SPRoleDefinition roleDef = new SPRoleDefinition();
                        //Set the base Permissions for the Permission Level
                        roleDef.BasePermissions = SPBasePermissions.ViewListItems | SPBasePermissions.AddListItems | SPBasePermissions.EditListItems |  SPBasePermissions.OpenItems |  SPBasePermissions.ViewVersions | SPBasePermissions.ManagePersonalViews | SPBasePermissions.ViewFormPages |  SPBasePermissions.Open | SPBasePermissions.ViewPages | SPBasePermissions.CreateSSCSite | SPBasePermissions.BrowseDirectories | SPBasePermissions.BrowseUserInfo | SPBasePermissions.AddDelPrivateWebParts | SPBasePermissions.UpdatePersonalWebParts | SPBasePermissions.UseClientIntegration | SPBasePermissions.UseRemoteAPIs | SPBasePermissions.CreateAlerts | SPBasePermissions.EditMyUserInfo;
    
                        roleDef.Name = "Contribute without Delete";
                        roleDef.Description = "Contribute without Delete Permission Level";
                        
                        //Add the Permission Level
                        web.RoleDefinitions.Add(roleDef);
    
                        web.Update();
    
                       Console.ReadLine();    
                    }
                }
    This will add a permission level programmatically. To modify the permissions, you have to use the BasePermissions property (SPBasePermissions enumeration): http://msdn.microsoft.com/en-us/library/microsoft.sharepoint.spbasepermissions%28v=office.14%29.aspx


    Add Permission Level in PowerShell code
    In SharePoint 2010 create permission level programmatically using Powershell, here is the script:
    Add-PSSnapin Microsoft.SharePoint.PowerShell -ErrorAction SilentlyContinue
    
    #Get the Target Site collection's Root web
    $web = Get-SPWeb "http://sharepoint.crescent.com/sites/operations"
    
    #Get Contributor Base Permission
    #$Contributor = $Web.RoleDefinitions["Contribute"]
    #write-host $Contributor.BasePermissions
    #or you can use: [System.Enum]::GetNames("Microsoft.SharePoint.SPBasePermissions") to get all base permissions
    
    #Create New Permission Level
    $ContributeNoDelete =New-Object Microsoft.SharePoint.SPRoleDefinition
    $ContributeNoDelete.Name="Contribute without Delete"
    #permission level description
    $ContributeNoDelete.Description="Contribute without Delete Permission Level"
    #Set the Base Permissions 
    $ContributeNoDelete.BasePermissions="ViewListItems, AddListItems, EditListItems,  OpenItems, ViewVersions, ManagePersonalViews, ViewFormPages, Open, ViewPages, CreateSSCSite, BrowseDirectories, BrowseUserInfo, AddDelPrivateWebParts, UpdatePersonalWebParts, UseClientIntegration, UseRemoteAPIs, CreateAlerts, EditMyUserInfo"
    
    #Add the Permission Level
    $web.RoleDefinitions.Add($ContributeNoDelete);
    write-host "Permission level created successfully"
    
    #Grant Permission Level Access to a SharePoint Group directly
    $SPGroup = $web.SiteGroups["Operations Members"]
    
    $RoleAssignment= new-object Microsoft.SharePoint.SPRoleAssignment($SPGroup)
    #Get the permission levels to apply
    $RoleDef = $web.Site.RootWeb.RoleDefinitions["Contribute without Delete"]
    #Assign the groups to the permission level
    $RoleAssignment.RoleDefinitionBindings.Add($RoleDef)
    #Add to web 
    $web.RoleAssignments.Add($RoleAssignment)
    
    $web.Update()
    Write-Host "Permission Level granted to the Group"
    
    $web.Dispose()
    This will create a SharePoint 2010 custom permission level"Contribute without Delete" and add permission level to group: "Operations Members" with the created permission level.

    Similarly, To remove a permission level from an existing SharePoint group, the PowerShell code goes like:
    Add-PSSnapin Microsoft.SharePoint.PowerShell -ErrorAction SilentlyContinue
    
    #Get the Target Site collections's Root web
    $web = Get-SPWeb "http://sharepoint.crescent.com/sites/operations"
    
    #Remove Permission Level From a SharePoint Group
    #Get the SharePoint Group
    $SPGroup = $web.SiteGroups["Operations Members"]
    
    #Get the Role Assignment 
    $RoleAssignment= $web.RoleAssignments.GetAssignmentByPrincipal($SPGroup)
    #Remove the Role Definition
    $RoleAssignment.RoleDefinitionBindings.Remove($web.RoleDefinitions["Contribute"])
    $RoleAssignment.Update();
    
    $web.Dispose()
    SharePoint 2010 change permission level for group
    sharepoint 2010 change permission level for a group

    To Change Permissions of a existing Permission Level:
     using (SPSite site = new SPSite("http://sharepoint.crescent.com"))
                {
                    using (SPWeb web = site.OpenWeb())
                    {
                        SPRoleDefinition roleDef = web.RoleDefinitions["Contribute without Delete"];
    
                        //Update Permissions for the Role Definition
                        roleDef.BasePermissions = SPBasePermissions.AddListItems | SPBasePermissions.BrowseDirectories | SPBasePermissions.EditListItems | SPBasePermissions.Open | SPBasePermissions.OpenItems | SPBasePermissions.ViewListItems | SPBasePermissions.ViewFormPages | SPBasePermissions.ViewPages | SPBasePermissions.CancelCheckout | SPBasePermissions.DeleteListItems | SPBasePermissions.ApproveItems;
    
                          roleDef.Update()
                    }
               }
    

    Delete custom role definition (Permission Level) Programmatically:
    If you want to remove an existing permission level, use this code:
    using (SPSite site = new SPSite("http://sharepoint.crescent.com"))
                {
                    using (SPWeb web = site.OpenWeb())
                    {
                       web.RoleDefinitions.Delete("Contribute without Delete");
                       Console.ReadLine();    
                    }
                }


    SharePoint 2010 get permission levels
    To check SharePoint permission level programmatically:
     using (SPSite site = new SPSite("http://sharepoint.crescent.com"))
                {
                    using (SPWeb web = site.OpenWeb())
                    {
                        //Get all Permission Levels
                        foreach (SPRoleDefinition role in web.RoleDefinitions)
                        {
                           Console.WriteLine(role.Name.ToString());
                        }
    
                       Console.ReadLine();    
                    }
                }

    Disable Delete List Option in SharePoint

    $
    0
    0
    What? We've a SharePoint list provisioned to store & retrieve custom application settings in a SharePoint site. Its critical to prevent this list from any accidental deletion, so we want to disable delete list option from list settings in SharePoint.

    How? We can disable "Delete this list" link in SharePoint by setting the List or Library's AllowDeletion Property to "False". Once set, delete option will go hidden.
    SharePoint list hide delete option
    Disable delete in SharePoint list
    Add-PSSnapin Microsoft.SharePoint.PowerShell -ErrorAction SilentlyContinue
    #Get the web where the particular list lives
    $web = Get-SPWeb "http://sharepoint.crescent.com/sites/operations"
    #Get the list
    $list = $web.Lists["AppConfig"]
    #Make the list 
    $list.AllowDeletion = $false
    $list.Update()
    Result: sharepoint delete list missing!sharepoint 2010 delete list missing
    By this way, we stop users from deleting SharePoint lists. If you notice, in some of the SharePoint lists & libraries (E.g. "Farm Templates" library), "Delete this List" or "Delete this Document Library" links are missing by default to prevent delete option.

    Revert the flag "AllowDeletion" to "True" programmatically, if you must delete a list that doesn't offer "Delete this list" link. Once this flag set to false, we can't delete it even programmatically! you will get "This list cannot be deleted." error if you try to delete it.

    Set SharePoint Web Application Recycle Bin configuration Programmatically with PowerShell

    $
    0
    0
    In continuation to my article SharePoint Recycle bins - Lets get it crystal clear , There are situations to set SharePoint recycle bin options programmatically with either object model code (C#) or with PowerShell.

    SharePoint 2010 powershell Script to Configure Recycle Bin:
    Add-PSSnapin Microsoft.SharePoint.PowerShell -ErrorAction SilentlyContinue
    
    #Get the Web Application
    $WebApp = Get-SpWebApplication "http://SharePoint.crescent.com"
    
    #*** Set Recycle bin Options ***
    #Enable Recycle bin
    $WebApp.RecycleBinEnabled = $true
    
    #Set Retention Period to 90 days
    $WebApp.RecycleBinRetentionPeriod = 90 
    #To Turnoff Recycle bin Retention, use: $WebApp.RecycleBinCleanUpEnabled=$false
    
    #Set Second Stage Recycle bin Quota %
    $WebApp.SecondStageRecycleBinQuota = 100
    #To turn OFF Second Stage recycle bin, use: $WebApp.SecondStageRecycleBinQuota = 0
    
    #Apply the changes
    $WebApp.Update()
    
    Write-Host "Recycle bin Settings Updated!"
    

    SharePoint Recycle bin configuration with STSADM:
    • stsadm -o setproperty -pn Recycle-bin-enabled –pv {On | Off} -url <web-app-url>  
    • stsadm -o setproperty -pn Recycle-bin-cleanup-enabled –pv {On | Off} -url <web-app-url>
    • stsadm -o setproperty -pn Recycle-bin-retention-period –propertyvalue <Numeric value indicating the number of days> [-url] <URL>
    • stsadm -o setproperty -pn Second-stage-recycle-bin-quota -pv 60 -url <web-app-url>

    The web server process that was being debugged has been terminated by Internet Information Services (IIS)

    $
    0
    0
    While debugging a SharePoint object model code in Visual studio, Got this error message: "The web server process that was being debugged has been terminated by Internet Information Services (IIS). This can be avoided by configuring Application Pool ping settings in IIS.  See help for further details."
    The web server process that was being debugged has been terminated by Internet Information Services (IIS)
    Cause: 
    IIS performs health monitoring by pinging worker processes to ensure they are up and running. IIS will terminate any worker process that does not respond to a ping request within the specified response time. So when the code execution is at a break-point in debugging mode and do not resume within the default response time of 90 seconds, IIS forcefully terminates the process and detach the debugger.

    Fix:
    To fix this error,  increase the Ping Maximum Response Time of the application pool in IIS. Following steps:
    • Go to Internet Information Services (IIS) Manager. (RUN >> InetMgr)
    • Expand the server tree , choose Application Pools.
    • Choose the Application Pool corresponding to your IIS website (usually it has the same name as your IIS website)
    • In Right side Property Pane choose Advanced Settings. (or right-click the name of the pool your application runs in, and then click Advanced Settings. )
    • Under the Process Model section, change "Ping Maximum Response Time (seconds)" to a higher value.
    application pool Ping Maximum Response Time (seconds)
    (E.g. I have set the value to 300 seconds which is 5 minutes). Alternatively, you can also set the Ping Enabled property to False.

    Now, re-attach the W3WP process from Visual Studio, you should not get the error message!
    Don't do this in Production environments! That will affect the performance!!

    Open with Explorer Error - Alternate Method

    $
    0
    0
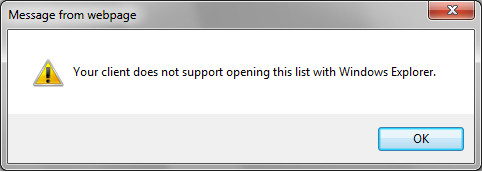
    When you try to use "Open with Explorer" on SharePoint document library, Received Error "Your client does not support opening this list with Windows Explorer".
    Your client does not support opening this list with Windows Explorer
    You tried all the workarounds on Open with Windows Explorer Error: "Your client does not support opening this list with windows explorer" , but no luck!

    Well, there is a alternate to Open with Explorer. Map to Network Drive!

    Just go to My Computer >> Right Click "Computer" node from left side Tree view >> Choose "Map Network Drive" and provide the SharePoint document library location.
    Open with Explorer Error - Alternate Method

    You may be prompted to provide credentials. Once done, will get a New Drive in My computer, where you can copy/paste files as you do in windows explorer.


    How to Hide SharePoint 2010 Ribbon Tab - Group - Button - Menu

    $
    0
    0
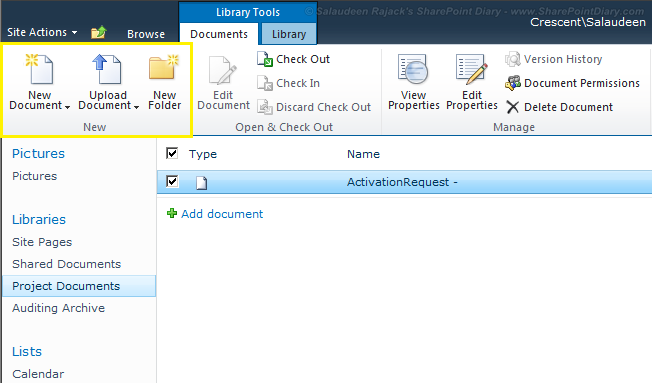
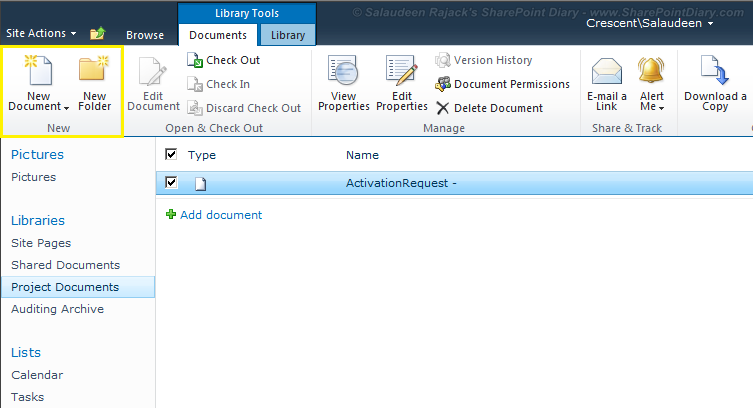
    How to hide Ribbon Tab - Group - Button - Menu in SharePoint 2010? But why? because, the requirement is: Users to fill the form and not upload any existing documents to the document libraries in a particular site. So wanted to disable Upload Document button from SharePoint ribbon.
    hide sharepoint ribbon button

    Solution:
    Override the existing SharePoint 2010 Ribbon Tab/Group/Button/Menu by creating an empty CommandUIDefinition!

    Steps in Detail:
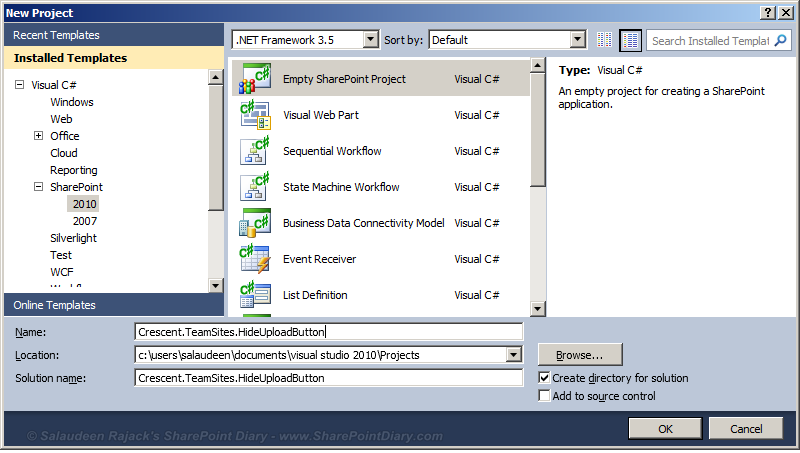
    1. Create an empty SharePoint 2010 farm solution project in Visual Studio 2010. Give it a name. Say, Crescent.TeamSites.HideUploadButton.
    sharepoint hide ribbon items
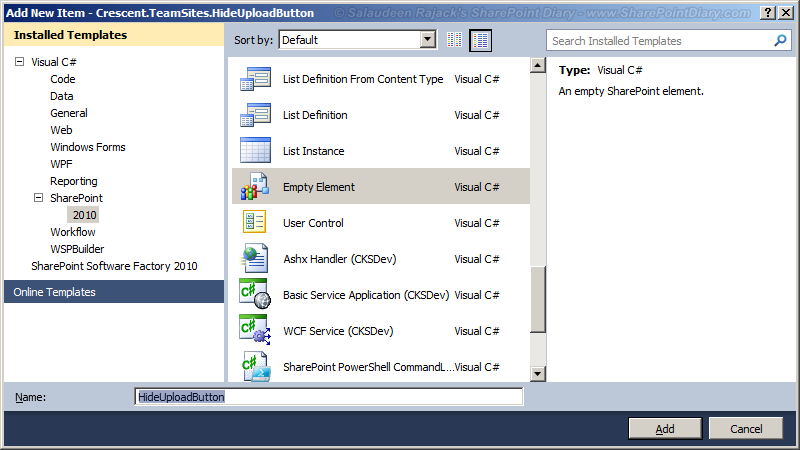
    2. Add a new "Empty Element" item to the project. This will create a Feature with Elements.xml file.
    hide sharepoint ribbon tab

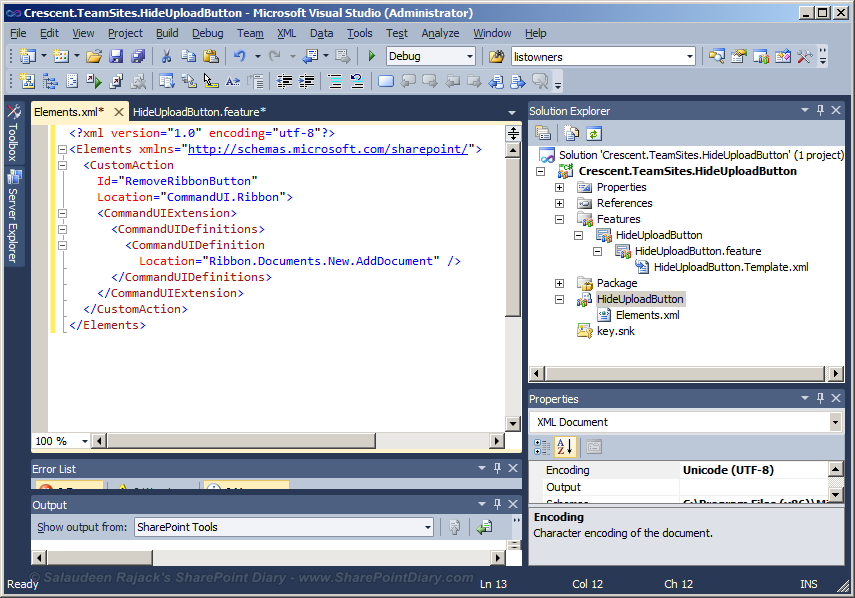
    3. Update the Elements.xml file with below content.
    <?xml version="1.0" encoding="utf-8"?><Elements xmlns="http://schemas.microsoft.com/sharepoint/"><CustomAction
          Id="RemoveRibbonButton"
          Location="CommandUI.Ribbon"><CommandUIExtension><CommandUIDefinitions><CommandUIDefinition
                Location="Ribbon.Documents.New.AddDocument" /></CommandUIDefinitions></CommandUIExtension></CustomAction></Elements> 
    hide a ribbon button in sharepoint 2010

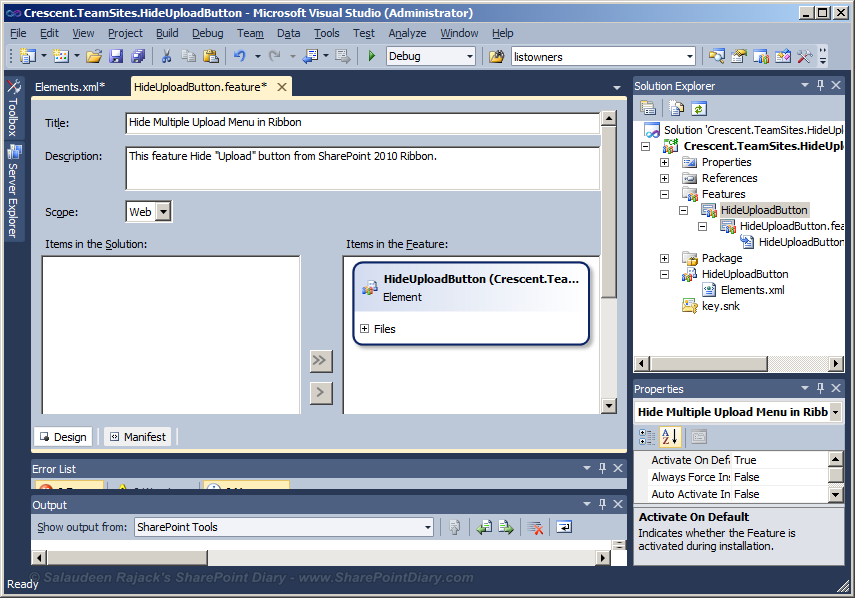
    4. Now, Go to Feature designer, Name the Feature Title & Description. Specify the scope as Web and Include the Element to the feature.
    sharepoint 2010 hide button from ribbon

    5. Deploy the feature and see the result in action.
    hide a ribbon button in sharepoint 2010
    Here the Location is the key. For all available location values, refer MSDN: http://msdn.microsoft.com/en-us/library/ee537543%28v=office.14%29.aspx

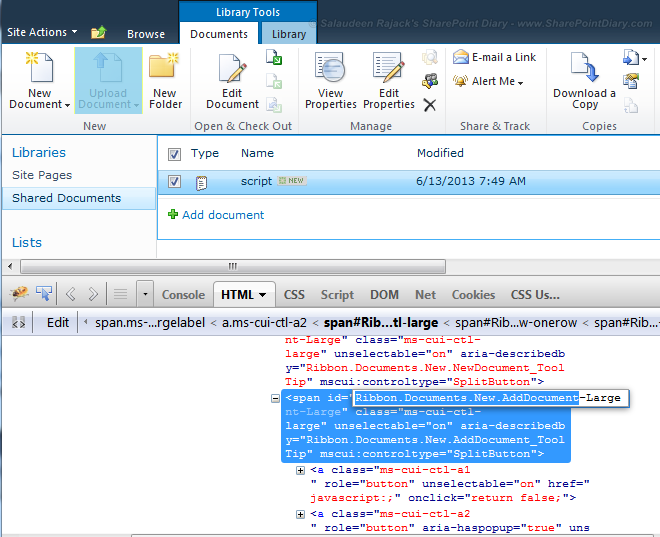
    Tips: You can also use IE Toolbar/Firebug to get the location ID! (Take the text till - Hyphen )
    sharepoint ribbon hide tab

    Hiding SharePoint 2010 Ribbon Tabs, Groups, Button Menus
    The above method applies when you want to hide button menus from the Ribbon.
    • E.g. Hide "Upload Multiple Documents" Menu link under "Upload" button, specify the location as: Ribbon.Documents.New.AddDocument.Menu.Upload.UploadMultiple
    • To Hide Ribbon Tabs, E.g. Hide Documents tab in document library ribbon, the location should be "Ribbon.Document". 
    • Similarly to hide Ribbon Tab Button Groups, E.g. "New" group in SharePoint Ribbon, specify the location as: Ribbon.Documents.New

    How to Hide Ribbon  Tab - Group - Button - Menu on a Particular List?
    While its possible to target custom action to List types, Content Types, File Types, There is no way to target on specific list declaratively! So, we can get it done programmatically. Here is how to hide ribbon buttons in SharePoint 2010 programmatically:

        static void Main(string[] args)
            {
                using (SPSite site = new SPSite("http://sharepoint.crescent/"))
                using (SPWeb web = site.OpenWeb())
                {
                    //Get the "Projects" List 
                    SPList list = web.Lists.TryGetList("Projects");
                    if (list != null)
                    {
                        var action = list.UserCustomActions.Add();
                        action.Location = "CommandUI.Ribbon";
                        action.Sequence = 50;
                        action.Title = "Hide Upload Button from Ribbon";
    
                        action.CommandUIExtension = @" 
                            <CommandUIExtension><CommandUIDefinitions><CommandUIDefinition Location=""Ribbon.ListItem.New""></CommandUIDefinition></CommandUIDefinitions></CommandUIExtension>";
                        action.Update();
                    }
                }
            }

    To remove the custom action use this code:
          using (SPSite site = new SPSite("http://sharepoint.crescent.com/"))
                using (SPWeb web = site.OpenWeb())
                {   
                    //Get the "Projects" List 
                    SPList list = web.Lists.TryGetList("Projects");
                    if (list != null)
                    {
                       foreach (SPUserCustomAction action in list.UserCustomActions)
                        {
                            if (action.Title == "Hide Upload Button from Ribbon")
                            {
                                action.Delete();
                                break;
                            }
                        }
                    }
                }

    Hide Ribbon Button by CSS:
    We can hide ribbon buttons using CSS also. Refer my post for more info: How to Disable Multiple File Upload in SharePoint

    Microsoft KB: http://support.microsoft.com/kb/2285182

    Print SharePoint Listview Web Part using JavaScript

    $
    0
    0
    Requirement is to Print a SharePoint List view web part with JavaScript.

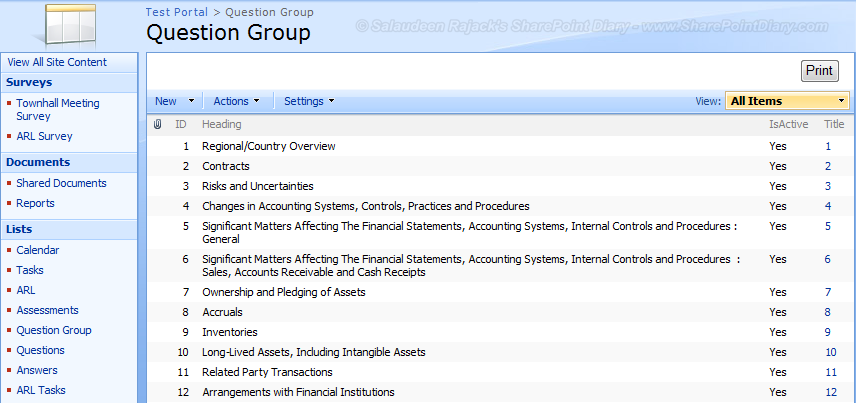
    Solution: Found this code somewhere on the Technet Forums: Place this code in a CEWP, This will add a "Print" button, on clicking the button, Script fetches the list view web part, place it in a new window and sends to Print.

    <INPUT type="button" onclick="javascript:void(printwebpart('WebPartWPQ2'))" value="Print"/><script type="text/javascript">
    function printwebpart(webpartid)
    {
    var WebPartElementID = webpartid;
    var bolWebPartFound = false;
    
    if (document.getElementById != null)
       {
      //Create html to print in new window
      var PrintingHTML = '\n\n';
    
     //Take data from Head Tag
    
      if (document.getElementsByTagName != null)
      {
      var HeadData= document.getElementsByTagName("HEAD");
    
      if (HeadData.length > 0)
      PrintingHTML += HeadData[0].innerHTML;
      }
    
     PrintingHTML += '\n\n\n';
     var WebPartData = document.getElementById(WebPartElementID);
    
     if (WebPartData != null)
     {
      PrintingHTML += WebPartData.innerHTML;
      bolWebPartFound = true;
     }
     else
     {
       bolWebPartFound = false; alert ('Cannot Find Web Part'); 
     } 
       } 
      PrintingHTML += '\n\n';
     
      //Open new window to print
    
      if (bolWebPartFound)
      {
       var PrintingWindow = window.open("","PrintWebPart", "toolbar,width=800,height=600,scrollbars,resizable,menubar");
       PrintingWindow.document.open();
       PrintingWindow.document.write(PrintingHTML);
       PrintingWindow.document.close();
       PrintingWindow.focus();
    
       // Open Print Window
       PrintingWindow.print();
       PrintingWindow.close();
      }
    
    }
    
    </script>  
    Output:

    Find the Number of Users Currently Connected to SharePoint Site

    $
    0
    0
    Had to perform an unplanned IIS Reset to fix an issue in production SharePoint Farm. But executing IISReset breaks ongoing user sessions and give "Service Unavailable" error message, isn't it? Wouldn't it be a good idea to find the No. of users currently connected with the SharePoint site and do the IISReset for a minimal impact? Sure!

    How to find how many users connected with SharePoint sites? use Performance Monitor!
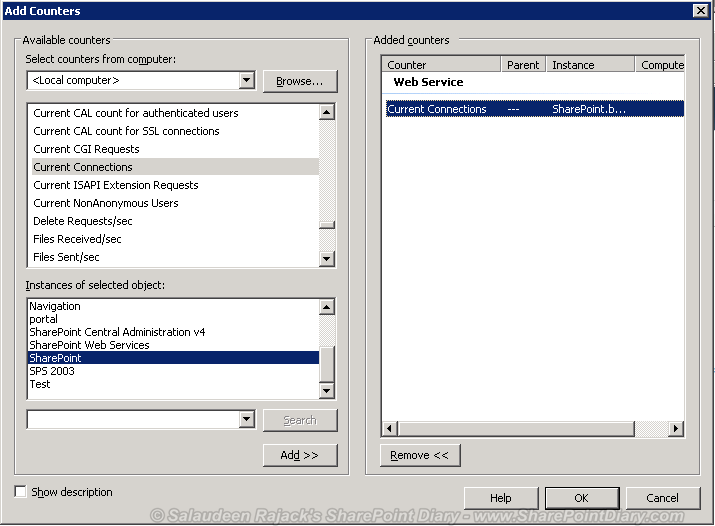
    • Go to Start >> Run >> Type "Perfmon", to fire up Performance Monitor.
    • Click on "Performance Monitor" , Right click "Add Counters" in Graph windowsharepoint how many users connected
    • Under the available Counters, Pick "Web Service" expand the node and select "Current Connections"
    • Under "Instances of Selected object" You can either select "Total" or pick a particular web applicationFind the number of users Currently Connected to SharePoint Site
    • Click on Add button to add the selected counter, and click "OK" button
    Now the graph will show the how many users connected to your SharePoint Site(s).
    sharepoint number of users connected
    Please not, this gives only the no of user sessions currently ongoing. But not the one already completed (Doesn't count the users already opened the site and left it idle!) There are possibilities that users may hit the SharePoint URL meanwhile and receive "Service Unavailable" message since IIS is reset!

    The default termstore for this site cannot be identified - Error on Creating Local Term Set Managed Metadata Column

    $
    0
    0
    When trying to create a Local term set by Selecting the option "Customize your term set:", Got the error message :
    "The default termstore for this site cannot be identified"
     
    Cause: 
    This is because: Managed Metadata Service Application Service Application to set default storage location for Term Sets is not specified!

    Solution:
    Go to Central Administration >> Manage Service Applications >> Highlight your Managed Metadata Service Application >> Click on the Service Connection >> Properties icon in the ribbon >> Enable "This service application is the default storage location for column specific term sets." 
    The default termstore for this site cannot be identified - Error on Creating Local Term Set Managed Metadata Column
    This will fix the problem!

    PowerGUI Error: Microsoft SharePoint is not supported with version 4.0.30319.1 of the Microsoft .Net Runtime

    $
    0
    0
    PowerGUI is my favorite IDE for creating PowerShell scripts. When I upgraded PowerGUI to a newer version 3.5, all my scripts stopped working and I started receiving below error:

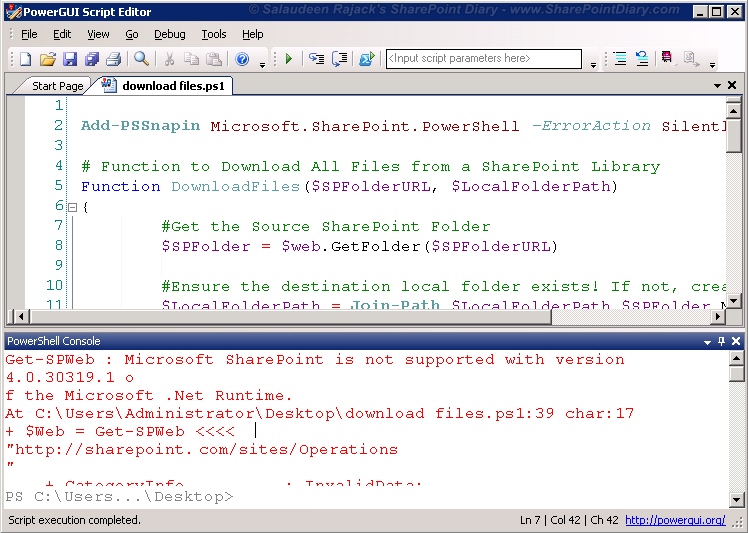
    "Get-SPWeb : Microsoft SharePoint is not supported with version 4.0.30319.1 of the Microsoft .Net Runtime."
    PowerGUI Error: Microsoft SharePoint is not supported with version 4.0.30319.1 of the Microsoft .Net Runtime
    Root Cause:
    SharePoint cmdlets do not work with .NET framework 4! In PowerGUI's configuration, We got to Remove that!

    Solution:
    Open the "ScriptEditor.exe.config" file from the location where PowerShell GUI is installed. Typically, "C:\Program Files (x86)\PowerGUI\".

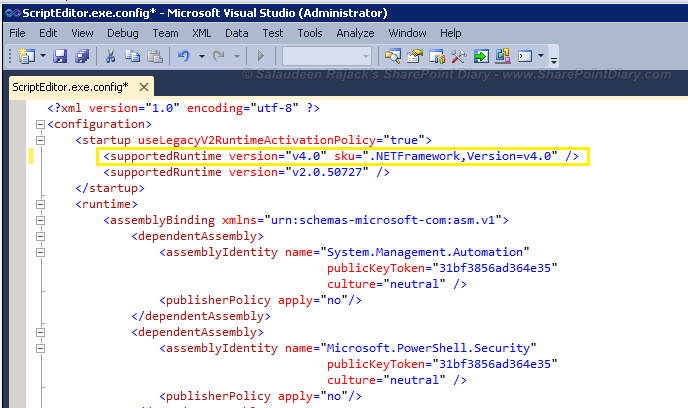
    Find the Line: " <supportedRuntime version="v4.0" sku=".NETFramework,Version=v4.0" /> " under "startup" node SharePoint PowerGUI Get-SPWeb Error
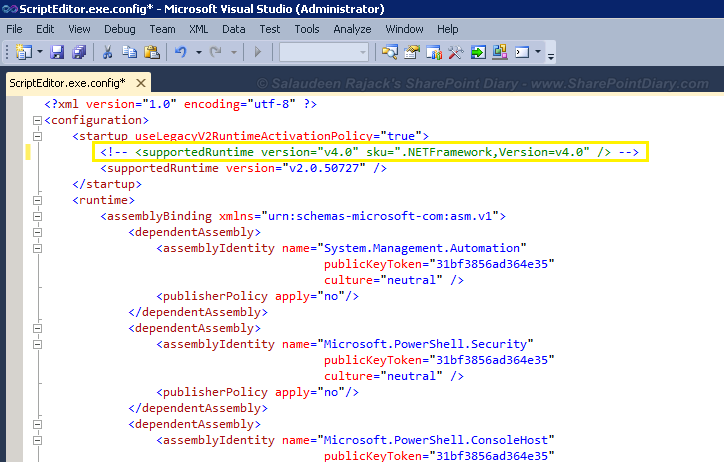
    Comment that line, Save & Close.

    Now, Restart the Script Editor. All should be working now.

    Delete Folders, Sub-Folders from SharePoint Library Programmatically

    $
    0
    0
    I need to delete a Folder from SharePoint 2010 document library using object model programmatically. Here is the code to delete the sub-folder from SharePoint document library:

    To Delete a Sub-folder from SharePoint Document Library Programmatically:
                String siteURL = "http://sharepoint.crescent.com/sites/sales"; 
                String listName = "Documents";
                String folderToDelete = "v2";
    
                using (SPSite site = new SPSite(siteURL))
                {
                    using (SPWeb web = site.OpenWeb())
                    {
                        SPFolderCollection folders = web.Folders[listName].SubFolders;
    
                        foreach (SPFolder folder in folders)
                        {
                            if (folder.Name == folderToDelete)
                            {
                               web.Folders[listName].SubFolders.Delete(folder.Url);
                            }
                        }                    
                    }
                }

    The above code can be converted to PowerShell also, to delete folders programmatically: 
     Add-PSSnapin Microsoft.SharePoint.PowerShell -ErrorAction SilentlyContinue
            $siteURL = "http://sharepoint.crescent.com/sites/sales.com"
            $listName = "Documents"
            $folderToDelete = "v2"
      #Get the Web
            $web = Get-SPWeb $siteURL  
      #Get all Sub folders
      $folders = $web.Folders[$listName].SubFolders
    
                        Foreach ($folder in $folders)
                        {
                            if ($folder.Name -match $folderToDelete)
                            {
            $web.Folders[$listName].SubFolders.Delete($folder);
              Write-Host "Folder has been deleted!"
                            }
                        }                    


    If you want to Delete All Folders from a Library:
     Add-PSSnapin Microsoft.SharePoint.PowerShell -ErrorAction SilentlyContinue
         $siteURL = "http://sharepoint.crescent.com/sites/sales"
               $listName = "Documents"
             #Get the Web
                    $web = Get-SPWeb $siteURL  
      #Get the list
      $list = $web.lists[$listName]
      #Get all folders under the list
      $query =  New-Object Microsoft.SharePoint.SPQuery
      $camlQuery = '<Where><Eq><FieldRef Name="ContentType" /><Value Type="Text">Folder</Value></Eq></Where>'
    
      $query.Query = $camlQuery
      $query.ViewAttributes = "Scope='RecursiveAll'"
      $folders = $list.GetItems($query)
    
      for ($index = $folders.Count - 1; $index -ge 0; $index--)
      {
       Write-Host("Deleting folder: $($folders[$index].Name) at $($folders[$index].URL)")
          $folders.Delete($index);
      }

    Related Post: Create Folders and Sub-Folders in SharePoint Programmatically

    Set Outgoing E-Mail Settings with PowerShell

    $
    0
    0
    Its a common tasks that every SharePoint administrator will have to perform is enabling SharePoint to send E-mails. Outgoing email settings can be configured within the Central Administration site by navigating to:
    • Central Administration>> System Settings>> Configure outgoing e-mail settings
    Set Outgoing E-mail Settings in SharePoint 2010

    To Set Outgoing E-Mail Settings with PowerShell:
    Add-PSSnapin Microsoft.SharePoint.PowerShell -ErrorAction SilentlyContinue
    
    #Define Outgoing E-mail settings 
    $outboundServer = 'g1exchangehub.crescent.org'
    $FromAddress = 'Teamsites@crescent.org'
    $ReplyAddress = 'SharePointSupport@crescent.org'
    $Charset = 65001
    
    #Get Central Administrtion Web site 
    $WebApp = Get-SPWebApplication -IncludeCentralAdministration | Where { $_.IsAdministrationWebApplication }
    
    #Apply the Settings
    $WebApp.UpdateMailSettings($outboundServer, $FromAddress, $ReplyAddress, $Charset)
    

    If you want it for MOSS 2007, Use:
    [System.Reflection.Assembly]::LoadWithPartialName("Microsoft.SharePoint")
    $CentralAdmin = New-Object Microsoft.SharePoint.Administration.SPGlobalAdmin
    $CentralAdmin.UpdateMailSettings($outboundServer, $FromAddress, $ReplyAddress, $Charset)
    Set Outgoing E-mail Settings with PowerShell 
    Setup outgoing Email for a particular web application:
    Its also possible to set outbound Email settings per web application. But in Central Administration, outgoing email settings are set globally to the Farm but not per web application. Say for e.g, We need different From/To addresses for different departments in the organization. Say, IT@Company.com or IT departments and Sales@company.com for sales department.

    This is where PowerShell comes to handy!We can set outbound Email settings per web application using PowerShell:
    Get-SPWebApplication -Identity <web-app-url>
    Set-SPWebApplication -OutgoingEmailAddress SharePointSupport@crescent.org -ReplyToEmailAddress SharePointSupport@crescent.org -SMTPServer emailserver.crescent.org
    Its also possible to set outbound Email using STSADM command line. To setup outgoing Email for a particular web application:
    stsadm -o email -outsmtpserver emailserver.crescent.org -fromaddress SharePointSupport@crescent.org -replytoaddress SharePointSupport@crescent.org -codepage 65001 -url http://server_name


    To get the outgoing email Server Settings:
    (Get-SPWebApplication -IncludeCentralAdministration | Where { $_.IsAdministrationWebApplication } ) | %{$_.outboundmailserviceinstance.server}

    Technet Reference: Configure outgoing e-mail for SharePoint Server 2010

    Change "Save" or "OK" Button Text on SharePoint List Forms

    $
    0
    0
    Wouldn't it be more meaningful to rename SharePoint List NewForm.aspx "Save" or "OK" button text to "Submit" in Request Tracking Lists?

    Yes! Sure, I'll possible to change "Save" button's text to something else which gives more meaningful in the context.

    Using jQuery to Rename "Save" button Text:
    Place the below jQuery script in a text file, Upload it to a document library, add a CEWP to the NewForm.aspx page, and specify the "Content Link" in Content Editor Web Part's Property Pane.

    <script src="https://ajax.googleapis.com/ajax/libs/jquery/1.3.1/jquery.min.js" type="text/javascript"></script><script>
        $(document).ready(function()
          {
                        $("input[value$='Save']").attr('value', "Submit");
         });</script>
    Result in action: SharePoint 2010 change save button text
    sharepoint 2010 change save button text

    Using JavaScript to Set SharePoint save button text:
    Open the NewForm.aspx in browser, Append: ?toolpaneview=2 , (E.g. http://sharepoint.crescent.com/sharepointsupport/lists/URLChangeRequests/NewForm.aspx?toolpaneview=2) You will get the page in edit mode. Now, add the CEWP below List View Web part and place the below code:

    <script type="text/javascript">
    _spBodyOnLoadFunctionNames.push("changeOKBtnTxt()");
    
    function changeOKBtnTxt()
    {
    //Get all Input Elements on the page
    var inputs = document.getElementsByTagName("input");
    
    //Get the "OK" button
    for(i = 0; i<inputs.length; i++)
     {
        if(inputs[i].type == "button" && inputs[i].value == "OK")
         {
          //Change the "OK" button's Text to "Submit"
          inputs[i].value = "Submit";
         } 
      }
    
    }
    </script>
    sharepoint 2007 change ok button text
    Its also possible to do it with SharePoint Designer. You have to hide the Default OK button and add custom buttons as explained in this post: Redirect Users to Thank You page from NewForm.aspx after form submission

    How to Hide a List or Library in SharePoint?

    $
    0
    0
    How to Hide a SharePoint list or library from browser? 
    But why? Because, My custom application uses some configurations which should be stored and retrieved from a SharePoint list, but it must not be visible to end-users to avoid any mess. So, we got to hide our configuration list from users.

    We don't want the configuration list to be available to users, but visible only for the custom application code to read/write in it.  So lets hide the configuration lists from "View All Site Content" page.

    Solution:
    To hide a SharePoint 2007 or SharePoint 2010 list or library, either we've to use SharePoint API (Set SPList.Hidden property of the SharePoint list programmatically with either C# Object Model code or PowerShell) or use SharePoint designer.

    Even SharePoint itself uses lots of hidden Lists & Libraries for its own operations (E.g. "Content and Structure Reports", "Master Page Gallery", "Form Templates", "User Information List", etc)

    To hide a list in SharePoint 2010 using PowerShell:
    To hide library in SharePoint, use the below PowerShell script.

    #Define the Web URL & List Name
    $WebUrl = "http://sharepoint.crescent.com/sites/Sales"
    $ListToHide = "AppConfig"
    
    #Get the Web
    $web = Get-SPWeb $WebUrl
    #Get the List
    $list = $web.Lists[$ListToHide]
    
    #Set the Hidden Property
    $list.Hidden = $true
    $list.Update()
    
    #Displose Web Object
    $web.Dispose()

    Hide a Document Library in SharePoint using C# Object Model Code:
    using (SPSite site = new SPSite("http://sharepoint.crescent.com/sites/Sales"))
    {
        using (SPWeb web = site.OpenWeb())
        {
           SPList configList = web.Lists["AppConfig"];
           configList.Hidden = true;
           configList.Update();
        }
    }
    This method of hiding SharePoint list applies to any SharePoint List, Document Library, picture library, etc.
    hide sharepoint list from view all site content
    This is how we can actually hide the lists from user view  programmatically using C# or PowerShell.
    Programmatically setting the Hidden property of the list will also hide the list from Quick Launch bar.  However, It is possible that the document library link may be placed in Quick launch manually and still appears! so take care of it.

    Hide a list from users using SharePoint Designer:
    Here is how we can hide a document library or list in SharePoint 2010:

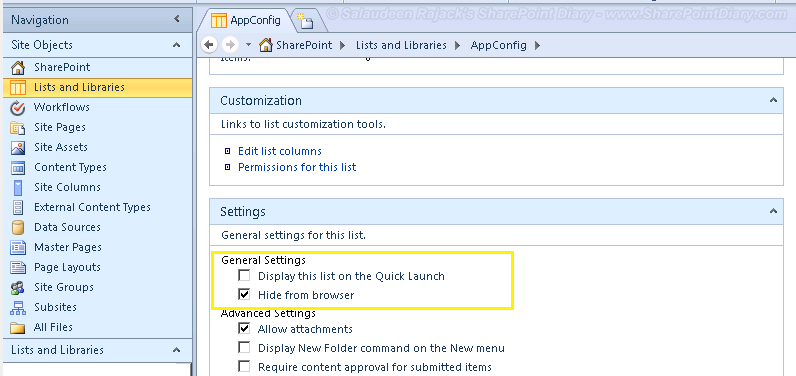
    • Open the site in SharePoint Designer, Right click the target list >> Choose List settings >> General Settings
    • Check the "Hide from browser" option
    •  Uncheck the "Display this list on quick launch" option
    •  Click on "Save" button to apply the changes
    hide document library in sharepoint 2010
    Now, Open it SharePoint site in browser and verify that your list is hidden.

    To Unhide a Hidden list in SharePoint Designer:
    Unhide a hidden list is little tricky! The above steps to hide list in SharePoint, will also hide the list from SharePoint designer's "Lists and Libraries" section. So, To unhide the list:
    • Go to "All Files" folder from the SharePoint designer left pane Treeview.
    • Right click on your hidden list >> Choose Properties
    • Revert back the settings "Hide from browser" to false and "Display this list on quick launch" to True! Save your settings.
    • Now, you'll get the hidden list back in the browser and in the SharePoint designer.
    Remember, although list's hidden property is set, it will not stop users from directly hitting the list URL in browser and get into the list! E.g. http://sharepoint.brightpoint.com/Lists/AppConfig
    If you really concerned about the confidentiality of the list, To hide a list from users: You have to break list permission inheritance and remove all user permissions from the list. So that the list data will not be visible to any users (But this doesn't control Site collection Admins, Farm Admins with Web Application Policy).

    How to Remotely Execute SharePoint 2010 PowerShell Cmdlets

    $
    0
    0
    PowerShell allows us to run cmdlets remotely from client machines. We can run SharePoint 2010 cmdlets on the SharePoint Server, remotely connecting from client machines by following these two steps:

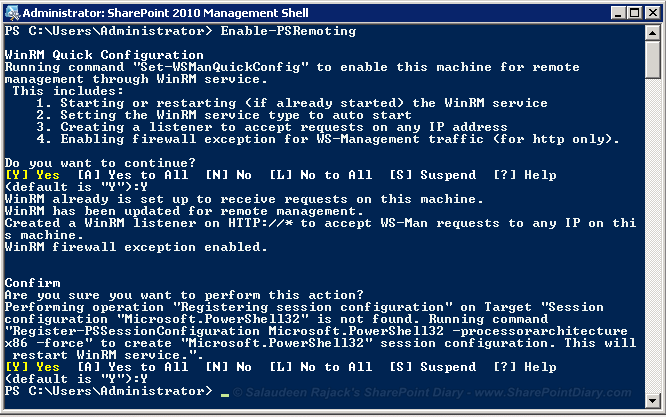
    Step 1: To execute SharePoint PowerShell remotely, you have to enable PowerShell Remoting on the Server first! By default PowerShell Remoting is disabled. Log-On to the server you want to access remotely, enable remote PowerShell for running SharePoint 2010 cmdlets

    Enable-PSRemoting
    execute sharepoint 2010 powershell remotely
    This command enables remote PowerShell for SharePoint 2010 by enabling WinRM service and configures windows firewall to allow incoming sessions. 
    Its a one time activity to configure remote PowerShell in SharePoint 2010.

    Step 2:
    Now, We can either directly invoke PowerShell Cmdlets or establish a session and then execute PowerShell cmdlets. E.g. To get the total no. of site collections, I'm using the below code:

     Option 1: Invoke PowerShell remotely to run SharePoint 2010 cmdlets:
     To Invoke SharePoint 2010 PowerShell on remote server:
     Invoke-Command -ComputerName SPSWFE01 -ScriptBlock { 
     Add-PSSnapin Microsoft.SharePoint.PowerShell; 
     $webApp = Get-SPWebApplication "http://sharepoint.crescent.com"; 
     write-host "Total No. of sites in the Web Application: $($webApp.Sites.Count)" 
     } -credential (Get-Credential)

    Option 2: Establish a Remote Session and then execute PowerShell cmdlets:
    We've to connect to remote SharePoint server using PowerShell. In the Client machine, enter:
    Enter-PSSession "SharePoint Server Name" -Credential (Get-Credential) 

    This cmdlet prompts for credentials and opens PowerShell remote session from the remote SharePoint farm .Once done, we can run PowerShell commands. Here is an example to establish and execute PowerShell commands
    Add-PSSnapin Microsoft.SharePoint.PowerShell
    $webApp = Get-SPWebApplication "http://sharepoint.crescent.com"
    write-host "Total No. of sites in the Web Application: $($webApp.Sites.Count)"
    Don't forget to exit the PowerShell session, once you are done with PowerShell:
    Exit-PSSession

    IE 10 Browser Compatibility issues with MOSS 2007 and SharePoint 2010

    $
    0
    0
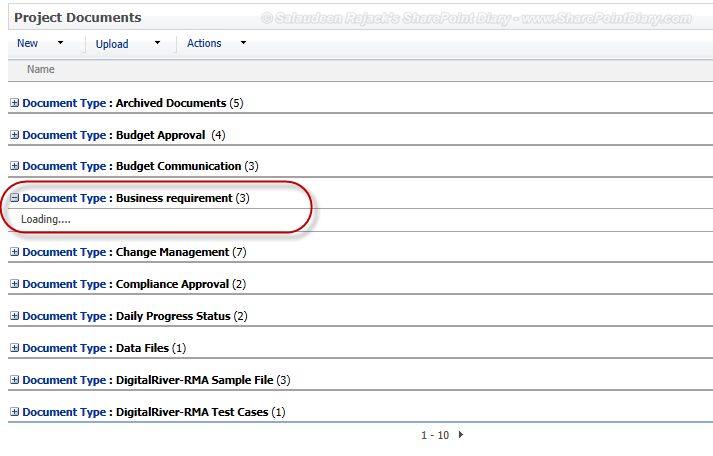
    Found so many user interface issues with Internet Explorer 10 while using it in MOSS 2007 and SharePoint 2010 sites. For instance, KPI didn't load, Grouped items stuck with "Loading.." message, etc. Additionally, Experienced many JavaScript errors when tying Datasheet view, Multiple File Upload, etc.
    IE 10 Browser Compatibility issues with MOSS 2007IE 10 Browser Compatibility issues with SharePoint 2010

    Temporary Fix: Set the Browser Mode to IE 8!

    How? Press F12, which fires IE Developer Tools. Select "Browser Mode: IE8". You can also try setting User Agent string to IE 8 from tools menu of IE Development tools.
    Internet Explorer 10 issues with SharePoint 2007 and 2010

    Permanent Fix: Install the Hot fix! http://support.microsoft.com/kb/2600100/en-us

    SharePoint WSP Solution Deployment Stuck at "Deploying"

    $
    0
    0
    Issue: SharePoint WSP Solution got stuck at "Deploying" stage for hours while trying to deploy using STSADM command!
    SharePoint WSP Solution Deployment Stuck at "Deploying"

    Workarounds: 
    Try these workarounds to fix the solution deployment stuck at "deploying" stage.
    • Make sure all your WFE & DB Servers in the Farm has no Time zone different! Make them aligned!
    • Try running: stsadm -o execadmsvcjobs as the first step!
    • Cancel  the deployment, Remove the WSP and Re-deploy: 
      • stsadm -o enumdeployments - This will give the GUIDs of all solution in "Deploying" State. Cancel the deployment using stsadm -o canceldeployment <GUID> command. E.g.:
      • stsadm -o canceldeployment -id "95823b2b-8c92-4d08-99d5-7cf14c7be602"
      • Delete the stuck solution with stsdm -o deletesolution -name mysolution.wsp -override
      • Redeploy the solution.
    • Try deploying for a single web application rather all.
    • Try Restarting Timer Job on all servers of the Farm.
    • Try Clear Config Cache
    • As the last: Reboot the server!

    SharePoint 2010 Rating Feature Configuration - How to Activate? Fix Ratings not Updating Issue

    $
    0
    0
    Rating feature was introduced in SharePoint 2010, It helps to rate Lists, Documents, Pages on a SharePoint site.

    How To Enable SharePoint 2010 Rating Setting:
    To setup SharePoint 2010 rating configuration, follow these steps:
    • Navigate to your SharePoint site and then Target list or document library where you want Ratings to be enabled.
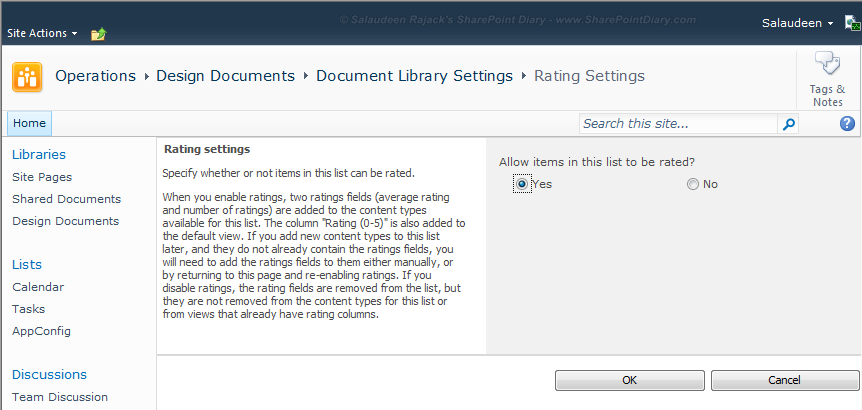
    • Go to the list settings, Click on "Rating Settings" under the "General Settings" section
      sharepoint 2010 rating document library
    • Enable "Allow items in this list to be rated" and click OK. This will add rating columns to SharePoint 2010 list/library.
      sharepoint 2010 enable rating feature
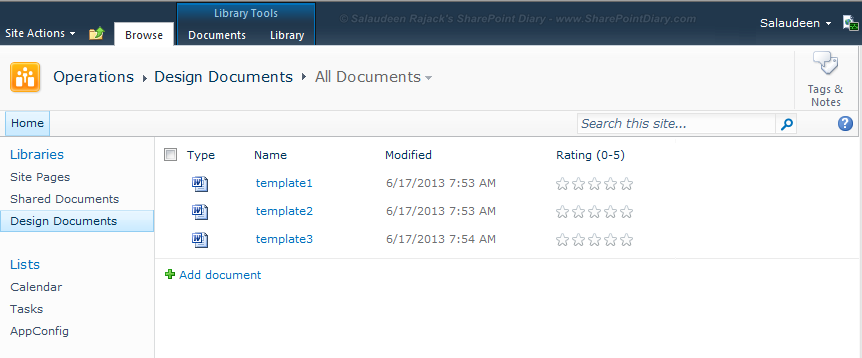
    • Now you will see two new columns: the Ratings (0-5) and the Number of Ratings under the Columns section of list settings.
      sharepoint 2010 list rating column
    • Go to the list items view, You can set the ratings inline or edit a list item/document and set the  rating for the item by simply mouse over the stars in the Rating(0-5) column and set the ratings as needed. (You need Edit permissions, BTW)sharepoint 2010 how to enable rating
    The next time the service timer job responsible for this social feature runs, the rating scale and number will reflect the results

    SharePoint 2010 Ratings not working?
    So you rated a List item or a document, but upon refresh, found SharePoint 2010 ratings not updating? Ratings not saved? But when you mouse over the rating icons, SharePoint gives the previously selected rating in tool tip. Well, that's confusing most of the users!

    This is due to: By default the Timer Jobs listed below, related to Rating service is set to run for every hour!
    rating in sharepoint 2010 not working
    Once ratings given to an item then it'll be stored in database. When the ratings are all gathered together it will show the average ratings, not just your ratings. When the page is refreshed, if the data hasn’t been analyzed yet by SharePoint via the below timer jobs, the ratings will be blank or old! This is how ratings work in SharePoint 2010.

    SharePoint 2010 rating timer jobs
    Rating values are compiled by these timer jobs
      1. User Profile Service Application - Social Data Maintenance Job
      2. User Profile Service Application - Social Rating Synchronization Job
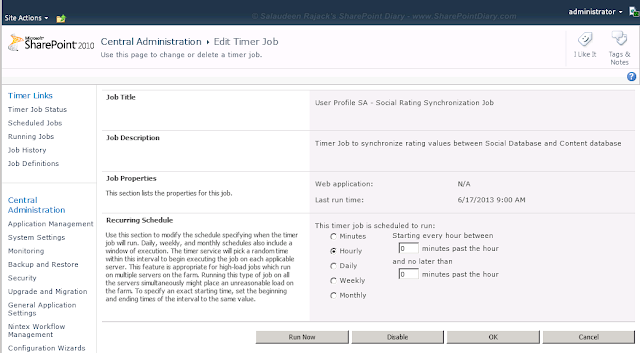
      By default, This timer job is scheduled to run every 1 Hour. You can Run these timer jobs on-demand by clicking "Run Now" or change the "Recurring Schedule" as required. Here is how - Go to:
      Central Administration>> Monitoring>> Timer Jobs>> Review Job Definition>> and select the above timer jobs.

      Click on "Run Now". our convenience and testing, schedule both these jobs to run every 1 min as shown below.
      sharepoint 2010 rating timer job


      As you hover over the ratings stars they light up, and then you just click to select your rating and record your vote,  users can see the average ratings  (Blue Stars) after the timer job run.
      sharepoint 2010 rating documents
      If a user giving rating which he already given, then his previous rating will be discarded and new selection only getting considered.

      SharePoint 2010 rating settings not available? Here is how to activate rating feature:
      Don't have "Rating Settings" appear on lists/libraries settings? Enable Rating feature to fix SharePoint 2010 rating settings missing issue:
      Enable-SPFeature Ratings -url http://site-collection-url

      Rating feature is available only with SharePoint Server 2010 and not with the SharePoint Foundation Services!
      Viewing all 1058 articles
      Browse latest View live


      <script src="https://jsc.adskeeper.com/r/s/rssing.com.1596347.js" async> </script>