Quantcast
Channel: SharePoint Diary
Viewing all 1058 articles
Browse latest View live

How to Create External Lists from SQL Server using BCS in SharePoint 2016

$
0
0
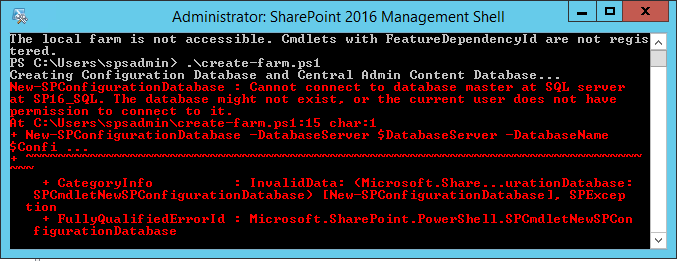
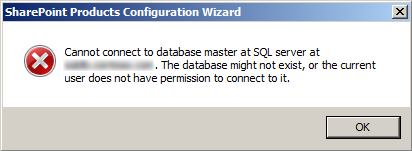
Business Data Connectivity Services enables SharePoint 2013/2016 and Office 2013/2016 clients to interact with data that doesn't live in SharePoint.  BCS allows you to integrate external data into SharePoint, External list provides familiar list like user experience. Lets see how to create a External List in SharePoint that grabs the data stored in SQL Server Database and display it in SharePoint 2016 without writing a single line of code.

Prerequisites: Before creating an external content type-External List, You need to have Business Data Connectivity Service (BCS) application and/or secure store service application configured in your SharePoint farm! Here is how to Create and configure BDC service application in SharePoint 2016

Step 1: Create External Content Type in SharePoint Designer 2013:
Follow these steps to create an External Content Type using SharePoint Designer 2013.
  • Open your SharePoint 2016 site in SharePoint Designer 2013
  • Select External Content Types in the left Navigation. Click on External Content Type under New Group.
    sharepoint 2013 using bcs with sql server database
  • In the External Content Type creation page, Enter the Name and Display Name for the external content type. Click on "Click here to discover external data sources and define operations" link next to "External System".
    sharepoint 2010 bcs sql server example
  • This takes you to the Operation Designer page. Now, Click on "Add a Connection" button to connect to the database. Select Data source type as SQL Server.
    sharepoint 2016 bcs sql server tutorial
  • Setup SQL Server connection properties. Enter the Database server name, Database name and choose the "Connect with impersonated windows identity" and enter the Application ID you created to connect with SQL server in Secure store service.I've created a target application ID in SharePoint 2016 secure store service. Refer this article on How to Create Target Application ID in Secure Store Service in SharePoint 2016
    sharepoint 2013 bcs connect to sql server
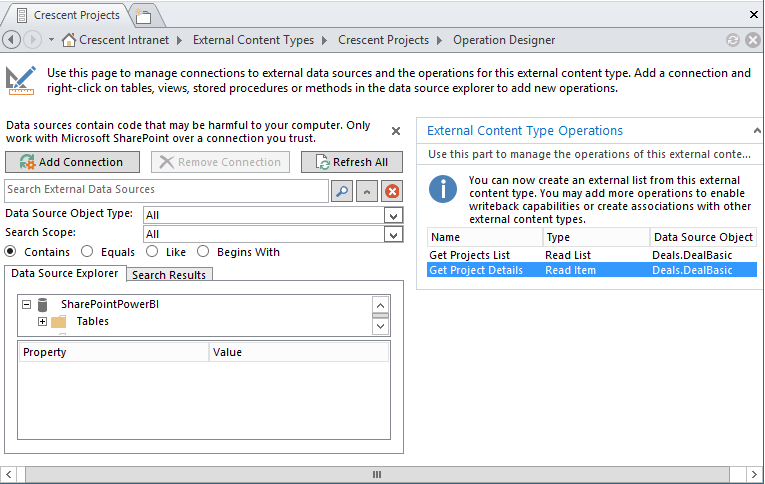
  •  Once the connection is made with the provided database, Data Source Explorer will be filled with the database objects we specified. Now select the relevant table to which we are going to connect from SharePoint. Right click the table and select the option "Read List Items". Repeat this step for "Read List" operation as well. 
    sharepoint 2013 using bcs with sql server database
  • You'll get Operation Properties wizard. Run through this wizard, specify appropriate settings such as filters, necessary fields and click on Finish button once done. 
    sharepoint 2016 using bcs with sql server database
  • You'll be presented with a list of operations that your External Content Type can do, as shown below.
    sharepoint bcs sql server
  • Hit Save button in SharePoint designer to complete creation of external content type.

Step 2: Create External List in SharePoint 2016:
The Next step is to expose that SQL table through an External List.
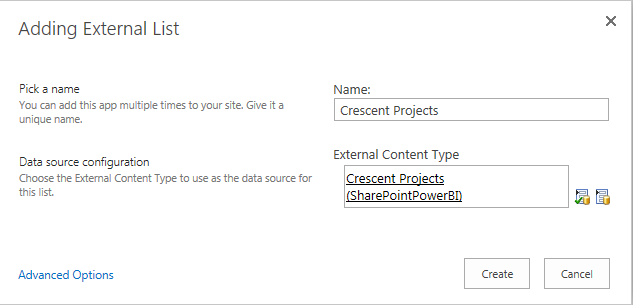
  • Open your SharePoint site in Browser, Add an App >> Choose External List
  • You will be presented with an External Content Type Picker and you will be able to view the Content Type you created a while ago. Choose that content type, Provide a name to your External list and hit OK
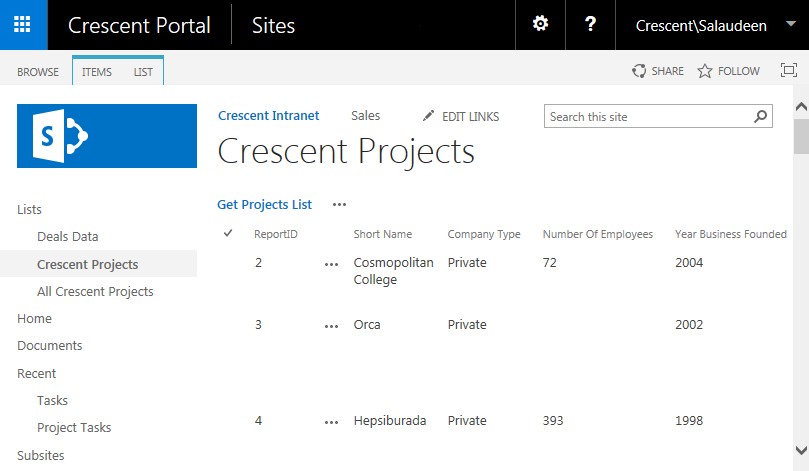
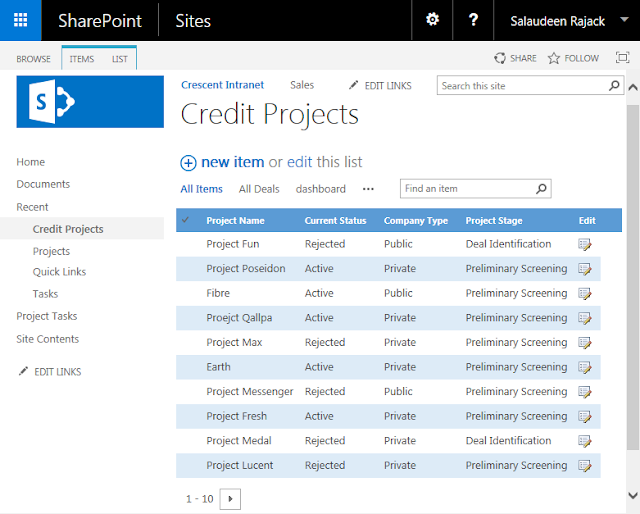
  • Now you can see your SharePoint list populated from the database table!
You may have to explicitly provide permission to External Content type through BCS service application if you have not set meta data permission to all users already! Last but not least: We can't compare External Lists with standard SharePoint lists. See my another post on some of the significant limitations when using external lists: 25 Limitations of External Lists in SharePoint

Fix "Unable to render the data. If the problem persists, contact your web server administrator." Issue in SharePoint BCS

$
0
0
Problem:
Tried created an external list SharePoint 2016 using business data connectivity services, configured secure store target application and created external list in SharePoint. All went good, however the external list displayed this error message with a correlation ID.
Unable to render the data. If the problem persists, contact your web server administrator.
Ran ULS Log viewer and found this message in the logs:
Error while executing web part: Microsoft.BusinessData.Infrastructure.BdcException: The shim execution failed unexpectedly - Unable to obtain the application proxy for the context.. ---> Microsoft.Office.SecureStoreService.Server.SecureStoreServiceException: Unable to obtain the application proxy for the context.   

Solution:
The root cause of the problem is: The web application is not associated with the secure store service application. So, the solution is:
  • Go to SharePoint 2013/2016 Central Administration site
  • Application management >> Click on Configure service application associations under Service Applications.
  • Pick the web application in which your site exist, Check the "Application proxy group" column >> Make sure the BDC and secure store service applications check boxes checked.service application association in sharepoint 2016

Add Links to Resources List in SharePoint Central Administration

$
0
0
The Resources list in SharePoint Central Administration site lets you to keep frequently accessed links to the home page. Say for e.g. To access User profile service application, you'll have to navigate through:
  • Central Administration >> Application Management 
  • Manage Service Applications >> Search and pick your user profile service Application
in some other cases, you'll find a difficulty in navigating To-And-Fro in SharePoint Central Administration. So, Resources list comes handy to manage this hassle. Just add your frequently accessed links to it! When you log into SharePoint Central Administration site, you'll see the Resources link list in right pane.
Consider Resources list as your Favorites or Bookmarks List!
sharepoint 2013 central admin resources list
To Add a link/remove links in resources list:
  • Click on "Resources" link from SharePoint Central Admin home page (or your can Click the gear icon and click Site Contents >>  Find the Resources list)
  • From here you can add or delete the link like any list item.
    sharepoint 2013 add link to resources list in central admin
This saves time and effort, especially if you have trouble finding service applications in Central Admin.

Populate Resources List using PowerShell:
Lets use PowerShell to add items to Resources list in SharePoint Central Administration site.
Add-PSSnapin Microsoft.SharePoint.Powershell -ErrorAction SilentlyContinue

#Get Central Administration Site
$CentralAdminUrl = Get-SPWebApplication -includecentraladministration | where {$_.IsAdministrationWebApplication} | Select -ExpandProperty URL

#Get Resources list from Central Admin
$List = (Get-SPWeb -identity $CentralAdminUrl).Lists["Resources"]

#Get Service Applications to add to Resources List
$ServiceApps = Get-SPServiceApplication | Where {($_.TypeName -eq "Excel Services Application") `
-or ($_.TypeName -eq "Managed Metadata Service") `
-or ($_.TypeName -eq "User Profile Service Application") `
-or ($_.TypeName -eq "Search Service Application") `
-or ($_.TypeName -eq "Business Data Connectivity Service Application") }

#Loop through and Add Links to Resources list
foreach ($App in $ServiceApps)
{
$Item = $List.Items.Add()
$Item["URL"] = "$($App.ManageLink.Url), $($App.DisplayName)"
$Item.Update()
}

Write-Host "Service Application Links added to Resource List!" -f Green

Get User Account By Display Name in SharePoint

$
0
0
Requirement: Get user by display name in SharePoint
We have a CSV file with list of projects and their Team leads information. This list to be updated on a SharePoint list. But the challenge is 'Team Lead' field has display names of users instead of account name (Domain\LoginID). So prior updating to SharePoint list, we need the Login ID of the user from his display name.

Solution: Lets Query Active directory for the given display name to get the user's Login ID.

Prerequisites: You need to have PowerShell module for Active directory installed to use: Import-Module ActiveDirectory! Use PowerShell cmdlet: Add-WindowsFeature RSAT-AD-PowerShell to add AD Module for PowerShell to your server/desktop! Otherwise, you'll get an error message: "Import-Module : The specified module 'ActiveDirectory' was not loaded because no valid module file was found in any module directory"

PowerShell script to get user accounts from display name and update SharePoint List:
Add-PSSnapin Microsoft.SharePoint.PowerShell -ErrorAction SilentlyContinue
Import-Module ActiveDirectory

#Configuration Variables
$SiteURL = "http://intranet.crescent.com/"
$ListName = "Projects"
$FieldName="Team Lead"
$CSVFile ="C:\TeamLeads.csv"

#Custom Function Get User Account from Display Name in AD
Function Get-UserAccount($DisplayName)
{
$UserAccount=Get-ADUser -LDAPFilter "(displayName=$DisplayName)" | Select sAMAccountName
if($UserAccount.sAMAccountName -ne $null)
{
return $UserAccount.sAMAccountName.tostring()
}
else
{
write-host $DisplayName not found in AD! -f Red
return $null
}
}
#Import from CSV file - CSV has Headers ("ProjectName", "TeamLead")
$CSVData = Import-CSV -path $CSVFile

#Get the Target Web & List
$Web = Get-SPWeb -identity $WebURL
$List = $web.Lists[$ListName]

#Iterate through each Row in the CSV file
foreach ($Row in $CSVData)
{
#Filter by Project Name
$Item = $List.Items | Where-Object { $_["Project Name"] -eq $Row.ProjectName }

#If the matching project found
If($Item -ne $null)
{
write-host "Searching for:"$Row.TeamLead
#Get the User Account from Display Name
$UserAccount = Get-UserAccount $Row.TeamLead

#If User account found in AD
if($UserAccount -ne $null)
{
$TeamLead=$web.ensureuser($UserAccount)

#Update Team member field
$item["Team Lead"] = $TeamLead
$item.Update()
Write-Host "Updated Project:"$Row.ProjectName -ForegroundColor Green
}
else
{
write-host "No matching User Account Found for :"$Row.TeamLead -f Red
}
}
else
{
write-host "No matching List Item Found for:"$Row.ProjectName -f Red
}
}
Using SPUtility's ResolvePrincipal Method:Instead of querying Active directory, you can also use SPUtility's ResolvePrincipal method to get a user by display name:
$Web = Get-SPWeb "http://intranet.crescent.com"
$DisplayName="Barunx Romeih"
$Principal = [Microsoft.SharePoint.Utilities.SPUtility]::ResolvePrincipal($web, $DisplayName, "All", "All", $null, $false)
$Principal.LoginName

Fix for SharePoint 2016 Project Templates Missing in Visual Studio 2015

$
0
0
Problem: SharePoint Project Templates are missing in Visual Studio 2015!
sharepoint project templates missing in visual studio
Solution:
We need to install "Microsoft Office Developer Tools for Visual Studio 2015" for SharePoint 2016 project templates in Visual Studio 2015.
Once installed, You should see SharePoint 2016 project templates in Visual Studio 2015!
sharepoint 2016 project templates missing in visual studio 2015

An error occurred while getting information about the user at server : The RPC server is unavailable

$
0
0
Problem:
After installing SharePoint 2016 to setup a new farm, tried running SharePoint 2016 products configuration wizard, and the wizard failed at step 3 saying:
Failed to create the configuration database.
An Exception of type System.InvalidOperationException was thrown. An error occurred while getting information about the user <Farm-Admin> at server <Domain-Name>: The RPC server is unavailable
Failed to create the configuration database. Additional exception information: An error occurred while getting information about the user account at server domain: The RPC server is unavailable
Tried creating SharePoint farm using PowerShell, but got the same results.

Troubleshooting:
  • Verified that the SharePoint server is part of the domain and there is no connectivity, network, firewall related issues.
  • Verified that the setup account is granted with DB_Creator & Security_Admin server roles. 
  • Tried Adding the IP of the DC to HOST file of the Local server
  • Tried ipconfig /flushdns - and ipconfig /registerdns commands as per Technet forums, but didn't help!
Solution: Download and install the KB KB3115299 to fix this issue!

As a general recommendation, download and install all latest patches before you create SharePoint 2016 farm. Download latest patches from Microsoft Technet site:
https://technet.microsoft.com/en-us/library/mt715807(v=office.16).aspx#BKMK_2016

Fix for "Cannot Connect to Database Master at SQL Server at Server Name - The Database might not exist, or the current user does not have permission to connect to it" SharePoint Error

$
0
0
Problem:
When trying to create a new SharePoint farm using PowerShell, the SharePoint 2016 management Shell gave an error message:
New-SPConfigurationDatabase : Cannot connect to database master at SQL server at <SQL-Server-Alias>. The database might not exist, or the current user does not have permission to connect to it.
New-SPConfigurationDatabase : Cannot connect to database master at SQL server at SP16_SQL. The database might not exist, or the current user does not have permission to connect to it.
Tried using SharePoint products configuration wizard as well and got the same issue!

Troubleshooting Checklist:
  1. Check the permissions for the Setup account which you are using to run the wizard or PowerShell. Make sure the setup account is granted with "DB_Creator" and "Security_Admin" Server Roles.
  2. In case of Named instance, it should be "Server\InstanceName". If is is SQL Alias, make sure the alias is properly configured and should be accessible from SharePoint Server. Verify if the SQL Server Alias is created for both 32 and 64-bit! How to Create SQL Server Alias for SharePoint
  3. Check if the SQL Server Service is running on your Database Server. Verify "TCP/IP" protocol is enabled under Network Configuration section of SQL Server Configuration Manager. 
  4. Test the connectivity between SharePoint and SQL Server. Try adding a HOST file entry in your SharePoint Server to point the SQL Server's IP!
  5. Check the firewall rules on SQL Server. If firewall is enabled on SQL Server, Create inbound TCP rule with ports: 1433,2383,2382. and inbound UPD rule with port: 1434.
  6. Double check if you have not fat-fingered User Name or Password!

How to Create SharePoint 2016 Farm using PowerShell

$
0
0
Creating SharePoint 2016 farm using PowerShell is almost as same as in its previous version. In SharePoint 2016 there is an additional parameter -LocalServerRole added as SharePoint 2016 introduced MinRoles.

Pre-Requisites:
  • SQL Server is already installed and ready to use.
  • You have created a Farm account for SharePoint 2016.
  • You have logged in to the server (Setup account) which has Administrator access on all SharePoint servers and DB_Creator, Security_Admin Server roles in SQL Server.

Step 1: Install SharePoint 2016 prerequisites and binaries to each server in your proposed SharePoint 2016 farm.
install sharepoint 2016 farm using powershell
On completing the installation, Uncheck "Run the SharePoint Products Configuration Wizard now" and close the wizard.
create new sharepoint 2016 farm with Powershell

Step 2: PowerShell Script to Create SharePoint 2016 Farm:
Save the below script as "Create-Farm.ps1" or something like that, change the configuration settings parameters as per your environment. Open SharePoint 2016 Management Shell as Administrator, and run the script. You'll see
"The local farm is not accessible. Cmdlets with FeatureDependencyId are not registered." error for the first time, which is quite normal, since we have not created the Farm yet! proceed running the script.

#Configuration Settings 
$DatabaseServer = "SP16-SQL"
$ConfigDatabase = "Intranet_Farm_Config"
$AdminContentDB = "Intranet_Farm_Content_Admin"
$Passphrase = "2FJlsXghFsas5vdJJKEXXwWF"
$FarmAccountName = "Crescent\Sp2016admin"
$ServerRole="SingleServerFarm"

#Get the Farm Account Credentials
$FarmAccount = Get-Credential $FarmAccountName
$Passphrase = (ConvertTo-SecureString $Passphrase -AsPlainText -force)

#Create SharePoint Farm
Write-Host "Creating Configuration Database and Central Admin Content Database..."
New-SPConfigurationDatabase -DatabaseServer $DatabaseServer -DatabaseName $ConfigDatabase -AdministrationContentDatabaseName $AdminContentDB -Passphrase $Passphrase -FarmCredentials $FarmAccount -LocalServerRole $ServerRole

$Farm = Get-SPFarm -ErrorAction SilentlyContinue -ErrorVariable err
if ($Farm -ne $null)
{
Write-Host "Installing SharePoint Resources..."
Initialize-SPResourceSecurity

Write-Host "Installing Farm Services ..."
Install-SPService

Write-Host "Installing SharePoint Features..."
Install-SPFeature -AllExistingFeatures

Write-Host "Creating Central Administration..."
New-SPCentralAdministration -Port 2016 -WindowsAuthProvider NTLM

Write-Host "Installing Help..."
Install-SPHelpCollection -All

Write-Host "Installing Application Content..."
Install-SPApplicationContent

Write-Host "SharePoint 2016 Farm Created Successfully!"
}
Once the script completed successfully, You'll see farm created successfully message. Here I've used "SingleServer" as MinRole. You can adjust it based on your requirement.

Add Additional Servers to the SharePoint 2016 Farm:
Once you are done with the creation of the SharePoint 2016 farm from first server, You can connect rest of the servers to the Farm either using SharePoint products configuration wizard or with PowerShell.

Open SharePoint products configuration wizard and choose "Connect to an existing server farm" and run through the wizard! Select the server MinRole as per your topology.
powershell script to create sharepoint 2016 farm

Join Additional Server to the SharePoint 2016 farm using PowerShell:
If you prefer PowerShell way to add an additional server to the farm, use this PowerShell script.  
$ServerRole="Application"
#"Custom","WebFrontEnd","Application","DistributedCache","SingleServerFarm","Search","ApplicationWithSearch","WebFrontEndWithDistributedCache"

Connect-SPConfigurationDatabase -DatabaseServer $DBServer -DatabaseName $DBName -PassPhrase $SecurePassPhrase -LocalServerRole $ServerRole

Write-Host "Installing SharePoint Resources..."
Initialize-SPResourceSecurity

Write-Host "Installing Farm Services ..."
Install-SPService

Write-Host "Installing SharePoint Features..."
Install-SPFeature -AllExistingFeatures

Write-Host "Installing Help..."
Install-SPHelpCollection -All

Write-Host "Installing Application Content..."
Install-SPApplicationContent

Write-Host "Joined the Server to Farm Successfully!"
If you don't want the server to host Distributed cache, use the parameter: -SkipRegisterAsDistributedCacheHost and the end!
Related post: How to Create SharePoint 2013 farm using PowerShell

Add Site Collection Administrator to All Sites in SharePoint using PowerShell

$
0
0
Site collection administrators have God like Power within a Site Collection in SharePoint 2016. Apart from Primary & Secondary site collection administrators, we can add additional site collection administrator on any SharePoint site collection.

How to Add a Site Collection Administrator in SharePoint 2016?
To Add a Site Collection Administrator follow these steps:
  • Site Settings Gear >> Click on "Site Settings" Menu Item
  • Click on "Site collection administrators link under "Users and Permissions"
  • Enter the New user in Site Collection Administrators Field. Click OK to save your changes.
    PowerShell to Add Site Collection Administrator to All Sites in SharePoint
OK! Now, How about adding a same user as administrator in all site collections?

PowerShell Script to Add a Site Collection Administrator to All Site Collections in SharePoint:
Add-PSSnapin Microsoft.SharePoint.PowerShell -ErrorAction SilentlyContinue

#User Account to add as Site Collection Admin
$UserAccount="Crescent\Salaudeen"

Get-SPSite -Limit "All" | ForEach-Object {
$User = $_.RootWeb.EnsureUser($UserAccount)
if($User.IsSiteAdmin -ne $True)
{
$User.IsSiteAdmin = $True
$User.Update()
Write-Host "Added Site Collection Administrator for Site Collection:" $_.URL -ForegroundColor Green
}
else
{
Write-Host "User is already an Site Collection Administrator for Site Collection:" $_.URL -ForegroundColor Yellow
}
}
You can use Web Application User Policy in Central Admin to give Full control to the Entire web application, instead of adding users into individual site collections!

How to Delete a SharePoint Web Application

$
0
0
SharePoint Web Applications are actually an IIS Containers at top level. Each web application we create from SharePoint, creates respective site in IIS and a content database in SQL Server.

To delete a SharePoint 2016 Web Application,
  • Open SharePoint 2016 Central Administration Site
  • Click on "Manage web applications" link under "Application Management"
  • Select your target web application, and from the ribbon, click on Delete button.
    how to delete a web application in sharepoint 2013
  • Specify whether you would like to delete the content databases and IIS web sites.
    how to delete a sharepoint web application
  • Confirm the Prompt once to delete a web application in SharePoint 2013 and your web application will be deleted momentarily.
This removes the specified web application from the SharePoint farm.

SharePoint delete web application zone:
To delete SharePoint web application extension, From SharePoint Central Administration:
  • Click on Administration Management >> Manage Web Applications
  • Select the web application you wish to remove the extended zone from >> Click on Delete button drop-down and choose "Remove SharePoint from IIS Web Site"
  • Select IIS web site & zone to remove, (make sure its not your "Default" zone!)
  • Set the value for "Delete IIS web sites" to "Yes" and click OK to delete web application zone.
    sharepoint delete web application zone
To delete a SharePoint web application using PowerShell, use this script: Delete SharePoint web application using PowerShell

Rich Text Column in SharePoint Document Library

$
0
0
Problem:
Could not add rich text columns to SharePoint document library, Picture Library and other type of Libraries!

Little background: End user created in document library with type "Description" column as "Multiple lines of text"and expecting this column to is expecting to have the Rich text capability. so, tried editing the column, and found no option to update the type of this column as rich text!
rich text field in sharepoint document library
Troubleshooting:
When you add a Multiple lines of text field to custom list, announcement, tasks, etc, You'll find the Rich text and Enhanced rich text options.
rich text field in sharepoint 2013 document library
However on document libraries, these options seems missing! It just displays a Text area without any formatting! It seems you can't have a rich text column in a document library with SharePoint 2013. So, How do we create Rich Text column for a Document Library?
sharepoint document library rich text field
Solution:
While there are many options to get rich text field in SharePoint 2013 document library like: Custom field types, Content Types, etc, here is the easiest way:
  • Open the site in SharePoint designer, Go to List & Libraries, Click on your library
  • Click on Edit columns under Customization >> Double click on the column which you want enable Rich Text functionality >> select the checkbox which says Rich Text and hit OK and then Save.
sharepoint 2013 document library rich text column
This fixes the problem!

PowerShell way: Setting "RichText" property of the field to True makes SharePoint 2013 document library field rich text enabled!
Add-PSSnapin Microsoft.SharePoint.PowerShell -ErrorAction SilentlyContinue

$SiteURL = "http://intranet.crescent.com/"
$ListName="Documents"
$FieldName="Description" #Internal Name

$Web = Get-SPWeb $SiteURL
$List = $Web.Lists[$ListName]
$Field = $List.Fields[$FieldName]
$Field.RichText = $True
$Field.Update()
sharepoint 2013 document library rich text column
I know this issue exists in all SharePoint versions: Including SharePoint 2007, SharePoint 2010, SharePoint 2013 and even in SharePoint 2016! and Yes, It's weird and I'm not sure why Microsoft hasn't fixed this issue yet!

Shared MinRoles in SharePoint 2016 Feature Pack 1

$
0
0
MinRole was an exciting new feature introduced in SharePoint 2016. In Simple words, based on the MinRole you select during setting up your Farm, SharePoint 2016 automatically takes care of services to run on that server and optimizes it to delivers better performance and reliability. However, the downside is: You need Eight SharePoint servers to have an highly available SharePoint 2016 farm!

So now with Feature pack 1, You can combine Web Front End and Distributed Cache roles - Application and Search roles together! and you just need Four servers to have a highly available SharePoint 2016 farm instead of Eight! Apart from MinRoles enhancement, Feature pack 1 also brings features such as: Central Administration Administrative Actions Logging, Custom Tiles in the SharePoint app launcher, Hybrid Auditing, Hybrid Taxonomy, OneDrive API, etc.

If you have installed Feature pack 1 prior creating SharePoint 2016 farm, this how it looks like on farm creation wizard:
Shared MinRoles in SharePoint 2016 Feature Pack 1
If your SharePoint farm is already created, you can switch the MinRoles from SharePoint 2016 Central Administration site: How to switch Server's MinRole in SharePoint 2016

How to Install Feature Pack 1 in SharePoint 2016?
Download and install November 2016 CU which brings the Feature pack 1 for SharePoint 2016. In addition, If you have language packs installed in your farm, you need to download and install the November 2016 CU Language pack fix (Optionally, you can download and install all other updates from Technet - SharePoint 2016 Updates ,
Don't forget to run SharePoint products configuration wizard once After the installation!

Configure My Sites in SharePoint 2016 - Step by Step Guide

$
0
0
SharePoint 2013 & SharePoint 2016 brought new social networking capabilities to the SharePoint collaboration space. With My Sites users can store documents, keep-up their profile information, news feed, contribute to the organization via blogs, follow activities on sites, people, tags, documents, etc! In short: My Site is the personal space for individual users in an organization. At high level, configuring my sites in SharePoint 2016 involves following steps:
  1. Create a dedicated web application & My Site host site collection
  2. Add a wildcard inclusion managed path to the web application
  3. Enable self-service site creation for the web application
  4. Create a permission policy & Grant everyone permission to My Site web application
  5. Configure My Site settings for the User Profile service application
This article walks you through step by step on creating and configuring My Sites for SharePoint 2016. Although this article aims at SharePoint 2016, same steps are applicable to SharePoint 2013 as well.

Prerequisites:
Before you create My Sites in SharePoint, you need to have the following services properly configured.
  • User Profile Service application - SharePoint My Sites depends on UPS! User Profile Service Application will be used to map the My Sites with the User Profiles.
  • Managed Metadata service application -  My Site users Keywords! so have MMS created  & configured prior setting up My Sites.
  • Search service application - not mandatory, but best practice for people search results!
Also make sure User Profile Service Application, Managed Metadata Service, and Search Service Application are up running and they are connected to your My site web application through service connections in Central Admin.

Step 1: Create New web application for My Sites

Although you can use an existing web application, its a best practice to create a dedicated web application for My sites for reasons like security, performance, etc. So, To start with, lets create a dedicated web application to host our my sites in SharePoint 2016.
  • Open SharePoint 2016 Central Administration site.
  • From Application Management >> Click the Manage Web Applications >> Click New to Create New Web Application.
  • Provide a Name, Port, Host Header, and fill the rest of the new web application form. Hit OK to create new web application.
create my site host sharepoint 2013

Create My Site Host Site Collection in SharePoint 2016:
Once the web application is created, proceed with creating a site collection in the root of the web application.
  • From SharePoint 2016 Central Administration, select Application Management and then select Create site collections
  • Select the Web application we created in the previous step. 
  • Provide a name and description to the site collection.
  • Choose the "My Site Host" as template.
  • Provide a primary site collection administrator.
  • Leave the quota option default.
  • Click the OK button to create the site collection.
create my site host sharepoint 2016

Step 2: Add new managed path to the My Site Web Application:

Managed paths defines the location to host site collections within a web application.In our environment, When SharePoint users provision their My Sites, we would like them to reside at http://mysite.crescent.com/personal/name-of-person/. So, We defined a wildcard managed path for "/personal/" as follows:
  • From SharePoint Central Administration >> Manage Web Application >> Select the My Site Host Web Application you just created.
  • In the ribbon click the Managed Paths button >> Define Managed Paths dialog, Add a new path called "personal" (or "my" or whatever you like!) and make it Wildcard inclusion. Click "Add Path" and then OK once done.
  • Optionally, You can delete the OOTB "Sites" managed path from My site web application.
    sharepoint mysite configuration

Step 3: Enable self-service site creation for the web application

Self-service site creation option enables the end user to create their own My site collection automatically.
  • Select your web application from Manage Web Applications page of Central Administration site.
  • Click on "Self Service Site Creation" button for the web application
    configure my site sharepoint 2013
  • Select "On" for Site Collections and "Prompt users to create a team site" under Start a Site. Provide the managed path we created ("/personal"). Leave the rest default.
    sharepoint 2013 my site step by step

Step 4: Add Permission Level Policy & User Permission to My Site Web Application:

Create a permission level policy for "Create Subsites" permission.
  • Select your My Site web application and Click on the "Permission Policy" button from the ribbon. In the "Manage Permission Policy Levels", click on "Add Permission Policy Level" link.
    sharepoint 2016 mysite web application
  • Under Permissions, scroll to Site Permissions, select the Grant option for "Create Subsites - Create subsites such as team sites, Meeting Workspace sites, and Document Workspace sites". Now, the new permission policy level should appear among other policy levels.
    sharepoint 2016 my sites configuration
  • You need to grant that policy level to all users. Highlight your my site web application, Click on the "User Policy" button from the ribbon.
  • Click on "Add users" link >> Choose All zones and enter the users as "Everyone". Click OK to commit your changes.
    sharepoint 2013 my site creation

Step 5: Configure My Site URL in the User Profile Service Application

Alright, Now you have a My Site Web Application, My Site Host root site collection,  wildcard managed path and self-service enabled for the web application. The only remaining thing would be to set up My Site URL on User Profile Service Application, So that user profile service knows where to create new site collections for user My Sites. 
  • Go to Central Administration >> Application Management >> Manage service applications.
  • Select your User Profile Service Application >> On the Manage User profile service page, in My Site Settings section, click on "Setup My Sites" link.
    sharepoint 2013 my site step by step
  • Enter the My Site Host URL and click Save.
  • Specify other settings like Personal Site Location, Site Naming Format, Secondary Owner, etc.
Each My Site exists as a separate site collection to provide security isolation in SharePoint.

Optional: Set up interval for activity feed timer job
  • Go to the Central Administration >> Monitoring >> Timer Job >> Review job definitions
  • Find "User Profile Service Application - Activity Feed Job", and set up the activity feed sync time according to your needs. By default, its set to run for every 10 Minutes.

Create My Sites in SharePoint 2016:
So, we completed all configurations to get My sites up and running. Lets perform a quick test.
  • Go to any of the SharePoint site in the farm and select "About Me" link from the welcome menu.
  • You will redirected to your personal My Site home page if all fine, Where you can edit Your personal details like profile picture, contact information etc.
    sharepoint my site configuration
My Site Quota & Content Database sizing - Best Practices:
Setup Storage Quota for My Sites! By default, this setting is unlimited. - But you don't want your SQL disks get filled by My Sites, isn't it?

By default, The maximum number of site collections created per content database is 5000. If you are planning for 10,000 My Sites, of 100 GB each you'll need 1000 TB disk space! So, plan to adhere Content database sizing recommendation - 200 GB or less per content database for better performance.

Technet reference: Configure My Sites in SharePoint Server 2016

How to Create State Service Application in SharePoint 2016

$
0
0
Lot of components like InfoPath Form services, Visio, Search Service, workflows, etc relies in State Service Application of SharePoint to store the application sessions. If its not configured already, you'd probably see error messages such as:

"The form cannot be rendered. This may be due to a misconfiguration of the Microsoft SharePoint Server State Service. For more information, contact your server administrator."

How to Create State Service application in SharePoint 2016?
State service application can't be created through new service application page. If you go to New dialog of Central Administration >> Manage Service Application page, you won't find it! here is how to create state service application in SharePoint 2016.
  • Go to Central Administration site >> Click on "Configuration Wizards" link from the bottom
  • In Configuration Wizards page >> click Launch the Farm Configuration Wizard link >> and then click "Start the Wizard".
    sharepoint 2013 configure state service application
  • On the services configuration page, under Services applications section, select the State Service check box (select any other service applications you may require) and click Next.
    create state service application sharepoint 2016 powershell
  • Click on Skip button if you set-up a top-level site collection. If not, go ahead and create it now by clicking OK.
You can verify the new state service application by: going to Central Administration > Application Management > Manage service applications >> State service application should be listed there!
create state service application sharepoint 2016
Once you created state service application, make sure your new state service application is associated with your web application by going to Central Administration >> Manage Web Applications >> Select your web application >> Click on "Service Application Associations" from the ribbon >> and in "Configure Service Application Associations" page, State Services should be selected.

Disadvantage: Configuration wizard creates state service database with GUIDs! E.g. StateService_2349fb4359fb45c9a5255562cb0eab0b. So, to avoid GUIDs in database, Create State service application using PowerShell:

SharePoint 2016: Create State Service Application using PowerShell
Add-PSSnapin Microsoft.SharePoint.PowerShell -ErrorAction SilentlyContinue

#Configuration variables
$ServiceAppName = "State Service Application"
$ServiceAppProxyName ="State Service Application"
$DatabaseName ="SP16_State_Service"

#Create New State Service application
$StateServiceApp = New-SPStateServiceApplication -Name $ServiceAppName

#Create Database for State Service App
$Database = New-SPStateServiceDatabase -Name $DatabaseName -ServiceApplication $StateServiceApp

#Create Proxy for State Service
New-SPStateServiceApplicationProxy -Name $ServiceAppProxyName -ServiceApplication $StateServiceApp -DefaultProxyGroup

Initialize-SPStateServiceDatabase -Identity $Database

Write-host "State Service Application Created Successfully!"

Fix "Unfortunately, help seems to be broken...There aren't any help collections in the current language for the site you're using." Error in SharePoint 2016

$
0
0
Problem: The Help Menu (?) in SharePoint 2016 is not working! On clicking the Help menu, it gets the error message:
"Unfortunately, help seems to be broken... There aren't any help collections in the current language for the site you're using."
Unfortunately, help seems to be broken... There aren't any help collections in the current language for the site you're using.

Troubleshooting Steps: 
  • Enable External Web-based Help in Privacy Options of SharePoint 2016 Central Admin. Navigate to :http://central-admin-url/_admin/privacy.aspx, and Set "Yes" to "Display Help from external web Sites as specified by each Help collection?"
  • Check the help collection status and install if needed: Open SharePoint 2016 Management Shell, Run:
    Get-SPHelpCollection 

    It gave nothing. Guess help collection is not installed. Now, Install help collection by running:
    Install-SPHelpCollection -All 
wait for few minutes to get them installed (10 min!). Try close and reopen the SharePoint 2016 sites! Now, SharePoint 2016 help should work.


Configure Continuous Crawl in SharePoint 2016

$
0
0
SharePoint 2013 introduced a new Search crawl type called "Continuous Crawls" to keep the search results as fresh as possible. If enabled, Continuous crawl automatically starts at predefined intervals - By default the interval for continuous crawls is every 15 minutes.

How continuous crawl works in SharePoint?
Continuous crawl crawls modified content such as content that are added, changed, or deleted since the last crawl. Also, an incremental crawl automatically runs every four hours for content sources that have continuous crawl enabled to re-crawl any items that repeatedly return errors, as continuous crawl does not process or retry items that return errors more than three times.

Continuous crawl vs incremental crawl SharePoint 2016:
Incremental starts at a particular time and repeats regularly at specified schedule. But continuous crawl automatically starts at 15 minutes time intervals by default. Multiple continuous crawls can run at the same time whereas you cannot run multiple full crawls or incremental crawls for the same content source in parallel - you'll have to wait until the existing one completes.
Continuous crawl is available only for SharePoint content sources!

Enable continuous crawl in SharePoint 2013:
Continuous crawl is to be enabled per SharePoint content source. To enable Continuous Crawl, follow these steps:
  • Go to Central Administration >> Service Applications >>Open the Search Service Application
  • Click on the Content Sources link from the left navigation
  • In the content source page, Select the content source such as "Local SharePoint Sites"
  • You will get Edit Content Source page. Scroll down and set "Enable Continuous Crawls" option under the Crawl Schedule section.
  • Click on OK button to save the changes. enable continuous crawl sharepoint 2013
That's all! You are done with enabling Continuous Crawl.

Disable continuous crawl SharePoint 2013
To disable the continuous crawl,
  • Open Search service application >> From the target content source's context menu, choose "Disable Continuous Crawl".
  • Confirm the prompt to disable continuous crawl. This will disable the continuous crawl.
  • Once its disable, SharePoint 2013 automatically triggers an incremental crawl.
disable continuous crawl sharepoint 2013
SharePoint 2016 search continuous crawl performance: The Crawler Impact Rules controls the maximum number of requests that can be executed by the server (By default its 8).

Technet reference on Manage continuous crawls in SharePoint Server 2016: https://technet.microsoft.com/en-us/library/jj219802(v=office.16).aspx

Open this link on a phone - New Feature in SharePoint 2016

$
0
0
SharePoint 2016 introduced a new feature to open links on your phone or tablet using QR codes. Here is how this feature works:
  • Go to any of your SharePoint 2016 library such as document library. From the document's context menu, click on the tiny phone icon.
    Open this link on a phone Feature in SharePoint 2016
  • This takes you to a page with QR code generated for the document URL. Open documents with QR code in sharepoint 2016
  • From your phone, use QR reader app to read the QR code and navigate to the document URL.

Find and Replace User ID in SharePoint InfoPath Forms using PowerShell

$
0
0
Requirement: Replace User IDs in InfoPath Forms.

Little background: A particular user's User account changed in Active directory and in SharePoint we ran Move-SPUser cmdlet to accommodate the user's SAM account name change. However, There are many InfoPath form libraries with bunch of InfoPath forms in it - with old user id. Of course, Move-SPUser has no effect on InfoPath Forms!

PowerShell script to search and replace user id in InfoPath XML Forms:
Add-PSSnapin Microsoft.SharePoint.PowerShell -ErrorAction SilentlyContinue

#Configuration Parameters
$SiteCollURL="http://intranet.crescent.com"

#Old and New User IDs - CASE SENSITIVE!
$OldUserID="<pc:AccountId>i:0#.w|Crescent\JohnA</pc:AccountId>"
$NewUserID="<pc:AccountId>i:0#.w|Crescent\JonhAbraham</pc:AccountId>"

#Get all webs in the site collection
$WebsColl = Get-SPSite $SiteCollURL | Get-SPWeb -Limit All

#Iterate through each web
foreach($web in $WebsColl)
{
Write-host "Processing web:"$web.Url

#Get all InfoPath Form Libraries in the web
$InfoPathLibs = $web.lists | where { $_.BaseType -eq "DocumentLibrary" -and $_.BaseTemplate -eq "XMLForm"}

#Loop through each InfoPath form library and Forms (.xml)
Foreach($Library in $InfoPathLibs)
{
Foreach($Item in $Library.Items)
{
# Load the contents of the InfoPath Form
$File = $Item.File
$Data = [System.Text.Encoding]::ASCII.GetString($File.OpenBinary())

#Check if the File has Old ID
if($data.Contains($OldUserID))
{
$Data = $Data.Replace($OldUserID, $NewUserID)
$Data = $Data.Replace("???","") #special fix!
$File.SaveBinary([System.Text.Encoding]::ASCII.GetBytes($Data))

Write-host "InfoPath XML File updated at $($web.URL)/$($Item.File.URL)"
}
}
}
}

Style SharePoint 2016 List View Web Part with Custom CSS

$
0
0
Requirement: Add a custom style to SharePoint 2016's standard list view web part to make it look like a dashboard!

By default, SharePoint list view web part looks dull, isn't it?
sharepoint 2013 list view web part css
So, lets add some custom CSS to the SharePoint 2016 list view, to make it look like a dashboard! How to add CSS to listview? Simple,
  • Click on Site Settings gear >> Edit Page
  • Insert web part >> Choose "Script Editor" under "Media and Content"
  • Place the below CSS code in it. Save and close!
CSS to Brand SharePoint List view:
<style type="text/css">

/* List View Header */
.ms-listviewtable > thead > tr > th {
background-color: #5B9BD5;
}

/* List view Header Text color*/
.ms-vh-div, .ms-headerSortTitleLink {
color:white!important; font-weight: bold;
}

/* background color for alternate rows */
.ms-listviewtable > tbody > tr.ms-alternating {
background: #DDEBF7
}
</style>

Here is the output of the branded List view web part:
sharepoint 2013 add css to listview
Same CSS works for SharePoint 2013 as well.

SharePoint Online: Site Users and Groups Report using PowerShell

$
0
0
Requirement: Generate a report with all site groups and members of each group of a SharePoint online site collection.

Get all Site Groups and Members of Each group:
#Variables for processing
$AdminURL = "https://crescent-admin.sharepoint.com/"
$AdminName = "spadmin@crescent.com"
$SiteURL="https://crescent.sharepoint.com/sites/sales"

#User Names Password to connect
$Password = Read-host -assecurestring "Enter Password for $AdminName"
$Credential = new-object -typename System.Management.Automation.PSCredential -argumentlist $AdminName, $Password

#Connect to SharePoint Online
Connect-SPOService -url $AdminURL -credential $Credential

#Get all Site groups
$SiteGroups = Get-SPOSiteGroup -Site $SiteURL

#Get Members of each group
foreach($Group in $SiteGroups)
{
Write-host "Group:"$Group.Title
Get-SPOSiteGroup -Site $SiteURL -Group $Group.Title | Select-Object -ExpandProperty Users
}
To get all users of the site collection, use:
Get-SPOUser -Site $siteURL | select DisplayName, LoginName | Where { $_.LoginName -like "*@crescent.com"}
Viewing all 1058 articles
Browse latest View live


<script src="https://jsc.adskeeper.com/r/s/rssing.com.1596347.js" async> </script>