Quantcast
Channel: SharePoint Diary
Viewing all 1058 articles
Browse latest View live

SharePoint Online: Create a Folder using PowerShell-CSOM

$
0
0
Create folder in SharePoint Online document library
Folders are used to organize files in SharePoint, similar to what we do in our computer. You can add a folder to SharePoint online list or library by following below steps.

How to Create a folder in SharePoint Online?
To create a folder in SharePoint online, Follow these steps:
  • Login to your SharePoint online site, Navigate to your document library in which you want to create a folder.
  • On the ribbon, click on Files tab (Items tab, if its a list, instead of library)
  • Click New Folder
    create new folder sharepoint online
  • In the Create A New Folder window, enter the folder name and click Save!
    sharepoint online create folder powershell
Now you can see your new folder in the Document Library. Please note, creating a folder is less preferred compared with adding a meta-data column to classify data in SharePoint!

How to Enable the "New Folder" option?
What if the New Folder option is grayed out? If the New Folder button isn't available, you can enable it.
  • Navigate to the List or Library setting >> click Advanced settings.
  • In the Folder section, Click "Yes" option to Make "New Folder" option available.
  • Click OK to save your changes.
Now, you should get "New folder" in the SharePoint list 

SharePoint Online: Create Folder using PowerShell-CSOM: 
Lets create folder in SharePoint document library using PowerShell.
#Load SharePoint CSOM Assemblies
Add-Type -Path "C:\Program Files\Common Files\Microsoft Shared\Web Server Extensions\16\ISAPI\Microsoft.SharePoint.Client.dll"
Add-Type -Path "C:\Program Files\Common Files\Microsoft Shared\Web Server Extensions\16\ISAPI\Microsoft.SharePoint.Client.Runtime.dll"

##Variables for Processing
$SiteUrl = "https://crescent.sharepoint.com/"
$ListName="Shared Documents"
$FolderName="Reports"
$UserName="salaudeen@crescent.com"
$Password ="Password Goes here"

#Setup Credentials to connect
$Credentials = New-Object Microsoft.SharePoint.Client.SharePointOnlineCredentials($UserName,(ConvertTo-SecureString $Password -AsPlainText -Force))

Try {
#Set up the context
$Context = New-Object Microsoft.SharePoint.Client.ClientContext($SiteUrl)
$Context.Credentials = $credentials

#Get the List Root Folder
$ParentFolder=$Context.web.GetFolderByServerRelativeUrl($ListName)

#Create New Folder
$Folder = $ParentFolder.Folders.Add($FolderName)
$ParentFolder.Context.Load($Folder)
$ParentFolder.Context.ExecuteQuery()

Write-host "New Folder Created Successfully!" -ForegroundColor Green
}
catch {
write-host "Error: $($_.Exception.Message)" -foregroundcolor Red
}

Create Sub-Folder at given path using PowerShell:
We can add a folder or sub-folder to any existing library or folder using PowerShell.
    #Set up the context
$Context = New-Object Microsoft.SharePoint.Client.ClientContext($SiteUrl)
$Context.Credentials = $credentials

#Create New Sub-Folder
$Folder=$Context.Web.Folders.Add("Shared Documents/Reports/V2")
$Context.Load($Folder)
$Context.ExecuteQuery()

Write-host "Folder Created at: " $Folder.ServerRelativeUrl -ForegroundColor Green


SharePoint Online: Create a Document Library or List with New Experience UI using PowerShell-CSOM

$
0
0
The new list and library experience in SharePoint Online improves the user experience by providing many features such as navigation, fast response, mobile UI, easier to use, etc. You can switch between classic & new experiences anytime. Here is the PowerShell-CSOM script to create a document library in SharePoint online with new experience UI.

PowerShell Script to create a document library in new experience UI:
#Load SharePoint CSOM Assemblies
Add-Type -Path "C:\Program Files\Common Files\Microsoft Shared\Web Server Extensions\16\ISAPI\Microsoft.SharePoint.Client.dll"
Add-Type -Path "C:\Program Files\Common Files\Microsoft Shared\Web Server Extensions\16\ISAPI\Microsoft.SharePoint.Client.Runtime.dll"

##Variables for Processing
$SiteUrl = "https://crescent.sharepoint.com/Projects"
$UserName="salaudeen@crescent.com"
$Password ="Password goes here"

#Setup Credentials to connect
$Credentials = New-Object Microsoft.SharePoint.Client.SharePointOnlineCredentials($UserName,(ConvertTo-SecureString $Password -AsPlainText -Force))

Try {
#Set up the context
$Context = New-Object Microsoft.SharePoint.Client.ClientContext($SiteUrl)
$Context.Credentials = $credentials

#Create new document library
$ListInfo = New-Object Microsoft.SharePoint.Client.ListCreationInformation
$ListInfo.Title = "Project Documents"
$ListInfo.TemplateType = 101 #Document Library
$List = $Context.Web.Lists.Add($ListInfo)

#Set "New Experience" as list property
$List.ListExperienceOptions = "NewExperience" #Or ClassicExperience
$List.Update()
$Context.ExecuteQuery()

Write-host "New Document Library Created!" -ForegroundColor Green
}
catch {
write-host "Error: $($_.Exception.Message)" -foregroundcolor Red
}

This creates a new library "Project Documents" in modern new experience UI.
sharepoint online new list experience

SharePoint Online: How to Change List to New Experience?

$
0
0
SharePoint Online's new list experience provides faster and easier user interface to lists and libraries. You can switch between classic & new experiences in SharePoint online by simply changing list settings.

To change list or library to new modern user interface:
  • Go to List or Library settings >> Click on "Advanced Settings"
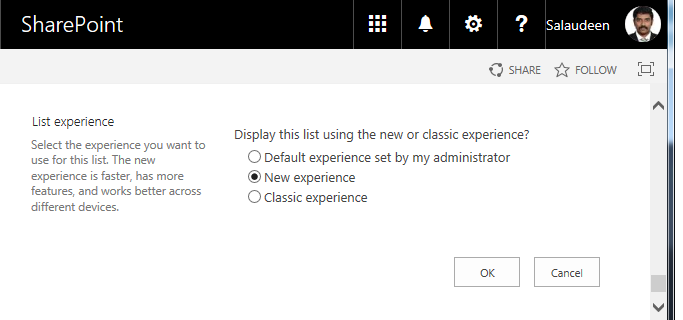
  • Scroll down to the bottom, and from "List experience" section, Select "New experience" option and hit OK.
This changes the list UI to new experience in SharePoint online, From:
To: New list experience in SharePoint online


How about setting the default option for all New Lists?
To set list experience for new lists, you can specify this option globally using using SharePoint Admin Center. Here is how:
  • Navigate to your SharePoint Admin Center(typically: https://YOURCOMPANY-admin.sharepoint.com/)
  • Click on "Settings" from the Left navigation
  • On the Setting page, under "SharePoint list and libraries experience" section, Select the appropriate option, such as : Classic experience or New experience (auto detect).

PowerShell script to Switch UI experience of a List or Library in SharePoint Online:
On any existing SharePoint online lists and libraries, you can switch the UI experience either using SharePoint web UI method as explained above or with below PowerShell script. 

#Load SharePoint CSOM Assemblies
Add-Type -Path "C:\Program Files\Common Files\Microsoft Shared\Web Server Extensions\16\ISAPI\Microsoft.SharePoint.Client.dll"
Add-Type -Path "C:\Program Files\Common Files\Microsoft Shared\Web Server Extensions\16\ISAPI\Microsoft.SharePoint.Client.Runtime.dll"

##Variables for Processing
$SiteUrl = "https://crescent.sharepoint.com/sites/sales"
$ListName= "Project Documents"
$UserName="salaudeen@crescent.com"
$Password ="Password goes here"

#Setup Credentials to connect
$Credentials = New-Object Microsoft.SharePoint.Client.SharePointOnlineCredentials($UserName,(ConvertTo-SecureString $Password -AsPlainText -Force))

Try {
#Set up the context
$Context = New-Object Microsoft.SharePoint.Client.ClientContext($SiteUrl)
$Context.Credentials = $credentials

#Get the document library
$List = $Context.web.Lists.GetByTitle($ListName)
#Set list properties
$List.ListExperienceOptions = "NewExperience" #ClassicExperience or Auto
$List.Update()

$context.ExecuteQuery()

Write-host "UI experience updated for the list!" -ForegroundColor Green
}
catch {
write-host "Error: $($_.Exception.Message)" -foregroundcolor Red
}

SharePoint online new experience not working?
In some cases, even after you changed the list experience settings from list settings, you will be still getting the same UI. This is because of the browser cookie! To fix the problem, simple clear your browse cookie and reload the page. (To be specific, the cookie is called "spInu" with a value of 0!)

Create User Profile Service Application using PowerShell in SharePoint 2016

$
0
0
We need User Profile Service Application to consume social features in SharePoint 2016 such as My Sites, User profiles, etc. This PowerShell script creates User Profile Service Application in SharePoint 2016.
Prerequisite: Create my site host prior creating user profile service application.

PowerShell to create user profile service application in SharePoint 2016
Add-PSSnapin Microsoft.SharePoint.PowerShell -ErrorAction SilentlyContinue

#Configuration Parameters
$ServiceAppName = "User Profile Service Application"
$ServiceAppProxyName = "User Profile Service Application Proxy"
$AppPoolAccount = "Crescent\SP16_Pool"
$AppPoolName = "Service Application App Pool"
$DatabaseServer ="SP16-SQL"
$UserProfileDB = "Farm_Profile_DB"
$UserProfileSyncDB = "Farm_Profile_Sync_DB"
$UserProfileSocialDB = "Farm_Profile_Social_DB"
$MySiteHostLocation="http://mysite.crescent.com/"

Try {
#Set the Error Action
$ErrorActionPreference = "Stop"

#Check if Managed account is registered already
Write-Host -ForegroundColor Yellow "Checking if the Managed Accounts already exists"
$AppPoolAccount = Get-SPManagedAccount -Identity $AppPoolAccount -ErrorAction SilentlyContinue
if($AppPoolAccount -eq $null)
{
Write-Host "Please Enter the password for the Service Account..."
$AppPoolCredentials = Get-Credential $AppPoolAccount
$AppPoolAccount = New-SPManagedAccount -Credential $AppPoolCredentials
}

#Check if the application pool exists already
Write-Host -ForegroundColor Yellow "Checking if the Application Pool already exists"
$AppPool = Get-SPServiceApplicationPool -Identity $AppPoolName -ErrorAction SilentlyContinue
if ($AppPool -eq $null)
{
Write-Host -ForegroundColor Green "Creating Application Pool..."
$AppPool = New-SPServiceApplicationPool -Name $AppPoolName -Account $AppPoolAccount
}

#Check if the Service application exists already
Write-Host -ForegroundColor Yellow "Checking if User Profile Service Application exists already"
$ServiceApplication = Get-SPServiceApplication -Name $ServiceAppName -ErrorAction SilentlyContinue
if ($ServiceApplication -eq $null)
{
Write-Host -ForegroundColor Green "Creating User Profile Service Application..."
$ServiceApplication = New-SPProfileServiceApplication -Name $ServiceAppName -ApplicationPool $AppPoolName -ProfileDBName $UserProfileDB -ProfileSyncDBName $UserProfileSyncDB -SocialDBName $UserProfileSocialDB -MySiteHostLocation $MySiteHostLocation
}
#Check if the Service application Proxy exists already
$ServiceAppProxy = Get-SPServiceApplicationProxy | where { $_.Name -eq $ServiceAppProxyName}
if ($ServiceAppProxy -eq $null)
{
#Create Proxy
$ServiceApplicationProxy = New-SPProfileServiceApplicationProxy -Name $ServiceAppProxyName -ServiceApplication $ServiceApplication -DefaultProxyGroup
}
#Start service instance
$ServiceInstance = Get-SPServiceInstance | Where-Object { $_.TypeName -eq "User Profile Service" }

#Check the Service status
if ($ServiceInstance.Status -ne "Online")
{
Write-Host -ForegroundColor Yellow "Starting the User Profile Service Instance..."
Start-SPServiceInstance $ServiceInstance
}

Write-Host -ForegroundColor Green "User Profile Service Application created successfully!"
}
catch {
Write-Host $_.Exception.Message -ForegroundColor Red
}
finally {
#Reset the Error Action to Default
$ErrorActionPreference = "Continue"
}
Once the script execution completed successfully, you can go to Central Administration >> Application Management >> Service Application Page to verify user profile service application is created.
sharepoint 2016 create user profile service application powershell

How to Change Default Content Access (Crawl) Account in SharePoint 2016 Search

$
0
0
Once we complete creating Search Service Application, The next step is to configure default content access account, which is used by Crawl Component to crawl the content sources like SharePoint content. This crawl account will have read access to all your search content sources such as SharePoint Web Applications.

You can change search crawl account from SharePoint Central Administration as:
  • SharePoint Central Admin >> Application Management >> Manage Service applications
  • From the service applications list, Select the Search service application
  • In the Search Administration page, click on the account already configured for Default content access account.
  • Provide the new crawl account user name and password.
    How to Change Default Content Access Crawl Account in SharePoint 2016 Search

PowerShell to Change Search Crawl Account in SharePoint 2016:
If you want to change the default content access account for SharePoint 2013 search service application using PowerShell, use this script:

Add-PSSnapin Microsoft.SharePoint.Powershell -ErrorAction SilentlyContinue

#Set Default content access account
$AccountID = "Crescent\SP16_Crawl"
$Password = Read-Host -AsSecureString

#Get Search service application
$SearchInstance = Get-SPEnterpriseSearchServiceApplication

#Set default content access account for crawl
Set-SPEnterpriseSearchServiceApplication -Identity $SearchInstance -DefaultContentAccessAccountName $AccountID -DefaultContentAccessAccountPassword $Password

How to Add Administrator & Grant Permission to Service Application using PowerShell

$
0
0
Often there are situations when you may need to add administrators or grant permissions to SharePoint service applications. Say, the setup account-farm account isn't added as service application administrator or not having permission to the service application.

How to Add Service Application Administrator in SharePoint 2016?
To add a  Service Application administrator, navigate to:
  • SharePoint 2016 Central Admin >> Manage Service Applications
  • From the list of available Service Applications, select the target service application such as "Managed Metadata service application".sharepoint 2016 service application add administrator grant permission
  • In the Ribbon click on "Administrators" button. Enter the user name that you wish to have admin rights to SharePoint service application >> Click on "Add" button.
  • From the permissions section, select "Full Control". Commit your changes by clicking the OK button.
    powershell to add service application administrator in SharePoint 2016
  • Similarly, to add permission, Click on "Permissions" button from the ribbon, Enter the user and add appropriate permission to the user.
    How to grant permission to service application using PowerShell

When these things are repeated, Lets use PowerShell to add administrator and grant permissions to service applications, say: Managed Metadata Service Application.

PowerShell to Add Service Application Administrator 
Add-PSSnapin Microsoft.SharePoint.PowerShell -ErrorAction SilentlyContinue

#Configuration Variables
$ServiceAppName="Managed Metadata Service Application"
$UserAccount="Crescent\Salaudeen"
$AccessRights = "Full Control"

#Get the service application
$ServiceApp = Get-SPServiceApplication -Name $ServiceAppName
#Convert user account to claims
$UserPrincipal = New-SPClaimsPrincipal -Identity $UserAccount -IdentityType WindowsSamAccountName

#Get the Service Application Security collection
$ServiceAppSecurity = Get-SPServiceApplicationSecurity $ServiceApp -Admin
#Add user & rights to the collection
Grant-SPObjectSecurity $ServiceAppSecurity -Principal $UserPrincipal -Rights $AccessRights

#Apply the Security changes
Set-SPServiceApplicationSecurity $ServiceApp $ServiceAppSecurity -Admin

Add Permission to Service Application using PowerShell
How about granting permission to service application? Well, the similar code goes for providing permission to service application, except the "-Admin" switch. Here is an example:
Add-PSSnapin Microsoft.SharePoint.PowerShell -ErrorAction SilentlyContinue

#Configuration Variables
$ServiceAppName="Managed Metadata Service Application"
$UserAccount="Crescent\Salaudeen"
$AccessRights = "Full Access to Term Store"

#Get the service application
$ServiceApp = Get-SPServiceApplication -Name $ServiceAppName
#Convert user account to claims
$UserPrincipal = New-SPClaimsPrincipal -Identity $UserAccount -IdentityType WindowsSamAccountName

#Get the Service Application Security collection
$ServiceAppSecurity = Get-SPServiceApplicationSecurity $ServiceApp
#Add user & rights to the collection
Grant-SPObjectSecurity $ServiceAppSecurity -Principal $UserPrincipal -Rights $AccessRights

#Apply the Security changes
Set-SPServiceApplicationSecurity $ServiceApp $ServiceAppSecurity

Add User Profile Service Application Administrator and Grant Permissions: 
Lets combine both the scripts to add administrator and set permission to user profile service application in SharePoint 2016 to avoid "No User Profile Application available to service the request. Contact your farm administrator." error.  
Add-PSSnapin Microsoft.SharePoint.PowerShell -ErrorAction SilentlyContinue

#Configuration Variables
$UserAccount="Crescent\Salaudeen"
$AccessRights = "Full Control"

#Convert user account to claims
$UserPrincipal = New-SPClaimsPrincipal -Identity $UserAccount -IdentityType WindowsSamAccountName

#Get the user profile service application
$ServiceApp = Get-SPServiceApplication | ? { $_.TypeName -eq "User Profile Service Application" }

Write-host "Adding Administrator to User Profile Service Application..."
#Get the Service Application Administrators Security collection
$ServiceAppAdmins = Get-SPServiceApplicationSecurity $ServiceApp -Admin
#Add user to the collection
Grant-SPObjectSecurity $ServiceAppAdmins -Principal $UserPrincipal -Rights $AccessRights
#Apply the new Security to service application
Set-SPServiceApplicationSecurity $ServiceApp $ServiceAppAdmins -Admin

Write-host "Granting permission to User Profile Service Application..."
#Get the Service Application Permissions Security collection
$ServiceAppPermission = Get-SPServiceApplicationSecurity $ServiceApp
#Add user & rights to the collection
Grant-SPObjectSecurity $ServiceAppPermission -Principal $UserPrincipal -Rights $AccessRights
#Apply the Security changes
Set-SPServiceApplicationSecurity $ServiceApp $ServiceAppPermission

Get User Department, Job Title from User Information List of SharePoint using PowerShell

$
0
0
Requirement: From a business requirement, need to generate a report for department wise users of a Intranet portal site. Say, How many users from "Sales" department have access to SharePoint Intranet portal?

Solution: Either query user profiles store or user information list to get the user profile properties such as Department, Job title, etc.


PowerShell to query User Information List in SharePoint:
Add-PSSnapin Microsoft.SharePoint.PowerShell -ErrorAction SilentlyContinue

#Configuration Parameters
$WebURL="http://portal.crescent.com/"
$ReportLocation = "C:\UserAnalysisRpt.csv"

#Get the Web
$Web = Get-SPWeb $WebURL

#Get User information list
$UserInfoList = $Web.SiteUserInfoList

#Get all Groups of the web and Iterate through
Foreach ($Group in $Web.Groups)
{
#Get Permission Levels Applied to the Group
$RoleAssignment = $Web.RoleAssignments.GetAssignmentByPrincipal($Group)

$RoleDefinitionNames=""
foreach ($RoleDefinition in $RoleAssignment.RoleDefinitionBindings)
{
$RoleDefinitionNames+=$RoleDefinition.Name+";"
}
#Array to Hold Result - PSObjects
$ResultCollection = @()

"Group Name: $($Group.name) : Permissions: $($RoleDefinitionNames)" >> $ReportLocation
#Iterate through Each User in the group
foreach ($User in $Group.users)
{
#Get the User details from UIL
$UserInfo = $UserInfoList.GetItemById($User.ID)
$Department = $UserInfo['Department']
$JobTitle = $UserInfo["JobTitle"]

#Send the output the report file
$User.name + "`t" + $user.Email + "`t" + $Department + "`t" + $JobTitle >> $ReportLocation
}
}
Write-host "User analysis data has been Exported to $ReportLocation"

If you want to go for querying user profile properties from profile store, use my another post: Query User Profile Properties using PowerShell in SharePoint 2013

SharePoint Online: Update Created By / Modified By, Created At / Modified At Field values using PowerShell CSOM

$
0
0
At times, you may have to create list items or set existing item's metadata fields such as Created by, Modified by, Created at, Modified values to a specific user - time stamp. Say, You are importing or migrating data from a network file share to SharePoint online and you want to keep these metadata as same as the source content.

Because, SharePoint doesn't let you to set these values from web user interface, we've to use PowerShell. Here is my PowerShell script to change the details of who created an item, modified it and when they created and modified it.

This script sets system fields (created, created by, modified, modified by) for a specific item in the list/library. Set the values in variables section appropriately and run the script.

PowerShell script to update Created by, Modified By, Created at, Modified at field values:
This PowerShell script sets item's metadata field values in SharePoint online
#Load SharePoint CSOM Assemblies
Add-Type -Path "C:\Program Files\Common Files\Microsoft Shared\Web Server Extensions\16\ISAPI\Microsoft.SharePoint.Client.dll"
Add-Type -Path "C:\Program Files\Common Files\Microsoft Shared\Web Server Extensions\16\ISAPI\Microsoft.SharePoint.Client.Runtime.dll"

##Variables for Processing
$SiteUrl = "https://crescent.sharepoint.com/sites/sales/"
$ListName= "Projects"
$ID=6
$UserID="Salaudeen@crescent.com"
$TimeStamp = "2015/12/01 02:10:00 AM"

#Get Credentials to connect
$Cred = Get-Credential
$Credentials = New-Object Microsoft.SharePoint.Client.SharePointOnlineCredentials($Cred.Username, $Cred.Password)

#Setup the context
$Ctx = New-Object Microsoft.SharePoint.Client.ClientContext($SiteUrl)
$Ctx.Credentials = $Credentials

#Get the User
$User = $Ctx.Web.EnsureUser($UserID)
$ctx.Load($user)

#Get the list Item
$List=$Ctx.Web.Lists.GetByTitle($ListName)
$ListItem = $List.GetItemById($ID)
$Ctx.Load($ListItem)

#Update Created by & Modified By
$ListItem["Author"] = $User
$ListItem['Editor'] = $User

#Set Created on & Modified on Time values
$ListItem["Created"] = $TimeStamp
$ListItem["Modified"] = $TimeStamp

#Update List item
$ListItem.Update()
$ctx.ExecuteQuery()

Write-host "Metadata values updated Successfully!" -f Green
and the result goes here:
sharepoint online powershell to update created by modified by created at modified at values
For Server side PowerShell script, refer: Update "Created By", "Last Modified" Metadata Fields of a List Item using PowerShell

SharePoint Online: How to Checkout a Document using Powershell CSOM

$
0
0
Checking out a document in SharePoint ensures that you are the only one making edits to it. The purpose of checkout is to prevent conflicts in a collaboration environment where multiple people may try to edit the same document or list item at the same time. So, When a file is checked out to you, you are the only one allowed making changes to it. The file will remain locked until you release it.

When you're finished making edits, check in the document so that other users can view the changes you made. The option of "Require checkout" can be turned ON or OFF from document library settings.

How to Check out a document?
  • Navigate to the document library in your SharePoint or SharePoint online site. Select the document which you would like to checkout. 
  • On the ribbon, click on Files tab, Click on "Check Out" button. (or you can checkout from the item's context menu)
  • Once the document is checked out, you'll get a tiny outward-pointing  green arrow, in the document icon.
how to checkout a file in sharepoint online powershell


PowerShell script to checkout a document in SharePoint online:
#Load SharePoint CSOM Assemblies
Add-Type -Path "C:\Program Files\Common Files\Microsoft Shared\Web Server Extensions\16\ISAPI\Microsoft.SharePoint.Client.dll"
Add-Type -Path "C:\Program Files\Common Files\Microsoft Shared\Web Server Extensions\16\ISAPI\Microsoft.SharePoint.Client.Runtime.dll"

#Function to Check if file exists in given URL
Function Checkout-Document($SiteURL, $FileRelativeURL, $Credentials)
{

#Setup the context
$Ctx = New-Object Microsoft.SharePoint.Client.ClientContext($SiteURL)
$Ctx.Credentials = $Credentials

Try {
#Try to get the File from URL
$File = $Ctx.web.GetFileByServerRelativeUrl($FileRelativeURL)
$Ctx.Load($File)
$Ctx.ExecuteQuery()

#check if the file is already checked out
If($File.CheckOutType -ne "None")
{
write-host "File is already checked-out!" -f Yellow
break
}
#Checkout the document
$File.CheckOut()
$Ctx.ExecuteQuery()

write-host "Document has been checked-out successfully!" -f Green
}
Catch {
write-host -f Red "Error checking out Document!" + $_.Exception.Message
}
}

#Set Variables for Site URL, List Name and Column Name
$SiteURL= "https://crescent.sharepoint.com/sites/sales/"
$FileRelativeURL="/sites/Sales/Shared%20Documents/Legal%20Template.xsn"

#Setup Credentials to connect
$Cred = Get-Credential
$Cred = New-Object Microsoft.SharePoint.Client.SharePointOnlineCredentials($Cred.UserName,$Cred.Password)

#Call the function to Checkout file
Checkout-Document -SiteURL $SiteURL -FileRelativeURL $FileRelativeURL -Credentials $Cred

SharePoint Online: Checkout Document using PowerShell CSOM:
Alternatively, instead of document URL, some times you may have to checkout from the Item ID. Here is the script to checkout a document from the item id.
#Load SharePoint CSOM Assemblies
Add-Type -Path "C:\Program Files\Common Files\Microsoft Shared\Web Server Extensions\16\ISAPI\Microsoft.SharePoint.Client.dll"
Add-Type -Path "C:\Program Files\Common Files\Microsoft Shared\Web Server Extensions\16\ISAPI\Microsoft.SharePoint.Client.Runtime.dll"

#Set Variables for Site URL, Library Name and Item ID
$SiteURL= "https://crescent.sharepoint.com/sites/sales/"
$LibraryName="Documents"
$ItemID="4"

#Setup Credentials to connect
$Cred = Get-Credential
$Cred = New-Object Microsoft.SharePoint.Client.SharePointOnlineCredentials($Cred.UserName,$Cred.Password)

#Setup the context
$Ctx = New-Object Microsoft.SharePoint.Client.ClientContext($SiteURL)
$Ctx.Credentials = $Cred

#Get the web, List, Item adn File
$Web=$Ctx.Web
$List=$web.Lists.GetByTitle($LibraryName)
$Item=$list.GetItemById($ItemID)
$File=$Item.File

#Check out the file
$File.CheckOut()
$Ctx.ExecuteQuery()

SharePoint Online: How to Check in a Document using PowerShell CSOM

$
0
0
Check out-Check in feature in SharePoint avoids conflicts in typical collaboration environments, where multiple users may try to edit the same document at the same time. You must check in the document back in order to make the changes available to all other users, Even if the document is saved.

How to Check-in a document in SharePoint online?
To check in a checked out file, follow these steps in SharePoint online.
  • Navigate to the document library where the checked out file is saved. Select the document(s) to Check in. 
  •  From the ribbon, click the Files tab, click on "Check In" from the "Open & Check Out" group.
  • In the Check In dialog box, click No for "keep the file checked out after checking it in" option.
  • Click OK.
If you Checking in a document but retain it to checkout, other users get to see your latest changes while you may continue to work on the rest of the changes to your document.
how to checkin a document in sharepoint online powershell

SharePoint online PowerShell to check in a document
Here is the PowerShell way of check in file in SharePoint Online.
#Load SharePoint CSOM Assemblies
Add-Type -Path "C:\Program Files\Common Files\Microsoft Shared\Web Server Extensions\16\ISAPI\Microsoft.SharePoint.Client.dll"
Add-Type -Path "C:\Program Files\Common Files\Microsoft Shared\Web Server Extensions\16\ISAPI\Microsoft.SharePoint.Client.Runtime.dll"

#Function to Check if file exists in given URL
Function Checkin-Document($SiteURL, $FileRelativeURL, $Credentials)
{

#Setup the context
$Ctx = New-Object Microsoft.SharePoint.Client.ClientContext($SiteURL)
$Ctx.Credentials = $Credentials

Try {
#Try to get the File from URL
$File = $Ctx.web.GetFileByServerRelativeUrl($FileRelativeURL)
$Ctx.Load($File)
$Ctx.ExecuteQuery()

#check if the file is checked out
If($File.CheckOutType -eq "None")
{
write-host "Document is not checked out Already!" -f Red
break
}
#Checkin the document
$File.CheckIn("",[Microsoft.SharePoint.Client.CheckinType]::MajorCheckIn)
#Checkin Types: MajorCheckIn,MinorCheckIn,OverwriteCheckIn

$Ctx.ExecuteQuery()

write-host "Document has been checked-in successfully!" -f Green
}
Catch {
write-host -f Red "Error checking-in Document!" $_.Exception.Message
}
}

#Set Variables for Site URL, List Name and Column Name
$SiteURL= "https://crescent.sharepoint.com/sites/sales/"
$FileRelativeURL="/sites/Sales/Shared%20Documents/Legal%20Template.xssn"

#Setup Credentials to connect
$Cred = Get-Credential
$Cred = New-Object Microsoft.SharePoint.Client.SharePointOnlineCredentials($Cred.UserName,$Cred.Password)

#Call the function to Checkin file
Checkin-Document -SiteURL $SiteURL -FileRelativeURL $FileRelativeURL -Credentials $Cred

The above script gets the file from URL. Alternatively, you can get file from Item ID and check in. Here is an another example.
#Load SharePoint CSOM Assemblies
Add-Type -Path "C:\Program Files\Common Files\Microsoft Shared\Web Server Extensions\16\ISAPI\Microsoft.SharePoint.Client.dll"
Add-Type -Path "C:\Program Files\Common Files\Microsoft Shared\Web Server Extensions\16\ISAPI\Microsoft.SharePoint.Client.Runtime.dll"

#Set Variables for Site URL, Library Name and Item ID
$SiteURL= "https://abraaj.sharepoint.com/sites/sales/"
$LibraryName="Documents"
$ItemID="4"

#Setup Credentials to connect
$Cred = Get-Credential
$Cred = New-Object Microsoft.SharePoint.Client.SharePointOnlineCredentials($Cred.UserName,$Cred.Password)

#Setup the context
$Ctx = New-Object Microsoft.SharePoint.Client.ClientContext($SiteURL)
$Ctx.Credentials = $Cred

#Get the web, List, Item adn File
$Web=$Ctx.Web
$List=$web.Lists.GetByTitle($LibraryName)
$Item=$list.GetItemById($ItemID)
$File=$Item.File

#Get the File to context
$Ctx.Load($File)
$Ctx.ExecuteQuery()

#check if the file is checked out
If($File.CheckOutType -eq "None")
{
write-host "Document is not checked out Already!" -f Red
}
else
{
#Check in the file
$File.CheckIn("Checked-in from PowerShell",[Microsoft.SharePoint.Client.CheckinType]::MajorCheckIn)
$Ctx.ExecuteQuery()

write-host "Document has been checked-in successfully!" -f Green
}

SharePoint Online: Rename Files in Document Library using PowerShell

$
0
0
Requirement: Rename files in SharePoint document library using PowerShell

PowerShell CSOM Script to rename a file in SharePoint Online:
#Load SharePoint CSOM Assemblies
Add-Type -Path "C:\Program Files\Common Files\Microsoft Shared\Web Server Extensions\16\ISAPI\Microsoft.SharePoint.Client.dll"
Add-Type -Path "C:\Program Files\Common Files\Microsoft Shared\Web Server Extensions\16\ISAPI\Microsoft.SharePoint.Client.Runtime.dll"

#Set Variables for Site URL, Old File Name and New File Name
$SiteURL= "https://crescent.sharepoint.com/sites/sales/"
$OldFileURL="/sites/Sales/Documents/Legal.docx"
$NewFileURL="/sites/Sales/Documents/LegalTemplate.docx"

#Setup Credentials to connect
$Cred = Get-Credential
$Cred = New-Object Microsoft.SharePoint.Client.SharePointOnlineCredentials($Cred.UserName,$Cred.Password)

Try {
#Setup the context
$Ctx = New-Object Microsoft.SharePoint.Client.ClientContext($SiteURL)
$Ctx.Credentials = $Cred

#Rename the File
$File = $Ctx.Web.GetFileByServerRelativeUrl($OldFileURL)
$File.MoveTo($NewFileURL, [Microsoft.SharePoint.Client.MoveOperations]::Overwrite)
$Ctx.ExecuteQuery()

write-host -f Green "File Renamed successfully!"
}
Catch {
write-host -f Red "Error Renaming File!" $_.Exception.Message
}

This script renames the given document to new name. How about renaming all files from a SharePoint online document library?

SharePoint online rename files in bulk using PowerShell:
Say in SharePoint online, you want to rename all documents which has a specific string in their names. 
#Load SharePoint CSOM Assemblies
Add-Type -Path "C:\Program Files\Common Files\Microsoft Shared\Web Server Extensions\16\ISAPI\Microsoft.SharePoint.Client.dll"
Add-Type -Path "C:\Program Files\Common Files\Microsoft Shared\Web Server Extensions\16\ISAPI\Microsoft.SharePoint.Client.Runtime.dll"

#Set Variables for Site URL, Library Name and Item ID
$SiteURL= "https://crescent.sharepoint.com/sites/sales/"
$LibraryName="Documents"
$OldString="National"
$NewString="Crescent"

#Setup Credentials to connect
$Cred = Get-Credential
$Cred = New-Object Microsoft.SharePoint.Client.SharePointOnlineCredentials($Cred.UserName,$Cred.Password)

Try {
#Setup the context
$Ctx = New-Object Microsoft.SharePoint.Client.ClientContext($SiteURL)
$Ctx.Credentials = $Cred

#Get the web and Library
$Web=$Ctx.Web
$List=$web.Lists.GetByTitle($LibraryName)

#Get all items
$Query = [Microsoft.SharePoint.Client.CamlQuery]::CreateAllItemsQuery()
$ListItems = $List.GetItems($Query)
$Ctx.Load($ListItems)
$Ctx.ExecuteQuery()

#Rename each file matching given old string
Foreach($Item in $ListItems)
{
#Replace string in the File Name
if($Item["FileRef"].ToString().Contains($OldString))
{
$CurrentURL=$Item["FileRef"].ToString()
$NewURL = $CurrentURL.Replace($OldString,$NewString)
$Item.File.MoveTo($NewURL, [Microsoft.SharePoint.Client.MoveOperations]::Overwrite)
$ctx.ExecuteQuery()
Write-host -f Green "Renamed: "$CurrentURL
}
}
}
Catch {
write-host -f Red "Error Renaming File!" $_.Exception.Message
}

Get All Site Collections in a Web Applications using PowerShell

$
0
0
To get all site collections in web application, from SharePoint central Admin, follow these steps:
  • Go to SharePoint Central Admin Site >> Application Management 
  • Click on "View all site collections" link under Site Collections Group. Select your web application. This page lists all site collections in the selected web application.
    sharepoint get all site collections in web application
Get all site collections in web application using PowerShell:
Here is the PowerShell to list all site collections in web application.
Add-PSSnapin Microsoft.SharePoint.PowerShell -ErrorAction SilentlyContinue

#Set the Web application URL
$WebAppURL="http://intranet.crescent.com"

#Get the Web Application
$WebApp = Get-SPWebApplication $WebAppURL

#Get all Site collections from the web application
$SitesCollection = $WebApp.Sites

#Enumerate all site collections in the web application
Foreach($Site in $SitesCollection)
{
#Get Site Collection URL, Owner, Content Database Details
Write-host $Site.URL
}

While the above code written in classic manner, you can use PowerShell one-liner to get list of all site collections in web application:
Get-SPWebApplication "http://intranet.crescent.com" | Get-SPSite | Select URL

PowerShell to get all site collections in a web application:
This time, lets use PowerShell expressions to dig into site collection properties, say: Site Name, content database, etc.
Get-SPWebApplication "http://intranet.crescent.com" | Get-SPSite | Select URL,@{Name="Site Name"; Expression={$_.RootWeb.Title}},Owner 

How to get all site collections in a web application and Export to CSV
How about get all site collections in a web application using PowerShell and Export to CSV?
Add-PSSnapin Microsoft.SharePoint.PowerShell -ErrorAction SilentlyContinue

#Web application URL and CSV File location Variables
$WebAppURL="http://intranet.crescent.com"
$CSVFile="C:\SitesList.csv"

#Get list of site collections in a web application powershell
Get-SPWebApplication $WebAppURL | Get-SPSite | ForEach-Object {
New-Object -TypeName PSObject -Property @{
SiteName = $_.RootWeb.Title
Url = $_.Url
DatabaseName = $_.ContentDatabase.Name }
} | Export-CSV $CSVFile -NoTypeInformation
This Script gets all site collections from the given web application and exports the site collection data to CSV
how to get all site collections in a web application using powershell

Create Search Service Application in SharePoint 2016 Multi-Server Farm using PowerShell

$
0
0
The Search Service Application in SharePoint provides search functionality, as its name implies. We have to use PowerShell scripts to configure search service application from SharePoint 2013 on wards as there is no user interface to configure the Search topology from SharePoint Central Admin - although we can create new search service application instance.

Configuring SharePoint 2016 Search Service Application for Multi-Server Farm:

While my earlier article addresses How to create search service application in SharePoint 2013 - Single Server farm, for Standalone SharePoint 2013 or SharePoint 2016 installations, In a production environment we may have to distribute and load balance search components to different servers in a multi-server farm.

Here is the proposed Farm search topology in high level:
create sharepoint 2016 search service application with Powershell

I've the below servers in my SharePoint 2016 environment using Shared MinRoles:
  • Web Front End + Distributed Cache Servers - 2
  • Application + Search Servers - 2
Since we'll be using multiple servers in SharePoint farm, we can add Redundancy, Performance, and Reliability  to the search application by splitting the six search components (Admin, Crawl, Content Processing, Indexing, Analytics, and Query Processing) among them. Also, we will configure two index partitions to ensure both servers have a replica of the search index.


PowerShell to Configure Search Service Application in SharePoint 2016:
Modifications to the search topology requires a decent understanding of SharePoint search topology as well as PowerShell. Here is the PowerShell script to create search service application in a multi-server SharePoint 2016 environment. You can add or modify the topology components according to your environment. Lets take an example. In my case we've two SharePoint Search App Servers to host all search components. Creating search service application for SharePoint 2016 involves these steps at high level:
  1. Creating Managed account, application pool for search service application.
  2. Creating SharePoint Search Service Application & Proxy
  3. Starting Search service instance on all servers participating search topology
  4. Creating an Search Topology and adding Search components and then Activating the search topology
Create Search Service Application using PowerShell:
Here is the PowerShell script to create SharePoint 2016 search service application.
Copy-Paste this script to PowerShell ISE or any other PowerShell editor (PowerGUI?), set the configuration parameters according to your environment and run one step at a time!

Create folders for Index Location & Replica Location (as in variables: $PrimaryIndexLocation & $ReplicaIndexLocation) on all servers which are hosting search topology index components, prior running the main script!
#Set the primary and replica index locations
$PrimaryIndexLocation = "D:\SearchIndex"
$ReplicaIndexLocation = "E:\SearchIndexReplica"

#Prepare Index Locations
Remove-Item -Recurse -Force -LiteralPath $PrimaryIndexLocation -ErrorAction SilentlyContinue
MKDIR -Path $PrimaryIndexLocation -Force
Remove-Item -Recurse -Force -LiteralPath $ReplicaIndexLocation -ErrorAction SilentlyContinue
MKDIR -Path $ReplicaIndexLocation -Force

PowerShell Script to Configure Search Service Application in SharePoint 2016:
Add-PSSnapin Microsoft.SharePoint.PowerShell -ErrorAction SilentlyContinue

#Region Config_Parameters
#Settings for Search Service Application
$SearchServiceApplicationName = "Search Service Application"
$SearchServiceApplicationProxyName = "Search Service Application Proxy"
$SearchAppPoolAccount = "Crescent\SP16_Services"
$SearchDatabaseServer = "SP16_SQL"
$SearchServiceApplicationDatabase = "Crescent_Search_ServiceApp"
$SearchAppPoolName = "Service Application App Pool"

#Farm Server topology: App with Search role: 2
$SearchAppServer1 = "SP16-APPSrv01"
$SearchAppServer2 = "SP16-APPSrv02"

#Set the primary and replica index locations
$PrimaryIndexLocation = "D:\SearchIndex"
$ReplicaIndexLocation = "E:\SearchIndexReplica"
#EndRegion


#*** Step 1: Create Managed Account, Service Application Pool for Search Service Application ****
#Check if Managed account is registered already
Write-Host -ForegroundColor Yellow "Checking if the Managed Accounts already exists..."
$SearchAppPoolAccount = Get-SPManagedAccount -Identity $SearchAppPoolAccount -ErrorAction SilentlyContinue
If ($SearchAppPoolAccount -eq $null)
{
Write-Host "Please Enter the password for the Service Account..."
$AppPoolCredentials = Get-Credential $SearchAppPoolAccount
$SearchAppPoolAccount = New-SPManagedAccount -Credential $AppPoolCredentials
write-host "Managed Account has been Created!" -ForegroundColor Green
}

#Try to Get the existing Application Pool
Write-Host -ForegroundColor Yellow "Checking if the App Pool already exists..."
$SearchServiceAppPool = Get-SPServiceApplicationPool -Identity $SearchAppPoolName -ErrorAction SilentlyContinue
#If Application pool Doesn't exists, Create it
if ($SearchServiceAppPool -eq $Null)
{
$SearchServiceAppPool = New-SPServiceApplicationPool -Name $SearchAppPoolName -Account $SearchAppPoolAccount
write-host "Created New Service Application Pool!" -ForegroundColor Green
}

#*** Step 2: Start Search Service Instances on required servers ***
Write-host "Starting Service Instances..." -ForegroundColor Green
#Search App Server 1
$SearchAppInstance1 = Get-SPEnterpriseSearchServiceInstance $SearchAppServer1
if(-not($SearchAppInstance1.Status -eq "Online"))
{
Write-Host -ForegroundColor Yellow "Starting Search Service instance on $SearchAppServer1..." -NoNewline
$SearchAppInstance1 | Start-SPEnterpriseSearchServiceInstance
while ($SearchAppInstance1.Status -ne "Online")
{
Write-Host -ForegroundColor Green "." -NoNewline
Start-Sleep -Seconds 5
$SearchAppInstance1 = Get-SPEnterpriseSearchServiceInstance $SearchAppServer1
}
Write-Host -ForegroundColor Green "Started Search Service instance on $SearchAppServer1"
}
Start-SPEnterpriseSearchQueryAndSiteSettingsServiceInstance $SearchAppServer1 -ErrorAction SilentlyContinue

#Search App Server 2
$SearchAppInstance2 = Get-SPEnterpriseSearchServiceInstance $SearchAppServer2
if(-not($SearchAppInstance2.Status -eq "Online"))
{
Write-Host -ForegroundColor Yellow "Starting Search Service instance on $SearchAppServer2..." -NoNewline
$SearchAppInstance2 | Start-SPEnterpriseSearchServiceInstance
while ($SearchAppInstance2.Status -ne "Online")
{
Write-Host -ForegroundColor Green "." -NoNewline
Start-Sleep -Seconds 5
$SearchAppInstance2 = Get-SPEnterpriseSearchServiceInstance $SearchAppServer2
}
Write-Host -ForegroundColor Green "Started Search Service instance on $SearchAppServer2"
}
Start-SPEnterpriseSearchQueryAndSiteSettingsServiceInstance $SearchAppServer2 -ErrorAction SilentlyContinue


#*** Step 3: Create Search Service Application and proxy****
Write-host "Creating Search Service Application..." -ForegroundColor Yellow
# Get the Search Service Application
$SearchServiceApplication = Get-SPEnterpriseSearchServiceApplication -Identity $SearchServiceApplicationName -ErrorAction SilentlyContinue
# Create the Search Service Application, If it doesn't exists!
if(!$SearchServiceApplication)
{
$SearchServiceApplication = New-SPEnterpriseSearchServiceApplication -Name $SearchServiceApplicationName -ApplicationPool $SearchServiceAppPool -DatabaseServer $SearchDatabaseServer -DatabaseName $SearchServiceApplicationDatabase
write-host "Created New Search Service Application" -ForegroundColor Green
}

#Get the Search Service Application Proxy
$SearchServiceAppProxy = Get-SPEnterpriseSearchServiceApplicationProxy -Identity $SearchServiceApplicationProxyName -ErrorAction SilentlyContinue
# Create the Proxy, If it doesn't exists!
if(!$SearchServiceAppProxy)
{
$SearchServiceAppProxy = New-SPEnterpriseSearchServiceApplicationProxy -Name $SearchServiceApplicationProxyName -SearchApplication $SearchServiceApplication
write-host "Created New Search Service Application Proxy" -ForegroundColor Green
}

#*** Step 4: Create New Search Topology and add components to it
Write-Host -ForegroundColor Yellow "Creating Search Service Topology..."
# Create New Search Topology
$SearchTopology = New-SPEnterpriseSearchTopology -SearchApplication $SearchServiceApplication

#Admin Component:App 01 & 02
New-SPEnterpriseSearchAdminComponent -SearchTopology $SearchTopology -SearchServiceInstance $SearchAppInstance1
New-SPEnterpriseSearchAdminComponent -SearchTopology $SearchTopology -SearchServiceInstance $SearchAppInstance2

#Content Processing:App 01 & 02
New-SPEnterpriseSearchContentProcessingComponent -SearchTopology $SearchTopology -SearchServiceInstance $SearchAppInstance1
New-SPEnterpriseSearchContentProcessingComponent -SearchTopology $SearchTopology -SearchServiceInstance $SearchAppInstance2

#Analytics processing:App01 & 02
New-SPEnterpriseSearchAnalyticsProcessingComponent -SearchTopology $SearchTopology -SearchServiceInstance $SearchAppInstance1
New-SPEnterpriseSearchAnalyticsProcessingComponent -SearchTopology $SearchTopology -SearchServiceInstance $SearchAppInstance2

#Crawl components:App 01 & 02
New-SPEnterpriseSearchCrawlComponent –SearchTopology $SearchTopology -SearchServiceInstance $SearchAppInstance1
New-SPEnterpriseSearchCrawlComponent –SearchTopology $SearchTopology -SearchServiceInstance $SearchAppInstance2

#Query processing: App 01 & 02
New-SPEnterpriseSearchQueryProcessingComponent -SearchTopology $SearchTopology -SearchServiceInstance $SearchAppInstance1
New-SPEnterpriseSearchQueryProcessingComponent -SearchTopology $SearchTopology -SearchServiceInstance $SearchAppInstance2

#Create Index Components : App 01 & 02
#Two index partitions and replicas for each partition
New-SPEnterpriseSearchIndexComponent –SearchTopology $SearchTopology -SearchServiceInstance $SearchAppInstance1 -RootDirectory $PrimaryIndexLocation -IndexPartition 0
New-SPEnterpriseSearchIndexComponent –SearchTopology $SearchTopology -SearchServiceInstance $SearchAppInstance2 -RootDirectory $ReplicaIndexLocation -IndexPartition 0
New-SPEnterpriseSearchIndexComponent –SearchTopology $SearchTopology -SearchServiceInstance $SearchAppInstance2 -RootDirectory $PrimaryIndexLocation -IndexPartition 1
New-SPEnterpriseSearchIndexComponent –SearchTopology $SearchTopology -SearchServiceInstance $SearchAppInstance1 -RootDirectory $ReplicaIndexLocation -IndexPartition 1

#Activate the Toplogy for Search Service
$SearchTopology.Activate() # Or Use: Set-SPEnterpriseSearchTopology -Identity $SearchTopology

#Remove all inactive topologies
$InactiveTopologies = Get-SPEnterpriseSearchTopology -SearchApplication $SearchServiceApplication | Where {$_.State -ne "Active"}
$InactiveTopologies | Remove-SPEnterpriseSearchTopology -Confirm:$false

Write-Host -ForegroundColor Green "Search Service Application has been created. Please start a Full Crawl!"

Once everything is setup, You can see the Search topology visually from SharePoint Central Administration site.
sharepoint 2016 configure search service application powershell

Scale-out SharePoint 2016 Search to Multiple Servers:
The above script is for SharePoint farm with two "Application with Search" Server. What if your SharePoint farm has more than two app servers, say Four?
Best Practice: Assign Query and Index components together in the same server(s) and place remaining components to other Search App servers.
create sharepoint 2016 search service application
Also, in the script do below changes: Farm Topology Section, include two more servers: Say, App03 and App04
#Farm Server topology: App+Search: 4
$SearchAppServer1 = "Cre-SP16App01"
$SearchAppServer2 = "Cre-SP16App02"
$SearchAppServer3 = "Cre-SP16App03"
$SearchAppServer4 = "Cre-SP16App04"
Start Service instances on app servers 3 & 4 :
#Search App Server 3
$SearchAppInstance3 = Get-SPEnterpriseSearchServiceInstance $SearchAppServer3
if(-not($SearchAppInstance3.Status -eq "Online"))
{
Write-Host -ForegroundColor Yellow "Starting Search Service instance on $SearchAppServer3..." -NoNewline
$SearchAppInstance3 | Start-SPEnterpriseSearchServiceInstance
while ($SearchAppInstance3.Status -ne "Online")
{
Write-Host -ForegroundColor Green "." -NoNewline
Start-Sleep -Seconds 5
$SearchAppInstance3 = Get-SPEnterpriseSearchServiceInstance $SearchAppServer3
}
Write-Host -ForegroundColor Green "Started Search Service instance on $SearchAppServer3"
}
Start-SPEnterpriseSearchQueryAndSiteSettingsServiceInstance $SearchAppServer3 -ErrorAction SilentlyContinue
#Search App Server 4
$SearchAppInstance4 = Get-SPEnterpriseSearchServiceInstance $SearchAppServer4
if(-not($SearchAppInstance4.Status -eq "Online"))
{
Write-Host -ForegroundColor Yellow "Starting Search Service instance on $SearchAppServer4..." -NoNewline
$SearchAppInstance4 | Start-SPEnterpriseSearchServiceInstance
while ($SearchAppInstance4.Status -ne "Online")
{
Write-Host -ForegroundColor Green "." -NoNewline
Start-Sleep -Seconds 5
$SearchAppInstance4 = Get-SPEnterpriseSearchServiceInstance $SearchAppServer4
}
Write-Host -ForegroundColor Green "Started Search Service instance on $SearchAppServer4"
}
Start-SPEnterpriseSearchQueryAndSiteSettingsServiceInstance $SearchAppServer4 -ErrorAction SilentlyContinue
On creating Search topology: Assign Query and Index Roles to App Servers 3 and 4
#Query processing: App 03 & 04
New-SPEnterpriseSearchQueryProcessingComponent -SearchTopology $SearchTopology -SearchServiceInstance $SearchAppInstance3
New-SPEnterpriseSearchQueryProcessingComponent -SearchTopology $SearchTopology -SearchServiceInstance $SearchAppInstance4

#Create Index Components : App 03 & 04
#Two index partitions and replicas for each partition
New-SPEnterpriseSearchIndexComponent –SearchTopology $SearchTopology -SearchServiceInstance $SearchAppInstance3 -RootDirectory $PrimaryIndexLocation -IndexPartition 0
New-SPEnterpriseSearchIndexComponent –SearchTopology $SearchTopology -SearchServiceInstance $SearchAppInstance4 -RootDirectory $ReplicaIndexLocation -IndexPartition 0
New-SPEnterpriseSearchIndexComponent –SearchTopology $SearchTopology -SearchServiceInstance $SearchAppInstance4 -RootDirectory $PrimaryIndexLocation -IndexPartition 1
New-SPEnterpriseSearchIndexComponent –SearchTopology $SearchTopology -SearchServiceInstance $SearchAppInstance3 -RootDirectory $ReplicaIndexLocation -IndexPartition 1

SharePoint Online: Get Content Type ID using PowerShell-CSOM

$
0
0
My other article speaks on How to find the content type id in SharePoint, using SharePoint UI and PowerShell for SharePoint On-premises, This post provides script to get content type by id programmatically for SharePoint online.
To get the content type ID, you can Go to List/Site Content Types >> Pick your content type >> The URL will have "Ctype" parameter with the content type ID!
sharepoint online get content type id

SharePoint Online: Get content type id using CSOM
Here is the PowerShell script to get content type id in SharePoint using csom code.
#Load SharePoint CSOM Assemblies
Add-Type -Path "C:\Program Files\Common Files\Microsoft Shared\Web Server Extensions\16\ISAPI\Microsoft.SharePoint.Client.dll"
Add-Type -Path "C:\Program Files\Common Files\Microsoft Shared\Web Server Extensions\16\ISAPI\Microsoft.SharePoint.Client.Runtime.dll"

#Config Parameters
$SiteURL= "https://crescent.sharepoint.com"
$ContentTypeName="Crescent Project Report"

#Setup Credentials to connect
$Cred = Get-Credential
$Cred = New-Object Microsoft.SharePoint.Client.SharePointOnlineCredentials($Cred.UserName,$Cred.Password)

Try {
#Setup the context
$Ctx = New-Object Microsoft.SharePoint.Client.ClientContext($SiteURL)
$Ctx.Credentials = $Cred

#Get content types of the web
$ctx.Load($ctx.Web.ContentTypes)
$Ctx.ExecuteQuery()

#Get the content type by its name
$ContentType = $Ctx.Web.ContentTypes | Where {$_.Name -Match $ContentTypeName}
$Ctx.Load($ContentType)
$Ctx.ExecuteQuery()

#sharepoint online get content type id
write-host -f Green "Content Type ID:" $ContentType.Id
}
Catch {
write-host -f Red "Error Getting Content Type ID!" $_.Exception.Message
Get content type id from SharePoint online List
Lets get Content Type id for a List content type:
#Load SharePoint CSOM Assemblies
Add-Type -Path "C:\Program Files\Common Files\Microsoft Shared\Web Server Extensions\16\ISAPI\Microsoft.SharePoint.Client.dll"
Add-Type -Path "C:\Program Files\Common Files\Microsoft Shared\Web Server Extensions\16\ISAPI\Microsoft.SharePoint.Client.Runtime.dll"

#Config Parameters
$SiteURL= "https://crescent.sharepoint.com/sites/sales/"
$ListName="Projects"
$ContentTypeName="Project Portfolio"

#Setup Credentials to connect
$Cred = Get-Credential
$Cred = New-Object Microsoft.SharePoint.Client.SharePointOnlineCredentials($Cred.UserName,$Cred.Password)

Try {
#Setup the context
$Ctx = New-Object Microsoft.SharePoint.Client.ClientContext($SiteURL)
$Ctx.Credentials = $Cred

#Get the List and Its content types
$List = $Ctx.Web.Lists.GetByTitle($ListName)
$Ctx.load($List)
$Ctx.load($List.ContentTypes)
$Ctx.ExecuteQuery()

#Get the content type by its name
$ContentType = $List.ContentTypes | Where {$_.Name -Match $ContentTypeName}
$Ctx.Load($ContentType)
$Ctx.ExecuteQuery()

#sharepoint online get content type id
write-host -f Green "Content Type ID:" $ContentType.Id
}
Catch {
write-host -f Red "Error Getting Content Type ID!" $_.Exception.Message
}

SharePoint Online: Configure Access Request Email Settings using PowerShell

$
0
0
Access request settings:
To configure access request email settings in SharePoint online, Go to
  • Site Settings >> Site Permissions >> Access Requests Settings 
  • This takes you to SharePoint online access request page >> Update access request email and hit OK to save your changes.sharepoint online access request settings powershell
Please note, SharePoint online access request email Site Settings must be configured at each site level.

Configure SharePoint online access request settings using PowerShell
Use this PowerShell script to update SharePoint online access request email.
#Load SharePoint CSOM Assemblies
Add-Type -Path "C:\Program Files\Common Files\Microsoft Shared\Web Server Extensions\16\ISAPI\Microsoft.SharePoint.Client.dll"
Add-Type -Path "C:\Program Files\Common Files\Microsoft Shared\Web Server Extensions\16\ISAPI\Microsoft.SharePoint.Client.Runtime.dll"

#Set Variables for Site URL
$SiteURL= "https://crescent.sharepoint.com/sites/sales/"
$AccessReqEmail="SharePointSupport@crescent.com"

#Setup Credentials to connect
$Cred = Get-Credential
$Cred = New-Object Microsoft.SharePoint.Client.SharePointOnlineCredentials($Cred.UserName,$Cred.Password)

Try {
#Setup the context
$Ctx = New-Object Microsoft.SharePoint.Client.ClientContext($SiteURL)
$Ctx.Credentials = $Cred

#Get the current settings
$Web = $Ctx.Web
$Ctx.Load($web.AllProperties)
$web.RequestAccessEmail
$Ctx.ExecuteQuery()

#Set Access request Email
$Web.RequestAccessEmail =$AccessReqEmail
#Member settings
$Web.MembersCanShare = $True
$web.AssociatedMemberGroup.AllowMembersEditMembership = $True
$web.AssociatedMemberGroup.Update()

$Web.Update()
$Ctx.ExecuteQuery()
}
Catch {
write-host -f Red "Error configuring Access request settings!" $_.Exception.Message
}

Disable access request in SharePoint online:
To disable access request, simply clear the Email value!
#Load SharePoint CSOM Assemblies
Add-Type -Path "C:\Program Files\Common Files\Microsoft Shared\Web Server Extensions\16\ISAPI\Microsoft.SharePoint.Client.dll"
Add-Type -Path "C:\Program Files\Common Files\Microsoft Shared\Web Server Extensions\16\ISAPI\Microsoft.SharePoint.Client.Runtime.dll"

#Set Variables for Site URL
$SiteURL= "https://crescent.sharepoint.com/sites/sales/"

#Setup Credentials to connect
$Cred = Get-Credential
$Cred = New-Object Microsoft.SharePoint.Client.SharePointOnlineCredentials($Cred.UserName,$Cred.Password)

Try {
#Setup the context
$Ctx = New-Object Microsoft.SharePoint.Client.ClientContext($SiteURL)
$Ctx.Credentials = $Cred

#disable Access request
$Web = $Ctx.Web
$Web.RequestAccessEmail = ""
$Web.MembersCanShare = $False
$web.AssociatedMemberGroup.AllowMembersEditMembership = $False
$web.AssociatedMemberGroup.Update()
$Web.Update()
$Ctx.ExecuteQuery()
}
Catch {
write-host -f Red "Error disabling Access request settings!" $_.Exception.Message
}

SharePoint Online: Delete List using PowerShell CSOM

$
0
0
How to Delete a list or library in SharePoint Online:
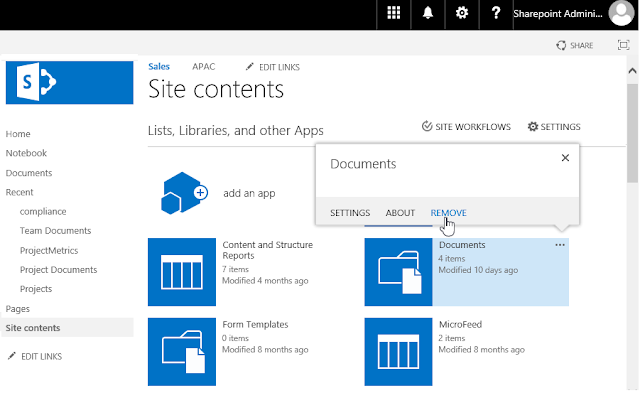
  • Click on Site Settings gear >> Select Site contents from the menu.
  • On the site contents page, Hover over the list or library that you want to delete and then click the drop-down menu icon (…)
  • On the menu that appears, click on "Remove" link and then confirm the prompt to send the list to the Recycle Bin. 
  • Alternatively, you may remove a list or library in SharePoint online by going to list settings >> Click on "Delete this list" under Permissions and Management group.
    delete list sharepoint online powershell
Delete List in SharePoint Online using PowerShell:
#Load SharePoint CSOM Assemblies
Add-Type -Path "C:\Program Files\Common Files\Microsoft Shared\Web Server Extensions\16\ISAPI\Microsoft.SharePoint.Client.dll"
Add-Type -Path "C:\Program Files\Common Files\Microsoft Shared\Web Server Extensions\16\ISAPI\Microsoft.SharePoint.Client.Runtime.dll"

#Set Variables for Site URL and List Name
$SiteURL= "https://crescent.sharepoint.com/sites/pmo"
$ListName="Projects"

#Setup Credentials to connect
$Cred = Get-Credential
$Cred = New-Object Microsoft.SharePoint.Client.SharePointOnlineCredentials($Cred.UserName,$Cred.Password)

Try {
#Setup the context
$Ctx = New-Object Microsoft.SharePoint.Client.ClientContext($SiteURL)
$Ctx.Credentials = $Cred

#Get the List
$List=$Ctx.Web.Lists.GetByTitle($ListName)

#Delete the list
$List.DeleteObject()
$Ctx.ExecuteQuery()

Write-host -f Green "List Deleted Successfully!"
}
Catch {
write-host -f Red "Error deleting list!" $_.Exception.Message
}

SharePoint Online: Delete Site Column using Powershell

$
0
0
Requirement: Delete Site Column in SharePoint online using PowerShell

How to delete a site column in SharePoint online?
To remove a SharePoint online site column, follow these steps:
  • Go to Site Settings by clicking Site settings gear and then "Site settings" from the menu.
  • Click on "Site Columns" link from Web Designer Galleries group >> Select the site column to delete.
  • Scroll down and click on "Delete" button and confirm the prompt to delete.
    sharepoint online powershell delete site column
This removes a site column in SharePoint online.

SharePoint online PowerShell to delete site column:
#Load SharePoint CSOM Assemblies
Add-Type -Path "C:\Program Files\Common Files\Microsoft Shared\Web Server Extensions\16\ISAPI\Microsoft.SharePoint.Client.dll"
Add-Type -Path "C:\Program Files\Common Files\Microsoft Shared\Web Server Extensions\16\ISAPI\Microsoft.SharePoint.Client.Runtime.dll"

#Set Variables for Site URL and Site column Title
$SiteURL= "https://crescent.sharepoint.com/sites/sales"
$ColumnName="Sales Region" #Case sensitive

#Setup Credentials to connect
$Cred = Get-Credential
$Cred = New-Object Microsoft.SharePoint.Client.SharePointOnlineCredentials($Cred.UserName,$Cred.Password)

Try {
#Setup the context
$Ctx = New-Object Microsoft.SharePoint.Client.ClientContext($SiteURL)
$Ctx.Credentials = $Cred

#Check if the site column exists
$Fields = $Ctx.web.Fields
$Ctx.Load($Fields)
$Ctx.ExecuteQuery()
$FieldNames = $Fields | select -ExpandProperty Title

#delete site column in sharepoint online
If($FieldNames.Contains($ColumnName))
{
#Delete the site column
$SiteColumn = $Fields.GetByTitle($ColumnName)
$Sitecolumn.DeleteObject()
$Ctx.ExecuteQuery()

Write-host -f Green "Site Column Deleted Successfully!"
}
else
{
Write-host -f Yellow "Site Column Doesn't Exists!"
}
}
Catch {
write-host -f Red "Error deleting Site Column!" $_.Exception.Message
}

SharePoint Online: How to Hide a List or Library using PowerShell

$
0
0
Requirement: Hide a list or library from SharePoint Online site.

SharePoint Online: Hide Document Library using PowerShell
There are many ways to hide a SharePoint online list. Here is the PowerShell CSOM script to create hidden lists in SharePoint online.  
#Load SharePoint CSOM Assemblies
Add-Type -Path "C:\Program Files\Common Files\Microsoft Shared\Web Server Extensions\16\ISAPI\Microsoft.SharePoint.Client.dll"
Add-Type -Path "C:\Program Files\Common Files\Microsoft Shared\Web Server Extensions\16\ISAPI\Microsoft.SharePoint.Client.Runtime.dll"

#Config Parameters
$SiteURL= "https://crescent.sharepoint.com/sites/sales/"
$LibraryName="ProjectConfig"

#Setup Credentials to connect
$Cred = Get-Credential
$Cred = New-Object Microsoft.SharePoint.Client.SharePointOnlineCredentials($Cred.UserName,$Cred.Password)

Try {
#Setup the context
$Ctx = New-Object Microsoft.SharePoint.Client.ClientContext($SiteURL)
$Ctx.Credentials = $Cred

#Get the web and Library
$Web=$Ctx.Web
$List=$web.Lists.GetByTitle($LibraryName)

#Hide the list
$List.Hidden = $True
$List.Update()
$Ctx.ExecuteQuery()

Write-host -f Green "List hidden Successfully!"
}
Catch {
write-host -f Red "Error hiding List: " $_.Exception.Message
}
You can also use SharePoint designer to mark a list hidden from browser. Read more here: How to hide a list in SharePoint?
how to hide list in sharepoint online

Tags: sharepoint online hidden list, sharepoint online hide task list, sharepoint online create hidden list, sharepoint online hide document library, sharepoint online hide library

SharePoint Online: PowerShell to Create Document Library

$
0
0
Requirement: Create a document library in SharePoint online using PowerShell

SharePoint online: PowerShell to Create Document Library:
How to Create document library in SharePoint online using PowerShell?
#Load SharePoint CSOM Assemblies
[System.Reflection.Assembly]::LoadWithPartialName("Microsoft.SharePoint.Client") | Out-Null
[System.Reflection.Assembly]::LoadWithPartialName("Microsoft.SharePoint.Client.Runtime") | Out-Null

#Variables for Processing
$SiteURL = "https://Crescent.sharepoint.com/Sites/Sales"
$LoginName ="Salaudeen@Crescent.OnMicrosoft.com"
$LoginPassword ="Password"

#Get the Client Context
$Context = New-Object Microsoft.SharePoint.Client.ClientContext($SiteURL)

#supply Login Credentials
$SecurePWD = ConvertTo-SecureString $LoginPassword –asplaintext –force
$Credential = New-Object Microsoft.SharePoint.Client.SharePointOnlineCredentials($LoginName,$SecurePWD)
$Context.Credentials = $Credential

#Create new document library
$ListInfo = New-Object Microsoft.SharePoint.Client.ListCreationInformation
$ListInfo.Title = "Project Docs"
$ListInfo.TemplateType = 101 #Document Library
$List = $Context.Web.Lists.Add($ListInfo)
$List.Description = "Repository to store project artifacts"
$List.Update()
$Context.ExecuteQuery()

write-host "New Document Library has been created!"
and the result:
sharepoint online powershell create document library
Related post: How to create a list in sharepoint online using PowerShell

SharePoint Online: Create Permission Level using PowerShell

$
0
0
Requirement: Create a new permission level in SharePoint online site collection for contribute without delete permissions.

SharePoint Online PowerShell to Create Permission Level 
#Load SharePoint CSOM Assemblies
Add-Type -Path "C:\Program Files\Common Files\Microsoft Shared\Web Server Extensions\16\ISAPI\Microsoft.SharePoint.Client.dll"
Add-Type -Path "C:\Program Files\Common Files\Microsoft Shared\Web Server Extensions\16\ISAPI\Microsoft.SharePoint.Client.Runtime.dll"

##Variables for Processing
$SiteUrl = "https://crescent.sharepoint.com/"
$SourcePermissionLevelName ="Contribute"
$TargetPermissionLevelName ="Contribute Without Delete"

Try {
#Get Credentials to connect
$Cred = Get-Credential
$Credentials = New-Object Microsoft.SharePoint.Client.SharePointOnlineCredentials($Cred.Username, $Cred.Password)

#Setup the context
$Ctx = New-Object Microsoft.SharePoint.Client.ClientContext($SiteUrl)
$Ctx.Credentials = $Credentials
$Web = $Ctx.Web

#Get the source permission level
$RoleDefinitions = $web.RoleDefinitions
$Ctx.Load($RoleDefinitions)
$SourceRoleDefinition = $RoleDefinitions.GetByName($SourcePermissionLevelName)
$Ctx.Load($SourceRoleDefinition)
$Ctx.ExecuteQuery()

#get base permissions from the source and remove "Delete"
$TargetBasePermissions = $SourceRoleDefinition.BasePermissions
$TargetBasePermissions.clear([Microsoft.SharePoint.Client.PermissionKind]::DeleteListItems)

#check if the given permission level exists already!
$TargetPermissionLevel = $RoleDefinitions | Where-Object { $_.Name -eq $TargetPermissionLevelName }
if($TargetPermissionLevel -eq $null)
{
#Create new permission level from source permission level
$PermissionCreationInfo = New-Object Microsoft.SharePoint.Client.RoleDefinitionCreationInformation
$PermissionCreationInfo.Name = $TargetPermissionLevelName
$PermissionCreationInfo.Description = $TargetPermissionLevelName
$PermissionCreationInfo.BasePermissions = $TargetBasePermissions

#Add the role definitin to the site
$TargetPermissionLevel = $Web.RoleDefinitions.Add($PermissionCreationInfo)
$Ctx.ExecuteQuery()

Write-host "New Permission Level Created Successfully!" -ForegroundColor Green
}
else
{
Write-host "Permission Level Already Exists!" -ForegroundColor Red
}
}
Catch {
write-host -f Red "Error Creating Permission Level!" $_.Exception.Message
}
Instead of copying an existing permission level and manipulating it, You can also create new permission level from the scratch.
#Create base Permission set
$Permissions = New-Object Microsoft.SharePoint.Client.BasePermissions
#Add permissions to it
$Permissions.Set([Microsoft.SharePoint.Client.PermissionKind]::ViewListItems)
$Permissions.Set([Microsoft.SharePoint.Client.PermissionKind]::ViewVersions)
This script copies existing permission level and creates the new permission level
Viewing all 1058 articles
Browse latest View live


<script src="https://jsc.adskeeper.com/r/s/rssing.com.1596347.js" async> </script>