Quantcast
Channel: SharePoint Diary
Viewing all 1058 articles
Browse latest View live

Export SharePoint List Data to SQL Server Table using PowerShell

$
0
0
Requirement:
For an in-house built business intelligence tool, had a requirement to export SharePoint list data into SQL Server table. As directly querying SharePoint content databases is not supported by Microsoft and it also could cause performance issues to your SharePoint farm - Lets not think about it further! Of course, there are 3rd party products available on the market to do this, however PowerShell can be utilized to fulfill this requirement.

This PowerShell script retrieves given SharePoint List(s), iterate through all available fields and dynamically creates SQL Server Table and then inserts the data after translating it, and inserts into the SQL Server database table.

Here is my PowerShell script to Convert SharePoint list into SQL Server table and extract data from SharePoint to SQL:

PowerShell Script to Extract SharePoint List Data into SQL Server Table:
Add-PSSnapin Microsoft.SharePoint.PowerShell -ErrorAction SilentlyContinue 

Function Create-List2Table($ListName,$TableName, $WebURL)
{
#Configuration Variables
$DatabaseServer="SP16-SQLServer01"
$DatabaseName="SharePointBI"
#SQL Authentication
$UserID="UserID"
$Password="Password"

#Log File
$CurrentDir=Split-Path -Parent -Path $MyInvocation.MyCommand.Definition
$LogFile = $CurrentDir+ "\" + $(Get-Date -format "yyyyMMdd_hhmmss")+".txt"

#Get Web, List and Fields
$Web= Get-SPWeb $WebURL
$List= $Web.Lists[$ListName]
#Get all required fields from the lists
$ListFields = $List.Fields | Where { ($_.Hidden -ne $true ) -and ($_.ReadOnlyField -ne $true ) -and ($_.InternalName -ne "Attachments") -and ($_.InternalName -ne "ContentType") }

#Function to Execute given SQL Query
Function Execute-SQLQuery([string]$Query)
{
#Write-Host "Executing SQL: ", $Query
#Connection object
$Connection = New-Object System.Data.SqlClient.SqlConnection("server=$DatabaseServer;database=$DatabaseName;User Id=$UserID;Password=$Password")
try
{
$Connection.open()
$cmd = new-object System.Data.SqlClient.SqlCommand ($Query, $Connection)
$ReturnValue = $cmd.ExecuteNonQuery()
}
catch { Write-Host "Error: ", $error[0]; "$($Query): $($_.Exception.Message)" >> $LogFile }
finally{ $Connection.close() }

}

#Function to Drop Table, if exists!
Function Drop-Table([string]$TableName)
{
$Query = "IF (OBJECT_ID('[dbo].[$($TableName)]','U') IS NOT NULL) DROP TABLE [dbo].[$($TableName)]"

#Run the Query
Execute-SQLQuery $Query
}

#Get SQL column Definition for SharePoint List Field
Function Get-ColumnDefinition([Microsoft.SharePoint.SPField]$Field)
{
$ColumnDefinition=""
Switch($Field.Type)
{
"Boolean" { $ColumnDefinition = '['+ $Field.InternalName +'] [bit] NULL '}
"Choice" { $ColumnDefinition = '['+ $Field.InternalName +'] [nvarchar](MAX) NULL '}
"Currency" { $ColumnDefinition = '['+ $Field.InternalName +'] [decimal](18, 2) NULL '}
"DateTime" { $ColumnDefinition = '['+ $Field.InternalName +'] [datetime] NULL '}
"Guid" { $ColumnDefinition = '['+ $Field.InternalName +'] [uniqueidentifier] NULL '}
"Integer" { $ColumnDefinition = '['+ $Field.InternalName +'] [int] NULL '}
"Lookup" { $ColumnDefinition = '['+ $Field.InternalName +'] [nvarchar] (500) NULL '}
"MultiChoice" { $ColumnDefinition = '['+ $Field.InternalName +'] [nText] (MAX) NULL '}
"Note" { $ColumnDefinition = '['+ $Field.InternalName +'] [nText] NULL '}
"Number" { $ColumnDefinition = '['+ $Field.InternalName +'] [decimal](18, 2) NULL '}
"Text" { $ColumnDefinition = '['+ $Field.InternalName +'] [nVarchar] (MAX) NULL '}
"URL" { $ColumnDefinition = '['+ $Field.InternalName +'] [nvarchar] (500) NULL '}
"User" { $ColumnDefinition = '['+ $Field.InternalName +'] [nvarchar] (255) NULL '}
default { $ColumnDefinition = '['+ $Field.InternalName +'] [nvarchar] (MAX) NULL '}
}
return $ColumnDefinition
}

################ Format Column Value Functions ######################
Function Format-UserValue([object] $ValueToFormat)
{
$Users = [string]::join("; ",( $ValueToFormat | Select -expandproperty LookupValue))
$Users = $Users -replace "'", "''"
return "'" + $Users + "'"
}

Function Format-LookupValue([Microsoft.SharePoint.SPFieldLookupValueCollection] $ValueToFormat)
{
$LookupValue = [string]::join("; ",( $ValueToFormat | Select -expandproperty LookupValue))
$LookupValue = $LookupValue -replace "'", "''"
return "'" + $LookupValue + "'"
}

Function Format-DateValue([string]$ValueToFormat)
{
[datetime] $dt = $ValueToFormat
return "'" + $dt.ToString("yyyyMMdd HH:MM:ss") + "'"
}

Function Format-MMSValue([Object]$ValueToFormat)
{
return "'" + $ValueToFormat.Label + "'"
}

Function Format-BooleanValue([string]$ValueToFormat)
{
if($ValueToFormat -eq "Yes") {return 1} else { return 0}
}

Function Format-StringValue([object]$ValueToFormat)
{
[string]$result = $ValueToFormat -replace "'", "''"
return "'" + $result + "'"
}

#Function to get the value of given field of the List item
Function Get-ColumnValue([Microsoft.SharePoint.SPListItem] $ListItem, [Microsoft.SharePoint.SPField]$Field)
{
$FieldValue= $ListItem[$Field.InternalName]

#Check for NULL
if([string]::IsNullOrEmpty($FieldValue)) { return 'NULL'}

$FormattedValue = ""

Switch($Field.Type)
{
"Boolean" {$FormattedValue = Format-BooleanValue($FieldValue)}
"Choice" {$FormattedValue = Format-StringValue($FieldValue)}
"Currency" {$FormattedValue = $FieldValue}
"DateTime" {$FormattedValue = Format-DateValue($FieldValue)}
"Guid" { $FormattedValue = Format-StringValue($FieldValue)}
"Integer" {$FormattedValue = $FieldValue}
"Lookup" {$FormattedValue = Format-LookupValue($FieldValue) }
"MultiChoice" {$FormattedValue = Format-StringValue($FieldValue)}
"Note" {$FormattedValue = Format-StringValue($Field.GetFieldValueAsText($ListItem[$Field.InternalName]))}
"Number" {$FormattedValue = $FieldValue}
"Text" {$FormattedValue = Format-StringValue($Field.GetFieldValueAsText($ListItem[$Field.InternalName]))}
"URL" {$FormattedValue = Format-StringValue($FieldValue)}
"User" {$FormattedValue = Format-UserValue($FieldValue) }
#Check MMS Field
"Invalid" { if($Field.TypeDisplayName -eq "Managed Metadata") { $FormattedValue = Format-MMSValue($FieldValue) } else { $FormattedValue =Format-StringValue($FieldValue)} }
default {$FormattedValue = Format-StringValue($FieldValue)}
}
Return $FormattedValue
}

#Create SQL Server table for SharePoint List
Function Create-Table([Microsoft.SharePoint.SPList]$List)
{
#Check if the table exists already
$Query="CREATE TABLE [dbo].[$($TableName)]([ID] [int] NOT NULL PRIMARY KEY, "
foreach ($Field in $ListFields)
{
$Query += Get-ColumnDefinition($Field)
$Query += ","
}
$Query += ")"

#Run the Query
Execute-SQLQuery $Query
}

#Insert Data from SharePoint List to SQL Table
Function Insert-Data([Microsoft.SharePoint.SPList]$List)
{
#Iterate through each row from the list
$ListItems= $List.Items # | where {$_["ID"] -eq 820}

#Progress bar counter
$Counter=0
$ListItemCount=$ListItems.Count

Write-host "Total SharePoint List Items to Copy:" $ListItemCount
foreach ($Item in $ListItems)
{

Write-Progress -Activity "Copying SharePoint List Items. Please wait...`n`n" -status "Processing List Item: $($Item['ID'])" -percentComplete ($Counter/$ListItemCount*100)

$sql = new-object System.Text.StringBuilder
[void]$sql.Append("INSERT INTO [dbo].[$($TableName)] ( [ID] ")
$vals = new-object System.Text.StringBuilder
[void]$vals.Append("VALUES ("+ $Item["ID"])

foreach ($Field in $ListFields)
{
[void]$sql.Append(",[$($Field.InternalName)]")
$ColumnValue = Get-ColumnValue $Item $Field
[void]$vals.Append( ","+ $ColumnValue)
}

[void]$sql.Append(") ")
[void]$vals.Append(") ")

#Combine Field and Values
$SQLStatement = $sql.ToString() + $vals.ToString()

#Run the Query
Execute-SQLQuery $SQLStatement

$Counter=$Counter+1;
}
"Total SharePoint List Items Copied: $($ListItemCount)" >> $LogFile
}

#Call functions to export-import SharePoint list to SQL table
Drop-Table $TableName
Create-Table $List
Insert-Data $List
}

#Call the function to Create SQL Server Table from SharePoint List
Create-List2Table -ListName "Projects" -TableName "ProjectData" -WebURL "https://portal.crescent.com/projects"
#Create-List2Table -ListName "Documents" -TableName "Documents" -WebURL "https://portal.crescent.com"

Make sure you have the database created (in my case, its "SharePointBI") and the User Name provided in the script has DBO or similar access on the database before running the script.

Credits: My sincere thanks to http://www.terrymarshall.com.au/Blog/tabid/162/EntryId/164/SharePoint-2010-Exporting-Lists-to-SQL-Server-Part-1.aspx

How to Remove Content Database in SharePoint using PowerShell

$
0
0
SharePoint content databases are the most important artifacts in SharePoint platform as they hold majority of the data. However, at times we may have to delete the content database from SharePoint. Here is how you can utilize PowerShell to delete database:

SharePoint 2010: Remove content database using PowerShell
To delete content databasefrom SharePoint, use: Remove-SPContentDatabase cmdlet, which removes the content database from SharePoint web application and deletes it from the SQL Server also.
Syntax:
Get-SPContentDatabase -Identity "ContentDB-Name" | Remove-SPContentDatabase

E.g.
Get-SPContentDatabase -Identity "SP10_Intranet_Content02" | Remove-SPContentDatabase
sharepoint powershell delete content database
This deletes SharePoint Content database from SharePoint as well as from SQL Server permanently! As stated, use: Dismount-SPContentDatabase cmdlet if you want to remove the database from SharePoint alone!

Related Posts:

PowerShell to Add-Remove Fields to Content Type in SharePoint

$
0
0

If you have a requirement to add a field to content type or remove a field from existing content type, use this PowerShell script:

PowerShell script to Add a field to content type:
#Get Web Object
$web = Get-SPWeb "http://sharepoint.company.com"

#Get Content Type and Field
$ContentType=$web.ContentTypes["Content-Type-Name"]
$FieldToAdd=$web.Fields["Field-Name"]

#Add Field to Content type
$FieldLink=New-Object Microsoft.SharePoint.SPFieldLink($FieldToAdd)
$ContentType.FieldLinks.Add($FieldLink)
$ContentType.Update()

Lets add some error handling and make a reusable function to add site column to content type using PowerShell!

PowerShell to Add Site Column to Content type in SharePoint 
#Add SharePoint Snap-in
Add-PSSnapin Microsoft.SharePoint.PowerShell -ErrorAction SilentlyContinue

Function Add-FieldToContentType([Microsoft.SharePoint.SPWeb] $web, [string]$ContentTypeName, [string]$SiteColumnName)
{
#Get Content Type and Field (Site column) objects
$ContentType=$web.ContentTypes[$ContentTypeName]
#Check if the content type exists
if($ContentType -ne $null)
{
#Check if the content type has the Field already
if(!$ContentType.Fields.ContainsField($SiteColumnName))
{
#Check if the site column exists
if($web.Fields.ContainsField($SiteColumnName))
{
$FieldToAdd=$web.Fields.GetField($SiteColumnName)#[$SiteColumnName]
#Add Site column to the content type
$FieldLink= New-Object Microsoft.SharePoint.SPFieldLink($FieldToAdd)
$ContentType.FieldLinks.Add($FieldLink)
$ContentType.Update($true)
Write-Host "Site Column Field Added to the Content Type!" -ForegroundColor Green
}
else
{
Write-Host "Site Column Not Found!" -ForegroundColor Red
}
}
else
{
Write-Host "Field Exists Already!" -ForegroundColor Red
}
}
else
{
Write-Host "Content type not found!" -ForegroundColor Red
}
}

Remove field from content type using PowerShell:
Here is how you can delete a site column from a content type programmatically
Function Remove-FieldFromContentType([Microsoft.SharePoint.SPWeb] $web, [string]$ContentTypeName, [string]$FieldNameToRemove)
{
#Get Content Type and Field (Site column) objects
$ContentType=$web.ContentTypes[$ContentTypeName]
#Check if the content type exists
if($ContentType -ne $null)
{
#Check if the content type has the Field
if($ContentType.Fields.ContainsField($FieldNameToRemove))
{
#Rempve the Field from the content type
$ContentType.FieldLinks.Delete($FieldNameToRemove)
$ContentType.Update($true)
Write-Host "Field removed from the Content Type!" -ForegroundColor Green
}
else
{
Write-Host "Field Doesn't Exists in the Content Type!" -ForegroundColor Red
}
}
else
{
Write-Host "Content type not found!" -ForegroundColor Red
}
}

Now, Lets call the respective function to add or remove site column from content type using PowerShell:
#Configuration parameters
$WebURL="http://portal.crescent.com"
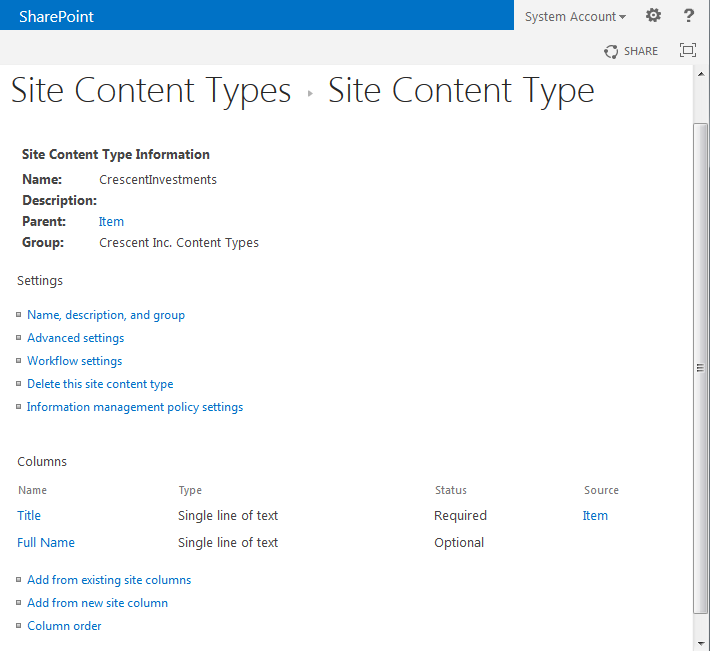
$ContentTypeName="CrescentInvestments"
$FieldName="FullName" # Internal Name of the field

#Get the Web
$Web = Get-SPWeb -Identity $WebURL

#Call the method to Add field to content type
Add-FieldToContentType $Web $ContentTypeName $FieldName
#Remove-FieldFromContentType $Web $ContentTypeName $FieldName
and the result goes here:
sharepoint 2013 powershell add field to content type

This Programmatically Updates the given Content Type. Here is my another post on PowerShell script to add site column to SharePoint: Create Site Column in SharePoint using PowerShell

Create BDC Service Application in SharePoint 2013 / 2016 using PowerShell

$
0
0
PowerShell script to create BDC Service Application in SharePoint 2013 / 2016:

Add-PSSnapin Microsoft.SharePoint.PowerShell -ErrorAction SilentlyContinue

#Configuration Parameters
$ServiceAppName = "BDC Service Application"
$ServiceAppProxyName = "BDC Service Applicatio Proxy"
$AppPoolAccount = "Crescent\SP16-AppPool"
$AppPoolName = "Service Application App Pool"
$DatabaseServer = "SP16-SQL001"
$DatabaseName = "SP16_BDC_ServiceApp"

#Check if Managed account is registered already
Write-Host -ForegroundColor Yellow "Checking if Application Pool Accounts already exists"
$AppPoolAccount = Get-SPManagedAccount -Identity $AppPoolAccount -ErrorAction SilentlyContinue
if($AppPoolAccount -eq $null)
{
Write-Host "Please Enter the password for the Service Account..."
$AppPoolCredentials = Get-Credential $AppPoolAccount
$AppPoolAccount = New-SPManagedAccount -Credential $AppPoolCredentials
}

#Check if the application pool exists already
Write-Host -ForegroundColor Yellow "Checking if the Application Pool already exists"
$AppPool = Get-SPServiceApplicationPool -Identity $AppPoolName -ErrorAction SilentlyContinue
if ($AppPool -eq $null)
{
Write-Host -ForegroundColor Green "Creating Application Pool"
$AppPool = New-SPServiceApplicationPool -Name $AppPoolName -Account $AppPoolAccount
}

#Check if the Service application exists already
Write-Host -ForegroundColor Yellow "Checking if BDC Service Application exists already"
$ServiceApplication = Get-SPServiceApplication -Name $ServiceAppName -ErrorAction SilentlyContinue
if ($ServiceApplication -eq $null)
{
Write-Host -ForegroundColor Green "Creating BDC Service Application"
$ServiceApplication = New-SPBusinessDataCatalogServiceApplication –ApplicationPool $AppPoolName –DatabaseName $DatabaseName –DatabaseServer $DatabaseServer –Name $ServiceAppName
}

#Start service instance
Write-Host -ForegroundColor Yellow "Starting the BDC Service Instance"
$ServiceInstance = Get-SPServiceInstance | Where-Object { $_.TypeName -like "*Business*" }
Start-SPServiceInstance $ServiceInstance

Write-Host -ForegroundColor Green "BDC Service Application created successfully!"

Create BDC Service Application in SharePoint 2016

$
0
0
The Business Data Connectivity (BDC or BCS) service application in SharePoint 2016 enables us to connect and manipulate with external line of business data sources such as SQL Server, web services, WCF Service, SOAP, REST Service Connection, XML file connection, oAuth and other proprietary data sources that are accessed by custom .NET assemblies from SharePoint. Using BDC, you can use SharePoint 2016 and Office clients as interfaces with data that doesn’t live in SharePoint. External content types are the core of BDC, It interacts with data through external content types which allows the interaction with external data in SharePoint lists.

During SharePoint farm configuration, If you ran Farm configuration wizard to configure all services then you may already have BDC service application configured for you by SharePoint. You can verify if its created already by going to:
  •     Open SharePoint Central administration site
  •     Click on Application Management >> Service Applications >> Manage service applications
  •     Check if Business Connectivity Services service application is listed.
Create new business data connectivity service application SharePoint 2013/2016:
Lets see how to create new business data connectivity service application in SharePoint 2016. BDC service application in SharePoint can be configured by following below steps:
  • Login as a Farm administrator and Open SharePoint Central administration site
  • Click on Application Management >> Service Applications >> Manage service applications
  • In the Manage service applications page, click on New button from the Ribbon.
  • From the menu, choose Business Data Connectivity Service.create new business data connectivity service application sharepoint 2013
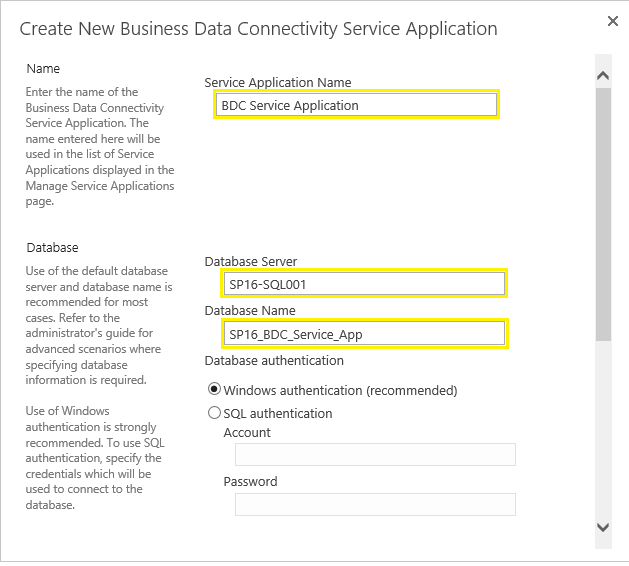
  • Provide the Name,Database Name, and database server. You can remove the GUID to keep it clean.
    create business data connectivity service application sharepoint 2016
  • If your SQL Server database for SharePoint is configured with mirroring, then you can include the Business Data Connectivity Service database in mirroring by providing the name of the failover database server in the Failover Database Server. Leave it empty otherwise.
  • Scroll down and set Application Pool settings. You can either select Use existing application pool or to create new application Pool by providing name and Managed Account.
    configure bdc service application sharepoint 2016
  • At the bottom of the page, click OK to trigger creating new BDC service application.
  • Once created, you should get the success popup and your new Business data connectivity service application will be listed under service applications list.
sharepoint business data connectivity service application

Start Business Data Connectivity Service instance:
Once the service application is created, make sure you have the corresponding service instance started.
  1. Browse to SharePoint 2016 Central Administration site
  2. On the "Application Management" page under "Service Applications" click "Manage services on server"
  3. Find Business Data Connectivity Service and then click Start if its not started already.

Check Service Application's Association with web applications:
Verify your Service application is associated with all web applications, Otherwise, You may encounter "There is no default Business Data Connectivity Service Proxy" error!. If you had created a new BDC service application, the new BDC service application must be associated with all of your web applications. Here is how you can verify it:
  • Open SharePoint 2016 central administration site
  • Click on Application Management >> Service Applications >> Configure service application associations
  • Make sure your newly created service application is listed with web applications there. 
If its not listed under default list, Click on "Default" link and then "set it as default" to set the service application under default proxy group. Alternatively, you can select the web application, Choose custom from the drop down and then select your new BDC service application
 bdc service application sharepoint
Last but not least: Assign Permissions
Make sure you grant appropriate permissions to users before they start working with BDC. Otherwise, You'll encounter "Access denied by Business Data Connectivity" error! Just Open the service application from SharePoint Central Administration >> Click on  Set Metadata store permissions button from the ribbon >> Add users and assign permissions such as  Edit, Execute
sharepoint 2013 bdc service application
Related post:How to Create Business data connectivity service application using PowerShell in SharePoint 2016

Add-Remove Permissions to SharePoint Group or User with PowerShell

$
0
0
Updating the permission level of a SharePoint group or user is fairly straightforward. To add or remove permissions levels of the SharePoint group, Navigate to:
  • Site Settings >> Site permissions
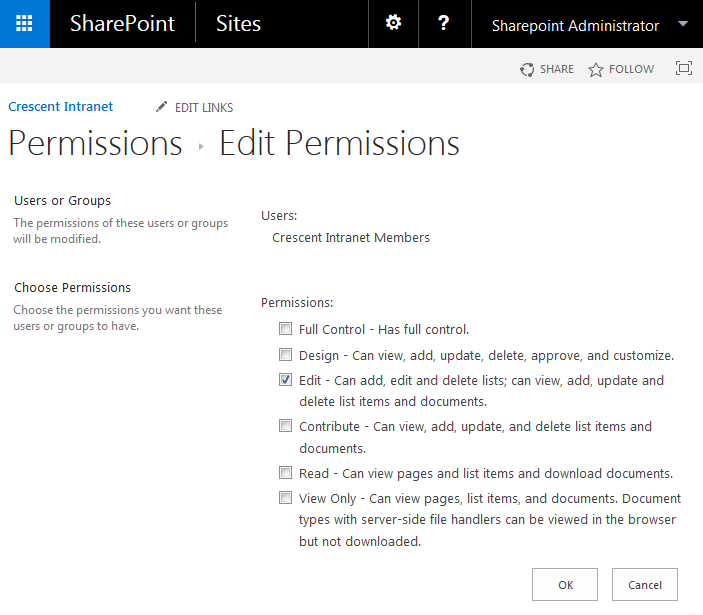
  • Select the person or group you want to change >> Click on "Edit User Permissions" ribbon button update user permissions using powershell in sharepoint 2016
  • Select or deselect any relevant permission levels required
    add remove permissions of a SharePoint group or user using powershell in sharepoint 2013
  • Click "OK" to save changes.

PowerShell script to update Permissions of a SharePoint group or User:
Here is my PowerShell script to change permission level of SharePoint group: Say, We want to remove "Edit" permission level and add "Contribute" to Members group of the SharePoint site.
Add-PSSnapin "Microsoft.SharePoint.PowerShell" -ErrorAction SilentlyContinue

#Configuration parameters
$SiteURL="http://intranet.crescent.com"
$GroupName="Crescent Intranet Members"
$PermissionToAdd="Contribute"
$PermissionToRemove="Edit"

#Get the Web & Group objects
$Web = Get-SPWeb $SiteURL
$Group = $web.SiteGroups[$GroupName]
$RoleAssignment = $Web.RoleAssignments.GetAssignmentByPrincipal($Group)

#For User, Use:
#$User = $web.EnsureUser("Crescent\Salaudeen")
#$RoleAssignment = $Web.RoleAssignments.GetAssignmentByPrincipal($User)

#Get the permission Levels to Add - Remove
$AddPermissionRole = $web.RoleDefinitions[$PermissionToAdd]
$RemovePermissionRole = $web.RoleDefinitions[$PermissionToRemove]

#Add Permission level to the group
if (!$RoleAssignment.RoleDefinitionBindings.Contains($AddPermissionRole))
{
$RoleAssignment.RoleDefinitionBindings.Add($AddPermissionRole)
Write-host "$($PermissionToAdd) Permission Added to the Group!"
}

#Remove Permission Level from the Group
if ($RoleAssignment.RoleDefinitionBindings.Contains($RemovePermissionRole))
{
$RoleAssignment.RoleDefinitionBindings.Remove($RemovePermissionRole)
Write-host "$($PermissionToRemove) permission removed from the Group!"
}

$RoleAssignment.Update()

How to Add a New User Group in SharePoint 2016

$
0
0
It is best practice to assign permissions to groups and add users to those groups rather than granting permission directly. If the default groups do not suit your needs, you can create new groups.

Lets see how to create new SharePoint 2013 groups.
Make sure you logged in as a site collection administrator or Site owner to create a new group in SharePoint!

Create a New Group in SharePoint 2016:
  • Login to the site where the group needs to be created
  • From the home page, click on Settings gear icon and choose Site Settings from the drop-down menu.
  • Click on Site Permissions under users and permissions section.
  • Click on Create Group icon from the ribbon.
  • Give a Name of the group and Description on the Create group page
  • You can assign group owner or add an additional group owner Optionally. The owner will be able to edit group membership. Select who can view membership of the group and who can edit group members.
  • Select the appropriate setting for membership requests.
  • Select the appropriate permission levels(s) for the group. Any permissions selected here will apply to the entire site.
The new SharePoint group will be created and you will be taken to the People and Groups page where you can start adding users to the group created.

Related post: How to create a SharePoint group using PowerShell

Configuring Web Application User Policy in SharePoint 2013 / 2016

$
0
0
A SharePoint web application may have hundreds or thousands of site collections. Providing same access to all of those site collections for a set of users can be difficult task, isn't it? So here is where SharePoint Web application Policies comes to play. Consider these practical scenarios where:
  • Your SharePoint search crawl account needs read access on all site collections.
  • You'll have to provide Read access to all site collections to "Auditors" group of your organization
  • You may want to provide read access to all users for an Intranet web application.  
  • Your CIO wants to get Full control on all site collections. 
  •  Your fellow farm administrator needs full control over all site collections on the SharePoint 2013 web application, etc.
Web application user polices are the comprehensive way to apply to permission to all site collections in a web application. Web application policy either grant or deny permissions to a set of users. By default, a web application has these four permission policy levels predefined:
  • Full Control
  • Full Read
  • Deny Write
  • Deny All
In fact, the Web application User policy is basically a mapping between Active Directory user or group and certain Web Application Level Permission policy. 

Permissions applied using web application User Policy simply supersedes all other permissions applied at the individual site collection level. E.g., if a user has Read access to some site collections, granting the Full Control permission gives the user "Full Control" all site collections within the entire web application. With web application level permission policies you can control centrally manage access to all content in the web application without individually adding site collection administrators on each site.

Deny permission level takes precedence over any existing permissions applied. E.g. Applying Deny All to a user prevents any and all access to a web application and all its site collections. BTW, Deny policy at web application level is the only way to block someone's access to SharePoint.

To access the user policy for a web application using Central Administration:
  1. Open SharePoint 2016/2013/2010 Central Administration site as a Farm Administrator
  2. Click Application Management >> Select Manage Web Applications.
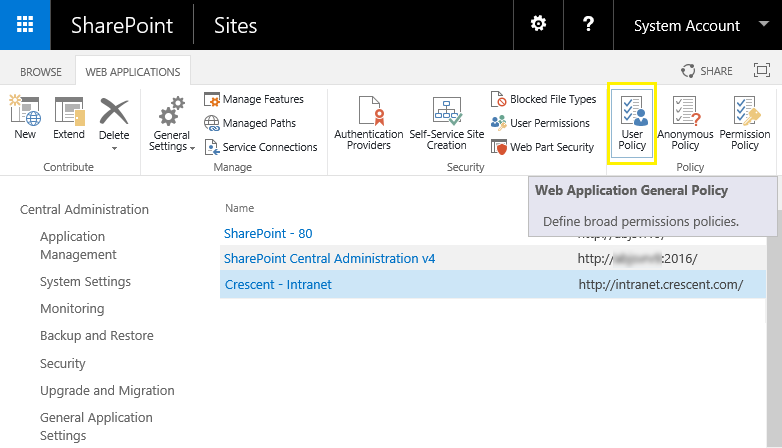
  3. Select your target web application >> Click the User Policy button from the ribbon.web application policy in sharepoint 2013
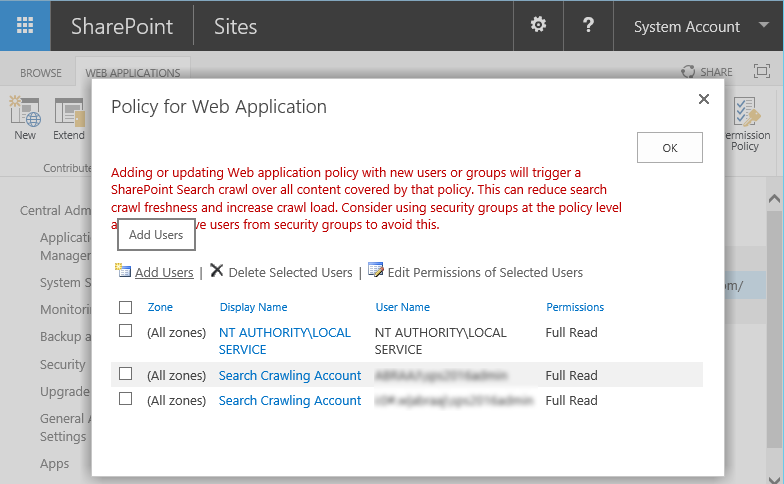
  4. This page lists all user policies created for the web application. Usually, you'll find the search service application crawl account here with full read access user policy to granted. web application user policy sharepoint 2016
How to add new Web application user Policy:
To add a new policy, click the Add Users link. Then perform the following steps:
  1. From the Policy for Web Application dialog box, click on "Add Users" link. 
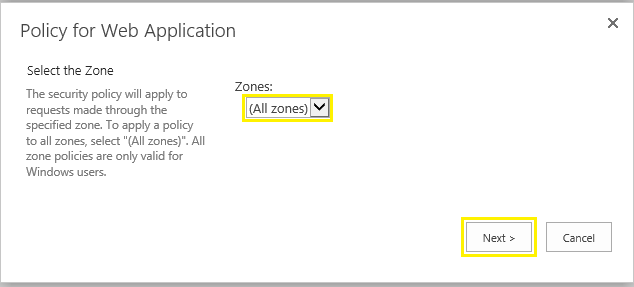
  2. Select All Zones for the web application and click on Next (You can optionally select a single zone such as Internet and limit the policy with the zone)web application policy sharepoint
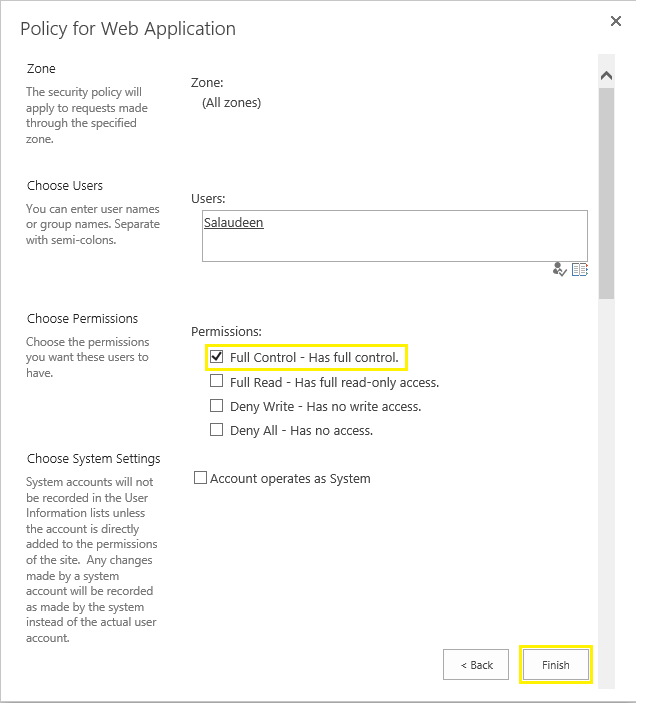
  3. Enter one or more user account names or security groups. You can enter multiple users or security groups.
  4. Select the permission policy levels that you want to apply. You can add custom permission policy levels from "Permission Policy".
  5. Optionally, you can select the "Account Operates As System" check box, which means if a user creates or modifies any item in this web application, the Created By and Modified by entries will be shown as: System Account.Add user to web application user policy sharepoint 2016
  6. Click Finish to save your changes. This ensures consistent security permissions across site collections of a web application.
By providing permissions policy at the web application level, Our purpose is to control who has access to the content within the site collections that are associated with the web application.
 
Edit Existing User Policies:
To edit any of the existing policy:
  • Click on the corresponding "Display Name" value (or you can check the policy and click the Edit Permissions Of Selected Users link). 
  • In the edit policy dialog box, adjust any required settings, such as permissions and click on Save once done..

To Delete a Web Application User Policy:
To remove a user policy, simply select the policy and click on "Delete Selected Users" link, Confirm when prompted.

As a best practice, use Active directory security groups in SharePoint web application user policies as adding individual users triggers search crawl to trigger. This procedure applies to all version of SharePoint SharePoint 2016, 2013, 2010, and 2007!

Related post: PowerShell script to Add Web Application User Policy in SharePoint

Backup-Restore All SharePoint Databases in SQL Server using PowerShell

$
0
0
Requirement: We planned to move our SharePoint's SQL database to a different server. So, we had to backup and restore all SharePoint databases from one SQL Server 2012 instance to another.

Solution:
Here are the steps at high level to move SharePoint from one SQL Server to another:
  1. Get a list of all SharePoint databases
  2. Backup all SharePoint databases from the source SQL Server
  3. Restore the backups to the target SQL server instance
  4. Change the SQL Alias in SharePoint Server to point to the new server.
Step 1: Get all SharePoint databases
#Get All SharePoint Databases and form an Array
Get-SPDatabase | Select -ExpandProperty Name | foreach { $Databases+= $_+"," }

#Export to a txt file
$Databases > databases.txt
This script gets you a list of all SharePoint databases, including configuration database, content databases and service application databases to a comma separated string. Lets take that string and give it to our backup script.
Tips: If you want to get all Content databases, use: Get-SPContentDatabase | Select -Expandproperty Name

Step 2: Backup All SharePoint Databases:
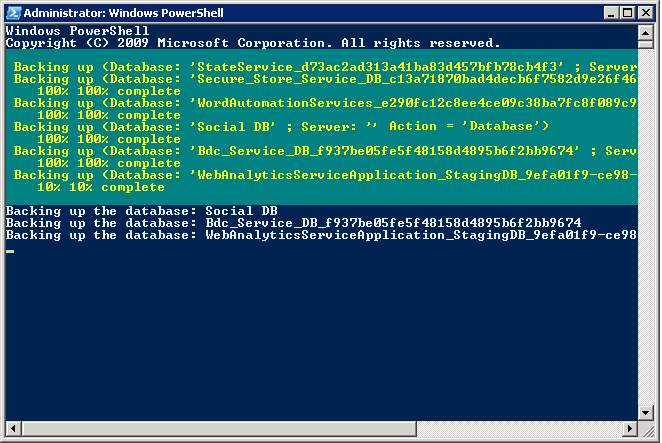
Before taking backup of all SharePoint databases, make sure you set the site(s) to Read-only mode (or set the database to Read-only in SQL Server) in order to avoid any data inconsistency issues.

Here is the PowerShell script to backup all Databases from SQL Server:
#Import SQL PowerShell module
Import-Module SQLPS –DisableNameChecking

#Configuration parameters
$SQLInstance="Cre-SQL-001"
$BackupPath="F:\Backup\"

#Array of Database names, Comma separated
$DatabaseColl="StateService_d73ac2ad313a41ba83d457bfb78cb4f3,Secure_Store_Service_DB_c13a71870bad4decb6f7582d9e26f46a,WordAutomationServices_e290fc12c8ee4ce09c38ba7fc8f089c9,Social DB,Bdc_Service_DB_f937be05fe5f48158d4895b6f2bb9674,WebAnalyticsServiceApplication_StagingDB_9efa01f9-ce98-4e4e-9e2d-ecfc9e19fc79,SharePoint_Config_2010,PerformancePoint Service Application_c1a8062656434a24a9c53f05fc8144f7,Search_Service_Application_CrawlStoreDB_76166d368e4a4ef58aabf8df57d7c670,Search_Service_Application_PropertyStoreDB_1fc75775ee894fd2aa0c4d1e7c75f0c7,Application_Registry_Service_DB_8e93a305ea904c81a34a3dd205265fc7,SharePoint_AdminContent_e0021dbb-cc00-4b58-a16d-9c4c481228ff,WSS_Content,WSS_Content_KM,WSS_Content_MySites,Search_Service_Application_DB_bfdf7354e7f84b1281121c7bdca7b43f,Managed Metadata Service_ff52c4f0cd504d938cd1b3dc9ef9ae8b,Profile DB,WSS_Logging,Sync DB,WebAnalyticsServiceApplication_ReportingDB_894b25ce-a2ba-4c7c-885e-08b3924deec8"

#Convert comma separated into an Array
$DatabaseNames = $DatabaseColl -split ","

#Backup Each Database
Foreach($DBName in $DatabaseNames)
{
write-host "Backing up the database: $($DBName)"
Backup-SqlDatabase -ServerInstance $SQLInstance -Database $DBName -BackupFile "$($BackupPath)\$($DBName).bak"
}

Step 3: Restore all databases to the target SQL Server instance
Copy all backup files from the source server to the target and then, use the below PowerShell script to restore SQL Server databases in bulk. Make sure the original location (as in the source database server) do exists in the target server.

PowerShell script to restore SQL Server databases in bulk:
#Import SQL PowerShell module
Import-Module SQLPS –DisableNameChecking

#Configuration parameters
$SQLInstanceName="Cre-SQL-002"
$BackupPath="E:\Backup\"

#Get all Backup files
$BackupFilesColl = Get-ChildItem –Path $BackupPath | where {$_.extension -eq ".bak"}

#Iterate through each backup file
Foreach($BackupFile in $BackupFilesColl)
{
#Get the full path of the backup file
$DatabasePath = $BackupPath + '\' + $BackupFile

#Frame the Database Name
$DatabaseName = $BackupFile.ToString().Replace(".bak", "")

#Restore the database
write-host "Restoring Database: $($DatabaseName)"
Restore-SqlDatabase -ServerInstance $SQLInstanceName -Database $DatabaseName -BackupFile $DatabasePath
}
Backup-Restore All SharePoint Databases in SQL Server using PowerShell

Step 4: Change SQL Server Alias to Point your New SQL Server:
and as a final step, change your SQL Alias from SharePoint servers to point new SQL server instance. Here is my post on configuring SQL server alias: How to Create SQL Server Alias for SharePoint. Do IISReset once done!

These scripts can be used in scenarios, such as:
  • During SharePoint migrations, where you may be taking all SharePoint databases to a new SQL Server instance.
  • When you have to move SharePoint databases from a Single standalone SQL Server to a highly available cluster, or SQL Server AlwaysOn cluster.

How to Hide the Timeline in the Task List of SharePoint 2013/2016

$
0
0
Requirement: Hide timeline from SharePoint 2016 task list
sharepoint task list hide timeline
Solution: Here is how you can hide the timeline in SharePoint 2013/2016 task lists.
  1. Go to the Task List, Click on List Tab and then click on "Modify View" button from the ribbon.
  2. In the Edit view page, scroll down and expand the 'Style' section.
  3. Under the Style selection, Uncheck the checkbox 'Show timeline above the view'
  4. click on 'OK' button to save changes.
Here is the Result:
sharepoint 2013 task list hide timeline

Alternatively, You can edit the page, Edit List view properties, and uncheck "Show Timeline" Checkbox to hide timeline from SharePoint tasks list.

How to Change Server Role after Installing SharePoint 2016

$
0
0
One of the exciting new feature in SharePoint 2016 is Minrole. It defines server's role in the SharePoint 2016 farm, and makes sure all necessary services are running in that server! SharePoint 2016 comes with below Minroles:
  1. Single Server Farm
  2. Front End
  3. Application
  4. Distributed Cache
  5. Search
  6. Custom
Change MinRole in  SharePoint 2016:
Server roles are selected during the installation of SharePoint 2016 or when you join a server to your farm. Based on the Server role selected, certain services will get activated on selected servers. What if you want to change the server role after SharePoint has been provisioned?  With the introduction of MinRoles in SharePoint 2016, its fairly straightforward to switch server roles between anyone among them:
  • Go to SharePoint 2016 Central Administration >> System Settings 
  • Click on Convert server role in this farm under Servers
How to Change Server Role in SharePoint 2016
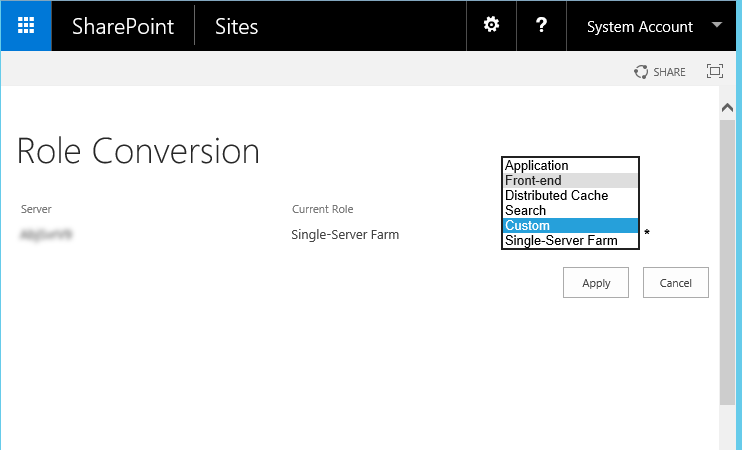
Now, It takes you to the "Role conversion" page, where you will see the options for all Minroles. Pick the new role from the dropdown and click Apply,  Your server will be changed to New role!
swith server role after provisioning SharePoint 2016
You can't combine two or more MinRoles in one server. However, You can use the Custom role  to achieve the same! To check roles assigned to servers in the farm, Go to: SharePoint 2016 Central Administration >> System Settings > Manage servers in this farm. This page lists all servers and their roles in the farm.

Update SharePoint List Items from CSV File using PowerShell

$
0
0
Requirement: Update SharePoint List Items from CSV file.

Bit background: We've a list with 1000's of rows of organization wide experts. Later we added a new field for "Department". Now the requirement is to update Department field for specific list of users. While the datasheet view can be used for bulk editing, filtering and editing 100's of rows would be time consuming. So the solution is: Have list of user names and their departments in CSV file format, give it to PowerShell!

PowerShell Script to Read from CSV file and Update SharePoint List Items:
Add-PSSnapin Microsoft.SharePoint.PowerShell -ErrorAction SilentlyContinue

#Read the CSV file
$CSVData = Import-CSV -path "C:\UserData.csv"

#Get the Web
$web = Get-SPWeb -identity "http://portal.crescent.com"

#Get the Target List
$List = $web.Lists["ExpertProfiles"]

#Iterate through each Row in the CSV
foreach ($Row in $CSVData)
{
#Get the List Item matching "Name" field in the CSV
$Item = $List.Items | Where-Object { $_["Title"] -eq $Row.Name }

if($item -ne $null)
{
#Update List Item - Internal Name!
$item["Department"] = $row.Department
$item.Update()
Write-Host "Updated:"$row.Name -ForegroundColor Green
}
else
{
write-host "No matching Item Found for:"$row.Name -f Red
}
}
While the above code serves the purpose, Lets optimize it with CAML-SPQuery

PowerShell to Update SharePoint List from CSV:
Add-PSSnapin Microsoft.SharePoint.PowerShell -ErrorAction SilentlyContinue

#Read the CSV file
$CSVData = Import-CSV -path "C:\UserData.csv"

#Get the Web
$web = Get-SPWeb -identity "http://portal.crescent.com"

#Get the Target List
$List = $web.Lists["ExpertProfiles"]

#Iterate through each Row in the CSV
foreach ($Row in $CSVData)
{
#Filter using CAML Query
$CAMLQuery="<Where><Eq><FieldRef Name='Title'/><Value Type='Text'>$($Row.Name)</Value></Eq></Where>"
$SPQuery=New-Object Microsoft.SharePoint.SPQuery
$SPQuery.ViewAttributes = "Scope='Recursive'" #Get all items including Items in Sub-Folders!
$SPQuery.Query=$CAMLQuery
$SPQuery.RowLimit = 1

#Get the List item based on Filter
$Item=$List.GetItems($SPQuery)[0]

If($Item -ne $null)
{
#Update List Item
$Item["Department"] = $Row.Department
#$item.Update()
Write-Host "Updated:"$row.Name -ForegroundColor Green
}
else
{
write-host "No matching Item Found for:"$row.Name -f Red
}
}
Related Posts:

Add-Remove User to SharePoint Multi-Valued People Picker Field using PowerShell

$
0
0
Requirement: 
We've a SharePoint list called "Projects" with 1000's of items. The list has a field called "Team Members" which allows multiple user values. We often get a requirement to either add or remove a particular user to all items or specific items filtered by other columns in the list.

Solution: Adding-removing user from multiple items in a bulk can be achieved with PowerShell. Lets use PowerShell to add or remove user from SharePoint people picker (person or group) field value.

PowerShell to Add new user to Person or Group Field:
Add-PSSnapin Microsoft.SharePoint.PowerShell -ErrorAction SilentlyContinue

#Configuration parameters
$SiteURL = "http://portal.crescent.com/projects/"
$ListName = "Projects"
$FieldName= "TeamMembers"
$UserToAdd="Crescent\Sam"

#Get site and List objects
$web = Get-SPWeb $SiteURL
$List = $web.Lists.TryGetList($ListName)

#Item Ids to update
$IDColl= @(4,5,7,14,55,169,258,260,261)

#Iterate through each item
foreach($ItemID in $IDColl)
{
#Get the Item
$Item = $List.GetItembyID($ItemID)
Write-Host "Processing: "$item["ProjectName"]

#Get Existing field value
$MultiUserCollection = [Microsoft.SharePoint.SPFieldUserValueCollection]$item[$FieldName]

#Prepre the user to Add
$User = $Web.EnsureUser($UserToAdd)

#Add new user to the collection
$NewUser = new-object Microsoft.SharePoint.SPFieldUserValue($Web, $User.ID,$User.Name)
$MultiUserCollection.Add($NewUser)

#Update the field value
$item[$FieldName] = $MultiUserCollection
$item.update()

write-host "Team Member Added!"
}

PowerShell to remove user from Multi-user People Picker field:
Add-PSSnapin Microsoft.SharePoint.PowerShell -ErrorAction SilentlyContinue

#Configuration parameters
$SiteURL = "http://portal.crescent.com/projects.abraaj.com/projects/"
$ListName = "Projects"
$FieldName= "TeamMembers"
$UserToRemove="Crescent\Sam"

#Get site and List objects
$web = Get-SPWeb $SiteURL
$List = $web.Lists.TryGetList($ListName)

$IDColl= @(184,259,281,282,306,318,331,378,404,410)
foreach($ItemID in $IDColl)
{
#Get the Item
$Item = $List.GetItembyID($ItemID)
Write-Host "Processing: "$item["ProjectName"]

#Get Existing field value
$MultiUserCollection = [Microsoft.SharePoint.SPFieldUserValueCollection]$item[$FieldName]
$NewUserCollection = new-object Microsoft.SharePoint.SPFieldUserValueCollection

#Prepre the user to remove
$User = $Web.EnsureUser($UserToRemove)

#Create a new collection - exclude user to remove
Foreach($MultiUser in $MultiUserCollection)
{
if($MultiUser.User.LoginName -ne $User.LoginName)
{
#Add user to new collection
$NewUser = new-object Microsoft.SharePoint.SPFieldUserValue($Web, $MultiUser.User.ID,$MultiUser.User.Name)
$NewUserCollection.Add($NewUser)
}
}
#Update the list item
$item[$FieldName] = $NewUserCollection
$item.update()

write-host "User Removed From Existing People Picker field Value!"
}

Customize Suitebar Text and Link in SharePoint 2016 using PowerShell

$
0
0
Requirement:
By default, SharePoint 2016 comes with "SharePoint" as the suitebar branding text.  What if you would like to change it to something meaningful, say "Your Company Intranet"? Well, PowerShell can help to customize the branding text, Logo and URL in SharePoint 2016.
sharepoint 2016 add link to suite bar powershell
PowerShell Script to change Suitebar navigation text and link:
Add-PSSnapin Microsoft.SharePoint.PowerShell -ErrorAction SilentlyContinue

$WebApp= Get-SPWebApplication "http://intranet.crescent.com"
$WebApp.SuiteNavBrandingText = "Crescent Portal"

#Blank image from Layouts folder
$webapp.SuiteNavBrandingLogoUrl = "/_layouts/images/dot_ruleper.gif"
$webapp.SuiteNavBrandingLogoTitle = "Crescent Logo"
$webapp.SuiteNavBrandingLogoNavigationUrl = "http://portal.crescent.com"
$webapp.Update()

Here is the result of customized SharePoint 2016 suite bar branding using PowerShell!
customizing the sharepoint 2016 suite bar branding using powershell
My another post Customizing the SharePoint 2013 suite bar branding using PowerShell

Copy Permissions from One SharePoint Site to Another using PowerShell

$
0
0
Requirement: Copy permissions from one site to another in SharePoint!

Solution: If you want to copy one SharePoint site to another site, there is no OOTB ways! However, You can use PowerShell to copy permissions between sites. Here is my PowerShell script to copy site permissions.

Copy Permissions from one site to another using PowerShell:
Add-PSSnapin Microsoft.SharePoint.PowerShell -erroraction SilentlyContinue

#PowerShell Function to copy permissions from one site to another
Function Copy-SitePermissions()
{
param(
$SourceWebURL,
$TargetWebURL
)
Try {
#Set the Error Action
$ErrorActionPreference = "Stop"

#Get the Source and Target Webs
$SourceWeb = Get-SPWeb $SourceWebURL
$TargetWeb = Get-SPWeb $TargetWebURL

#if permissions are Inherited in the target, Break it!
if($TargetWeb.Permissions.Inherited)
{
#Reset the Inheritence in Target Web
$TargetWeb.BreakRoleInheritance($false)
}
#Copy permissions from Source to Target Web
$SourceWeb.RoleAssignments | foreach-object {
$TargetWeb.RoleAssignments.Add($_)
}
$TargetWeb.Update()
Write-Host "Permissions copied from Source Site to the Target!" -f Green
}
catch {
Write-Host $_.Exception.Message -ForegroundColor Red
}
finally {
#Reset the Error Action to Default
$ErrorActionPreference = "Continue"
}
}

#Call the function to copy Web permissions
Copy-SitePermissions -SourceWebURL "http://portal.crescent.com/ProjectHub/" -TargetWebURL "http://portal.crescent.com/TaxAudits/"

How to Create a Custom Master Page Using Design Manager in SharePoint 2016 - Step by Step

$
0
0
What is Design Manager in SharePoint 2013?
Design manager is a nifty tool introduced in SharePoint 2013 that uses HTML based approach to convert static HTML templates into SharePoint master pages and page layouts. Use Design manager, if you want to implement Branding and customization to your SharePoint sites. The overall idea of SharePoint design manager is: Have your web site template prototype designed by someone who is good at web design and then you use that HTML file to convert to SharePoint Master page. Lets have a SharePoint design manager walk-through.

Enable design manager in SharePoint 2013:
Design manager is enabled by default in SharePoint server publishing sites. You may have to activate publishing feature for other site templates to enable design manager in SharePoint 2013. Design manager is available only in SharePoint Server 2013/2016 and Office 365.

SharePoint 2013 design manager permissions
Make sure you have at least "Designer" permissions in order to start using the Design Manager.

How to open design manager SharePoint 2013?
You can access design manager either from Site actions menu or from site settings page as in the below screen! Design manager URL: /_layouts/15/DesignWelcomePage.aspx
design manager sharepoint 2013 missing
You'll get Design manager wizard with below steps:
  1.     Welcome
  2.     Manage Device Channels
  3.     Upload Design Files
  4.     Edit Master Pages
  5.     Edit Display Templates
  6.     Edit Page Layouts
  7.     Publish and Apply Design
  8.     Create Design Package
Among the above steps listed, we need only three steps to create/customize master pages in SharePoint 2013. Lets see how to use design manager SharePoint 2013 to create a custom master page.

Step 1: Upload Design files


Working with design manager in SharePoint 2013 is quite simple. Go to Upload Design Files: On this page it will ask you to map out your drive so that you will be able to use any HTML editor to access your design files in the future for editing. Here is how to map network drive setup for Master pages library:
  • In Design Manager, Click on "Upload Design Files" tab. You'll get the URL to map to network drive. Copy it to your clipboard.
    design manager in sharepoint 2013 step by step
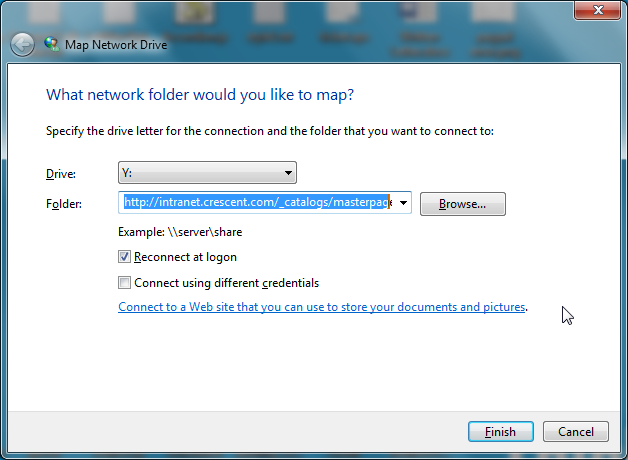
  • SharePoint 2013: Design manager - map network drive: Go to Start >> Right Click on "Computer" and then choose "Map to network drive". Enter the URL you copied from SharePoint Design Manager and then click on "Finish" button.
    design manager tutorial sharepoint 2013
This opens your Master Pages library in Windows Explorer view: http://intranet.crescent.com/_catalogs/masterpage/
Its a good idea to create your own folder in Master Pages library to keep all your files in one single location. I've created my folder "Crescent" there!
In Windows Server 2008 or 2012, You have to install desktop experience feature in order to enable map network drive. Map Network Drive in Windows Server 2008 or 2012
Once you map you map a network drive to the Master Page Gallery folder, it gives you easier way to save files in the correct location.

Upload Design Files
Now upload the HTML version of your Master Page and all CSS, JS, image and any other design assets to the mapped location. The overall idea of Design manager is: You create a visual design for your website by using any web design tool or HTML editor, and then use Design Manager to import the design into SharePoint. To do this, you have to make sure that the design tool stores its files in your site’s Master Page Gallery,
sharepoint 2013 design manager step by step

Step 2: Edit Master Pages - Convert HTML template to SharePoint Master page

 A master page defines common elements across all the pages of your site. You can use the network drive you mapped earlier to edit your master pages using any HTML editor. To preview your master page, click on its file name or status. While previewing your HTML master page, use the Snippet Gallery to get code snippets for SharePoint functionality that you can copy and paste into your HTML file.
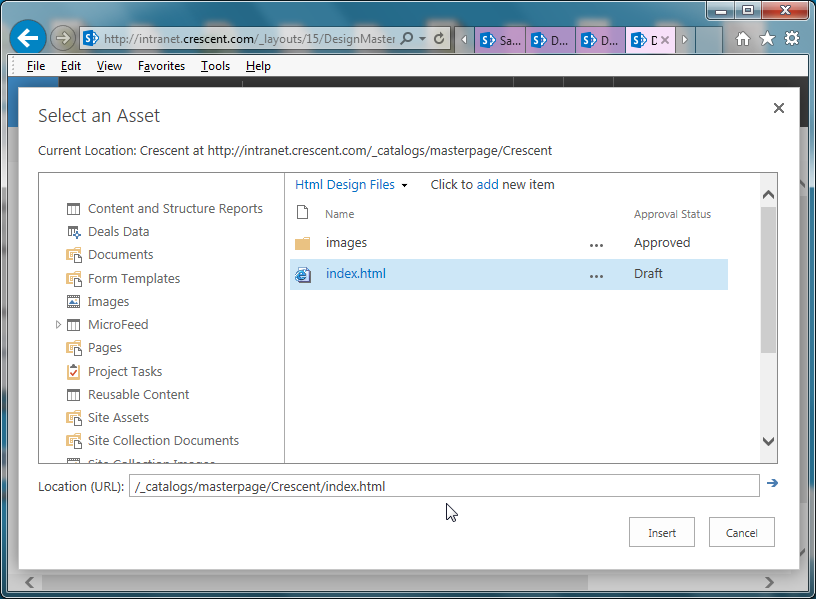
  • Go to "Edit Master Pages" tab, Click on "Convert HTML file to a SharePoint Master Page" link, 
  • Browse and locate the HTML template you uploaded in the previous step.
 design manager sharepoint 2013 tutorial
Do not edit the .master file, always edit .html file! SharePoint takes care of updating the .master page automatically.

Make sure your HTML template is XML compliant! You can use W3C Validator: https://validator.w3.org/

Wait for a while, and your HTML master page should be converted with an extension .master page. Once converted you will see the converted Master Page in the List with the status Conversion Successful. If you encounter any warnings or errors, use this link to troubleshoot: https://msdn.microsoft.com/en-us/library/office/jj822362.aspx
Modify the master page to wrap inside content place holder:
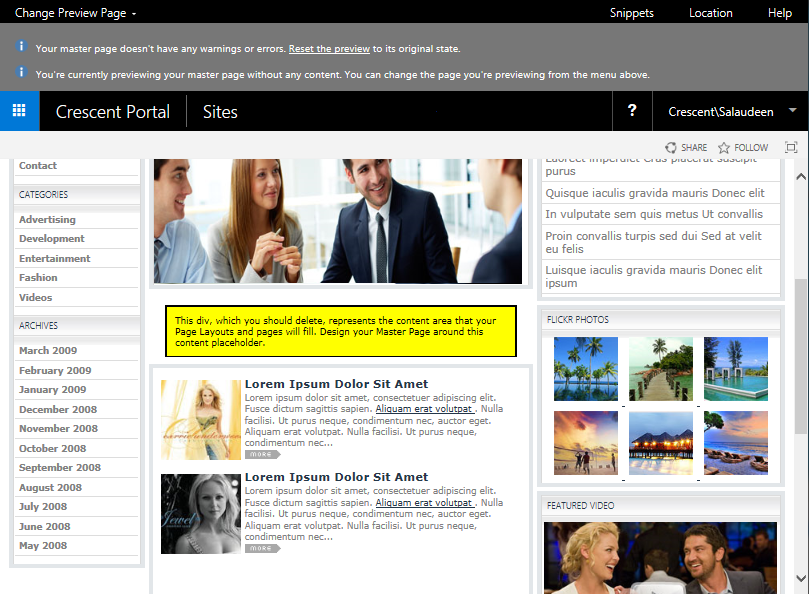
Now, Click on the "Index" file to see the preview of the HTML master page generated. If you scroll down, You'll find this below:
This div, which you should delete, represents the content area that your Page Layouts and pages will fill. Design your Master Page around this content placeholder.
Which simply tells you that this content place holder in the HTML file should be wrapped inside the appropriate content place holder of your HTML template file.
  • Open the HTML Master page file (Index.html) in SharePoint designer 2013 and find the DIV <div data-name="ContentPlaceHolderMain">
  • Move the above DIV completely inside to the content area of your HTML template file. Once moved, your HTML master page will look like:
    sharepoint design manager example
SharePoint 2013 design manager snippets 
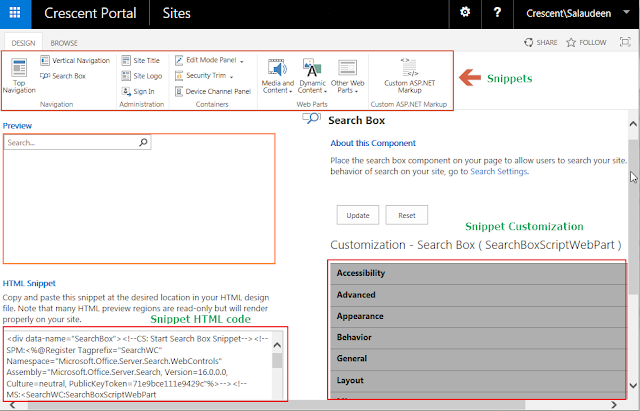
Once the master page is generated, the next step is to add SharePoint functionality to the master page using snippets. Snippets allow you to take SharePoint widgets and plug it into your master page. E.g. Search box, Top Navigation Menu, etc.  To Access snippets, Click on your HTML master page generated, Click on "Snippets" link at the top, Pick the required component and then copy the code to your Master page using SharePoint designer or some other editing tools.

SharePoint Design Manager vs SharePoint Designer: Don't confuse SharePoint Designer with Design Manager! The Design Manager is a feature of Publishing sites and can be used to Design SharePoint Branding artifacts like Master Pages, Page Layouts, etc. 
sharepoint 2013 design manager snippets
Go to the Master Pages Library from SharePoint site, Locate and Publish the HTML Master page once.

Step 3: Apply the New Master page:

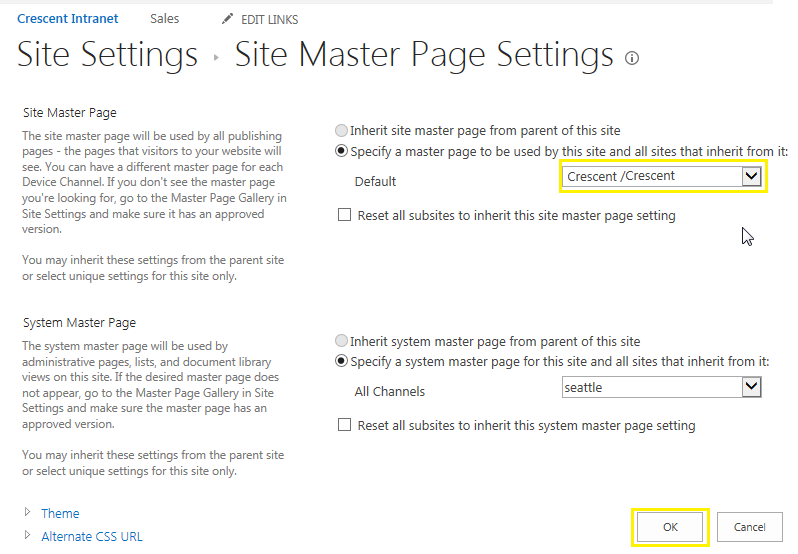
Now navigate to Site Settings >> Look and Feel >> Master Page, Select the master Page You created and click on OK to use it for the site collection.
using design manager sharepoint 2013
You can also create a package for your design to make it deployable to other site collections.

How to Create SharePoint 2016 Design Package using Design Manager

$
0
0
How to create a design package in SharePoint 2016:
The design package is a .wsp file that can be created through the Design Manager in SharePoint 2013 or SharePoint 2016, contains branding assets that are stored in Design Manager. With the packaging feature of Design manager, we can package all our branding artifacts into Re-deployable package (wsp) without using Visual studio.
Refer this article to create a custom master page using SharePoint 2016 design manager: How to Create a Custom Master Page Using Design Manager in SharePoint 2016 - Step by Step
Here are the steps to create and apply a design package:
  1. Create a design package using Design Manager in SharePoint 2016
  2. Export design package WSP file from the source site collection
  3. Import & Apply design package to the target site
Step 1: Create a design package in SharePoint 2013/2016:
Creating the design package is quite simple.
  • Go to Site Settings >> Design Manager 
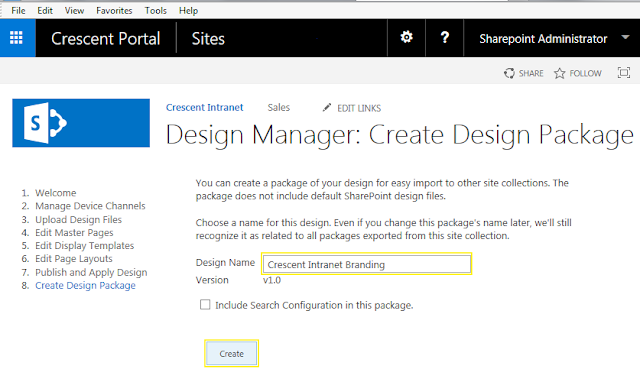
  • Clickon "Create Design Package" link from the design manager left navigation
    sharepoint 2013 create a design package
  • Design manager gives the name and version number for you automatically - You can rename it if required. Optionally you can include the Site Collection search configuration in the package. Click on "Create" button to create the WSP package.
    create a design package in sharepoint 2016
  • Wait for a while it generates the WSP package with all branding artifacts, including: MasterPages, Page Layouts, Display Templates, CSS Style Sheets, JavaScript files, Images, etc. Once the package creation is completed, you'll get the link to download the wsp file. This generates a WSP file that will live in the Solutions gallery
  • Export design package: Click on "Your Package is ready. Click here to download" link to download the wsp.
    sharepoint 2013 design package download
The design package will be stored in side solution gallery of the site collection that can be found here: http://site-collection-url/_catalogs/solutions


Step 3: SharePoint 2013 import design package (wsp)
Once the design package is ready, can be imported to any site through the "Import design package" option in Site Settings. we can port it to anywhere and apply the new design through this package. Here are the steps to apply the design package in the target site.
Make sure the destination site collection is a publishing site or have Publishing feature enabled!
  • Navigate to the site settings of the target site. Click on "Import Design Package" link under "Look and Feel" section
    upload design package sharepoint 2013
  • Click on "Browse" button and select the WSP file generated from the previous step. Click on "Import" button once.
    sharepoint 2013 import design package powershell
  • Wait for a while til it gives the message "import of package "your package name" succeeded".
    sharepoint online import design package
That's all. This actives the sandbox solution automatically and your new design should be live now!

How to Configure Secure Store Service Application in SharePoint 2016 - Step by Step

$
0
0
Secure store service enables you to securely store credentials required for connecting to external systems and associating those credentials to a specific identity or group of identities.  Secure Store Service solves the problem of having to sign into many applications and entering different usernames and passwords. This is managed through the SharePoint central administration and keeps the credentials stored secure and safe within a secured storage. Secure Store Service was introduced as a replacement to Single Sign-On in MOSS 2007.

Purpose of secure store service in SharePoint 2013
Primary purpose of Secure Store Service is to maintain credentials for target applications on external systems. When we connect to external data sources, it needs to pass the user credentials like user name and password. These type of scenarios we can solve with configure an unattended service account for the external data access.

E.g. When you want to use external data, such as data from your other business applications, in SharePoint, you can use Business Connectivity Services (BCS) together with Secure Store Service. And, you can manage BCS and Secure Store right in the SharePoint central administration site. The external data source that you can connect to is called a Secure Store Target Application. BCS makes it possible for you to set up a connection to the Target Application, and the Secure Store enables you to manage the credentials that are required by the external data source.

SharePoint has its built-in services that can be supported through Secure Store Service. They are as follows:
  • Excel Services
  • Visio Services
  • Business Connectivity Services
  • PowerPivot for SharePoint
  • PerformancePoint Service

How to Create Secure Store Service Application in SharePoint 2016?
Lets see how to create secure store service configuration SharePoint 2016 step by step.
  • Go to SharePoint 2013 Central Administration >> Manage Service Applications
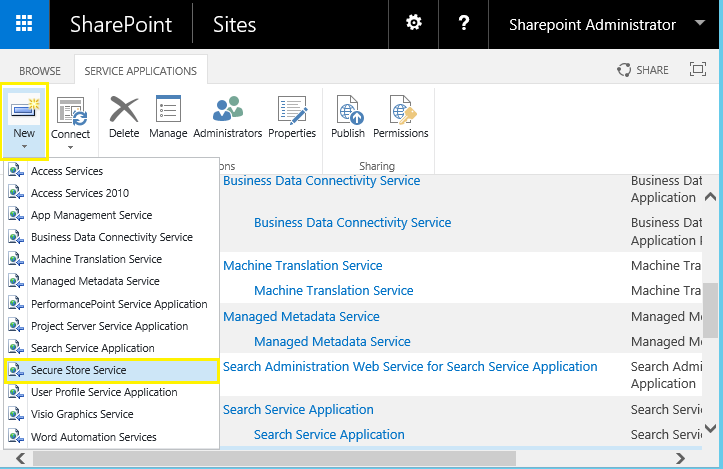
  • In the Service Applications ribbon click on New button and then select Secure Store Service
    how to create secure store service application in sharepoint 2013
  • Enter a name for the Secure store Service Application, database Server and Database name details
    secure store service sharepoint 2013 step by step
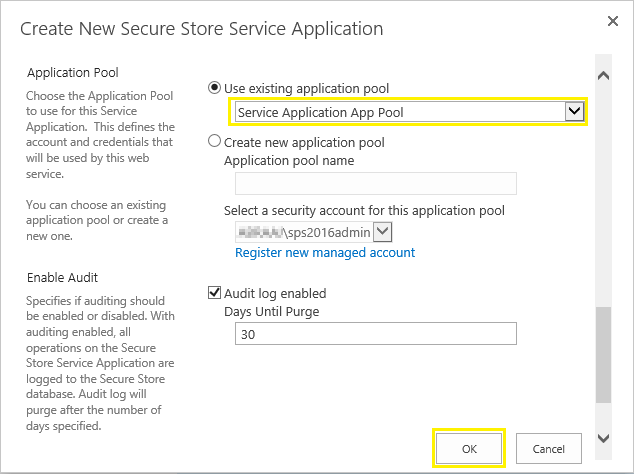
  • Scroll down and either choose an existing application pool or create a new application pool using the managed account. To run the application pool, you need a domain account. No specific permissions are required for this account. Click OK to create secure store service.
    secure store service configuration sharepoint 2013
  • Wait for the secure store service application created message.
Generate new key in Secure Store Service:
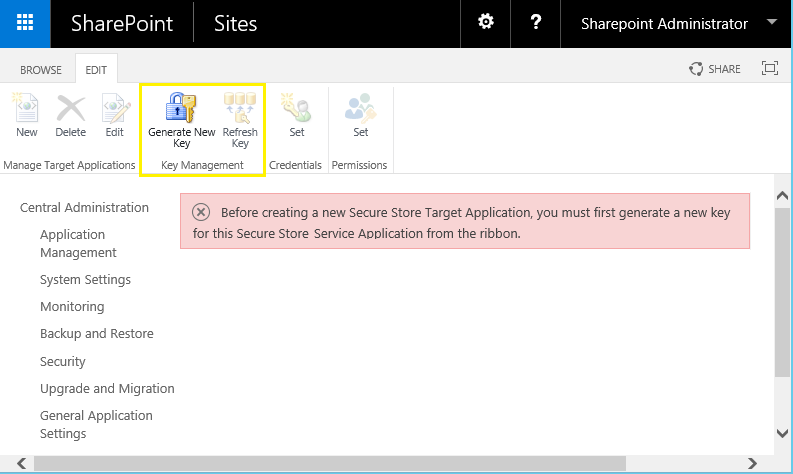
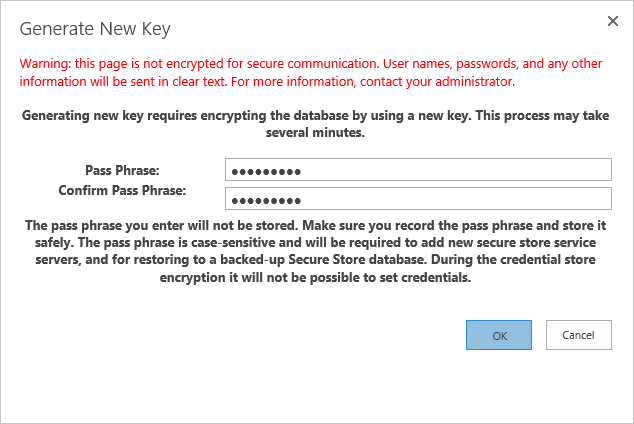
Secure Store Service requires a key/ pass phrase to encrypt-decrypt credentials. The first time you access the Secure Stored Service it will ask you generate a new encryption key. Before using the Secure Store Service to create target applications, you must provide it with a pass phrase.
  • Go to Central Administration site >>  Application Management
  • Service applications page, pick your newly created Secure store service application.
  • Click on Generate New Key from the ribbonsecure store service in sharepoint foundation 2013
  • Enter the passphrase and click on OK to complete secure store service configuration. Remember it or save a in safe place to have access it when you need.
    use of secure store service sharepoint 2013
Now the error message that displayed on the secure store has gone and it should read something like there are no Secure Store Target Application.

Start the Secure Store Service Instance on the application server(s)
The next step is to start secure store service on the server if its not started already.
  • Go to Central Administration >> System Settings >> Manage service on server (Under Servers).
  • Select the application server >> Locate the Secure Store Service then click start next to it.
The next step is to create Target Application, which I'll explain in an another article.

Technet reference: Configure the Secure Store Service in SharePoint 2013

Create SharePoint 2013 Secure Store Service Application using PowerShell

$
0
0
PowerShell Script to Create SharePoint 2013/2016 Secure store Service application:
Secure Store Service was introduced as a replacement to the SSO feature since SharePoint 2010. Secure Store Service is a shared service that provides storage and mapping of credentials such as account names and passwords. It solves the problem of having to sign into many applications and entering different usernames and passwords. It enables you to securely store data that provides credentials required for connecting to external systems and associating those credentials to a specific identity or group of identities

Create Secure store Service application using PowerShell in SharePoint 2016:
Add-PSSnapin Microsoft.SharePoint.PowerShell -ErrorAction SilentlyContinue

#Configuration Parameters
$ServiceAppName = "Secure Store Service Application"
$ServiceAppProxyName = "Secure Store Service Application Proxy"
$AppPoolAccount = "Crescent\SP16-AppPool"
$AppPoolName = "Service Application App Pool"
$DatabaseServer ="SP16-SQL001"
$DatabaseName = "SP16_Service_SecureStore"

Try {
#Set the Error Action
$ErrorActionPreference = "Stop"

#Check if Managed account is registered already
Write-Host -ForegroundColor Yellow "Checking if the Managed Accounts already exists"
$AppPoolAccount = Get-SPManagedAccount -Identity $AppPoolAccount -ErrorAction SilentlyContinue
if($AppPoolAccount -eq $null)
{
Write-Host "Please Enter the password for the Service Account..."
$AppPoolCredentials = Get-Credential $AppPoolAccount
$AppPoolAccount = New-SPManagedAccount -Credential $AppPoolCredentials
}

#Check if the application pool exists already
Write-Host -ForegroundColor Yellow "Checking if the Application Pool already exists"
$AppPool = Get-SPServiceApplicationPool -Identity $AppPoolName -ErrorAction SilentlyContinue
if ($AppPool -eq $null)
{
Write-Host -ForegroundColor Green "Creating Application Pool..."
$AppPool = New-SPServiceApplicationPool -Name $AppPoolName -Account $AppPoolAccount
}

#Check if the Service application exists already
Write-Host -ForegroundColor Yellow "Checking if Secure Store Service Application exists already"
$ServiceApplication = Get-SPServiceApplication -Name $ServiceAppName -ErrorAction SilentlyContinue
if ($ServiceApplication -eq $null)
{
Write-Host -ForegroundColor Green "Creating Secure Store Service Application..."
$ServiceApplication = New-SPSecureStoreServiceApplication -Name $ServiceAppName –ApplicationPool $AppPoolName –DatabaseName $DatabaseName –DatabaseServer $DatabaseServer -AuditingEnabled:$false
$ServiceApplicationProxy = New-SPSecureStoreServiceApplicationProxy -Name $ServiceAppName" Proxy" -ServiceApplication $ServiceApplication -DefaultProxyGroup
}

#Start service instance
$ServiceInstance = Get-SPServiceInstance | Where-Object { $_.TypeName -like "*Secure Store Service*" }

#Check the Service status
if ($ServiceInstance.Status -ne "Online")
{
Write-Host -ForegroundColor Yellow "Starting the Secure Store Service Instance..."
Start-SPServiceInstance $ServiceInstance
}

Write-Host -ForegroundColor Green "Secure Store Service Application created successfully!"
}
catch {
Write-Host $_.Exception.Message -ForegroundColor Red
}
finally {
#Reset the Error Action to Default
$ErrorActionPreference = "Continue"
}
Create Master Key for Secure Store Service using PowerShell:
#Config parameters
$Passphrase = "Password1"
$ServiceAppProxyName="Secure Store Service Application Proxy"

#Get the Service App Proxy
$ServiceAppProxy = Get-SPServiceApplicationProxy | where { $_.Name -eq $ServiceAppProxyName}

#Create Master key
Update-SPSecureStoreMasterKey -ServiceApplicationProxy $ServiceAppProxy -Passphrase $Passphrase

Don't forget to change the values in #Configuration Parameters section!

How to Create New Target Application ID in Secure Store Service for BCS in SharePoint 2016

$
0
0
When you want to consume external data in SharePoint, such as data from your other business applications, you can use Business Connectivity Services (BCS) together with Secure Store Service. The external data source that you can connect to is called a Secure Store Target Application. BCS makes it possible for you to set up a connection to the Target Application, and the Secure Store enables you to manage the credentials that are required by the external data source

Before proceeding, You have created and configured Secure store service application and generated the master key from SharePoint 2013/2016 Central Administration site, isn't it? If not, Refer:
Now you are all set to create new Target Applications and use in SharePoint. Here you go!

How to Create New Target Application ID?
Here are the steps to Add new Target Application ID in SharePoint 2016 Secure store Service:
  • Go to SharePoint Central Administration site >> Click on "Manage Service Applications"
  • Locate and pick your Secure store service application
  • In the Ribbon, Under the Edit tab click on New button
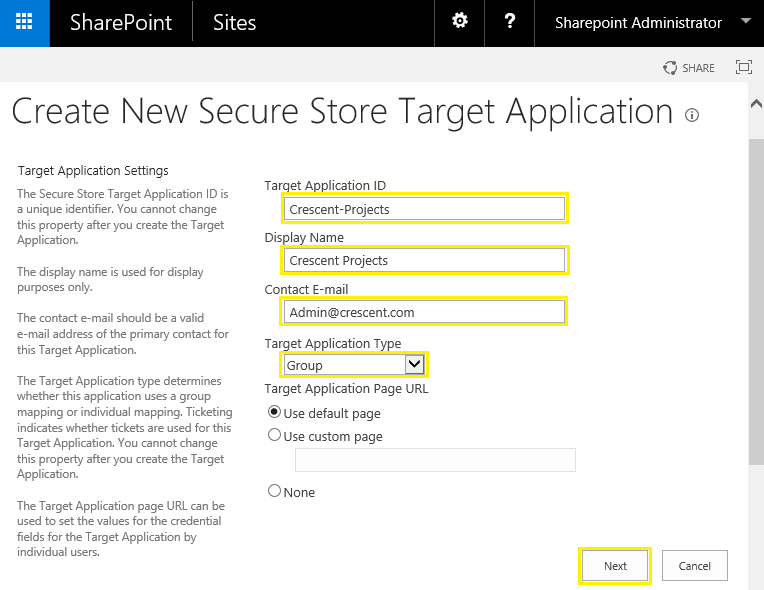
  • Enter the Target Application ID (Make sure the ID is unique - and you can't change it later), Display Name, Contact E-Mail. Choose the application type - Group: Maps group of users to a single set of stored credentials Individual: Maps a single user to a single set of stored credentials. Click Next.
    sharepoint secure store application id
  • The next window gives you the ability to Add/Change credential fields associated with the external data source. In my case, I left it with Windows User Name and Windows Password fields as they are sufficient to connect with SQL Server database using windows credentials. Click on Next.
    sharepoint secure store application id 2013
  • Enter the name(s) of the users that will administer the target application and Group who will use the target application and click OK
    sharepoint 2013 secure store target application type
Now we have successfully created target application.  

Set up Credentials for New Target Application ID:
The next step is to set the credentials for the target application ID.
  • Click on Context menu of newly created Target Application Id and choose Set Credential
    sharepoint 2016 create secure store application id
  • Enter the User Name and Password & Confirm Password which will be used to connect to the target data source on behalf of authorized users and click on OK to complete the creation of secure store target application ID. Make sure this access account (In my case its: Crescent\DBAccess) have proper rights on external database for the operation such as Read/Write.
    sharepoint designer secure store application id
Now All users of the given group can use the Application ID to connect with external data source with the application ID generated! Once the target application is created in Secure store service, you can associate it with any application to interact with the external database or application model, such as from SharePoint Designer, Excel, etc.
Viewing all 1058 articles
Browse latest View live