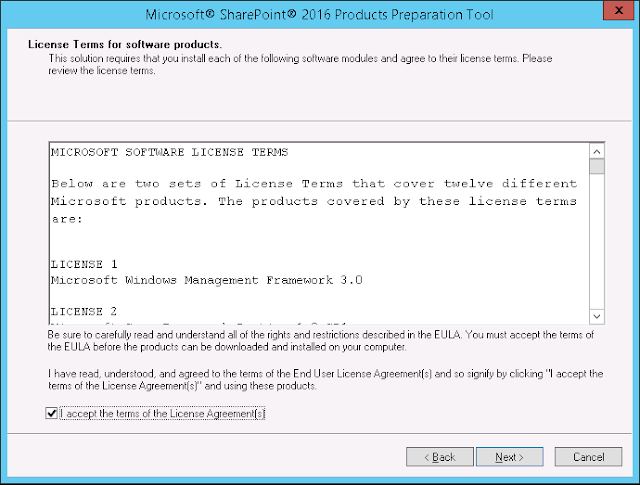
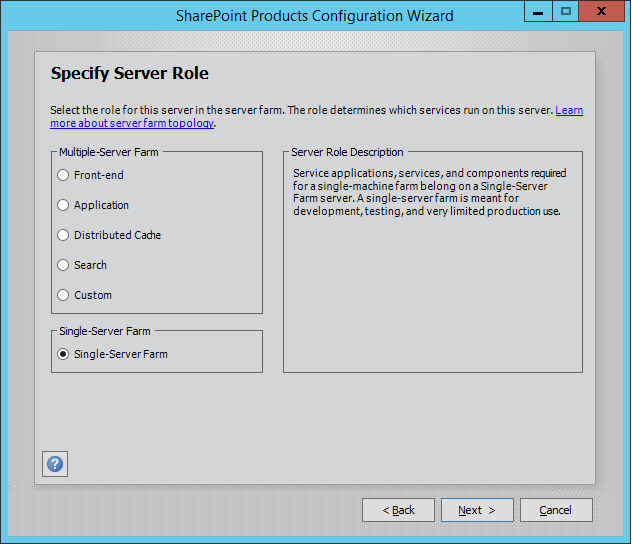
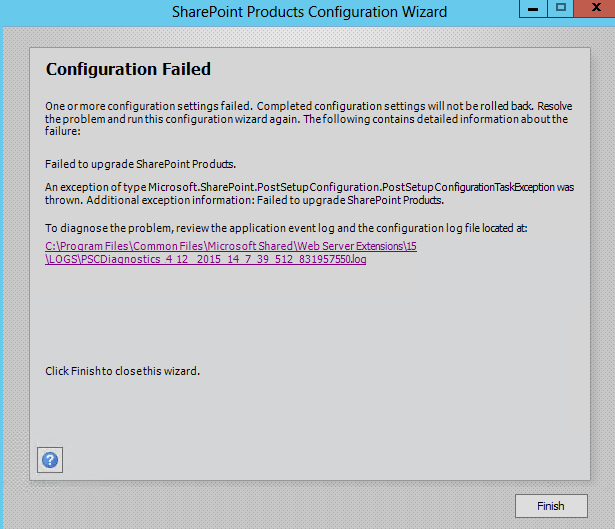
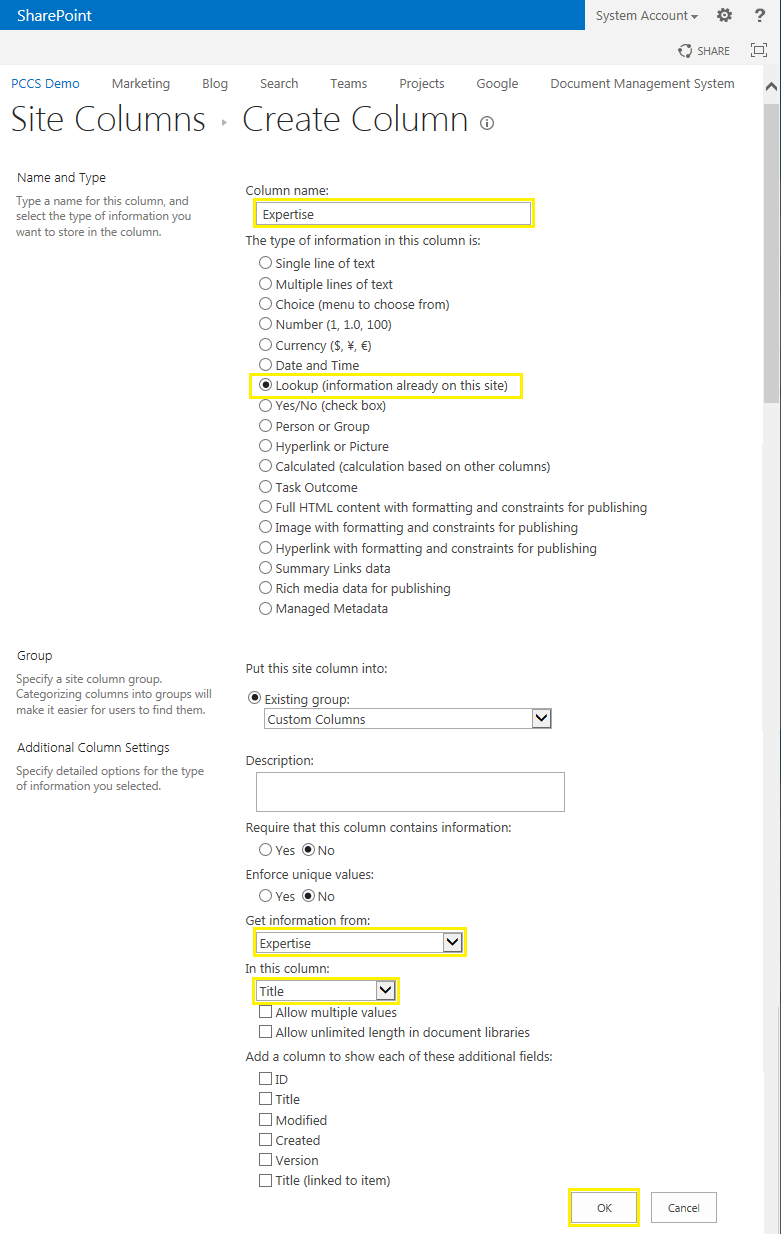
Quantcast
Channel: SharePoint Diary
Viewing all 1058 articles
Browse latest View live

People Search relevance is not optimized when the Active Directory has errors in the manager reporting structure - SharePoint 2013 Health analyzer error

$
0
0
Problem: 
SharePoint 2013 Health analyzer logged this error - People Search relevance is not optimized when the Active Directory has errors in the manager reporting structure.
People Search relevance is not optimized when the Active Directory has errors in the manager reporting structure

Also in Windows Event Viewer, from MSSQL$SHAREPOINT Source, "An exception occurred while enqueuing a message in the target queue. Error: 15404, State: 11. Could not obtain information about Windows NT group/user , error code 0x534."
 
Root Cause: There are user profiles in Active directory with no "Manager" property value defined (empty!). SharePoint uses this field for features such as to determine colleagues, social, people search relevance,etc.

Solution: Set the Manager property value for all users who don't have it set! Here is the quick way to find a list of users who don't have Manager field:
Import-Module ActiveDirectory

Get-ADUser -Filter * | Where-Object {$_.Manager -Eq $Null} | Export-CSV D:\Profiles.csv -notype

Alternatively, although its not a good idea, you can disable this rule in SharePoint health monitor if you want to suppress these errors!

What if Users don't have Manager at all?
Say for e.g. by organization's structure, CxOs may not have manager, isn't it? If that's the case, you'll have to explicitly specify these users as company leaders. Here is how:
$UPSProxy = Get-SPServiceApplicationProxy | ? {$_.typename -eq "User Profile Service Application Proxy"}

Add-SPProfileLeader -ProfileServiceApplicationProxy $UPSProxy -Name "Domain\Username"

You can follow this technet article: https://technet.microsoft.com/en-us/library/hh867937%28v=office.14%29.aspx

Managed Metadata Columns Usage Report in SharePoint

$
0
0
Requirement: Find the usage of all Managed Metadata columns in SharePoint environment.

PowerShell script to find managed metadata column usage:
Here is the PowerShell script to find all managed metadata columns in SharePoint site collection.
Add-PSSnapin Microsoft.SharePoint.PowerShell -ErrorAction SilentlyContinue 

$SiteCollURL="https://portal.crescent.com"
$ReportOutput="c:\MMS-Columns.csv"

$WebsColl = (Get-SPSite $SiteCollURL).AllWebs

#Array to hold Results
$ResultColl = @()

#Loop through each site, List and Fields
Foreach($web in $WebsColl)
{
Write-host "Scanning Web:"$Web.URL
Foreach($list in $web.Lists)
{
Foreach($Field in $list.Fields)
{
if($field.GetType().Name -eq "TaxonomyField")
{
$Result = New-Object PSObject
$Result | Add-Member -type NoteProperty -name "List Name" -value $List.Title
$Result | Add-Member -type NoteProperty -name "URL" -value "$($List.ParentWeb.Url)/$($List.RootFolder.Url)"
$Result | Add-Member -type NoteProperty -name "Field Name" -value $Field.Title

$ResultColl += $Result
}
}
}
}
#Export Results to a CSV File
$ResultColl | Export-csv $ReportOutput -notypeinformation
Write-Host "Managed Metadata columns usage Report has been Generated!" -f Green
This script scans each and every list of given site collection and generates report in CSV.

PowerShell script to find All Managed Metadata Terms in use:
Now the next part. Get what terms are being used in these MMS columns?Their values:
Add-PSSnapin Microsoft.SharePoint.PowerShell -ErrorAction SilentlyContinue 

$SiteCollURL="https://portal.crescent.com"
$ReportOutput="c:\MMS-Terms-Usage.csv"

$WebsColl = (Get-SPSite $SiteCollURL).AllWebs

#Array to hold Results
$ResultColl = @()

#Loop through each site, List and Fields
Foreach($web in $WebsColl)
{
Write-host "Scanning Web:"$Web.URL
Foreach($list in $web.Lists)
{
#Get all Managed metadata fields
Foreach($Field in $list.Fields | where {$_.GetType().Name -eq "TaxonomyField"})
{
Foreach ($item in $list.Items)
{
#Get All values of MMS field
$MMSFieldValueColl = $item[$Field.Title] #-as [Microsoft.SharePoint.Taxonomy.TaxonomyFieldValueCollection]

#concatenate each term in the collection
$MMSFieldTerms=""
Foreach ($MMSFieldValue in $MMSFieldValueColl)
{
if($MMSFieldValue.label -ne $null)
{
$MMSFieldTerms+=$MMSFieldValue.label+";"
}
}

#Collect the result
if($MMSFieldTerms -ne "")
{
$Result = New-Object PSObject
$Result | Add-Member -type NoteProperty -name "MMs Column Name" -value $Field.Title
$Result | Add-Member -type NoteProperty -name "MMS Column Value" -value $MMSFieldTerms
#Get the URL of the Item
$ItemURL= $Item.ParentList.ParentWeb.Site.MakeFullUrl($item.ParentList.DefaultDisplayFormUrl)
$ItemURL=$ItemURL+"?ID=$($Item.ID)"
$Result | Add-Member -type NoteProperty -name "Item URL" -value $ItemURL
$Result | Add-Member -type NoteProperty -name "List Name" -value $List.Title
$Result | Add-Member -type NoteProperty -name "List URL" -value "$($List.ParentWeb.Url)/$($List.RootFolder.Url)"

$ResultColl += $Result
}
}
}
}
}

#Export Results to a CSV File
$ResultColl | Export-csv $ReportOutput -notypeinformation
Write-Host "Managed Metadata columns usage Report has been Generated!" -f Green

Get/Set Managed Metadata Column Values using PowerShell

$
0
0
Here is my collection of PowerShell scripts to read and write Managed Metadata field values in SharePoint:

Read Managed Metadata column Value:
Add-PSSnapin Microsoft.SharePoint.PowerShell -ErrorAction SilentlyContinue 

$WebURL="https://portal.crescent.com/"
$ListName="Deals"
$FieldName="Region"
$ItemID=1

#Get Objects
$Web = Get-SPWeb $WebURL
$List= $Web.Lists[$listName]
$Item = $List.GetItembyID($ItemID)

#Get MMS column Value
[Microsoft.SharePoint.Taxonomy.TaxonomyFieldValue]$MMSFieldValue = $item[$FieldName]

write-host $MMSFieldValue.Label

Get Multiple Value MMS field values using PowerShell:
When "Allow Multiple Values" Selected, here is how we can retrieve the value of it:
Add-PSSnapin Microsoft.SharePoint.PowerShell -ErrorAction SilentlyContinue 

$WebURL="https://portal.crescent.com/"
$ListName="Deals"
$FieldName="Region"
$ItemID=2

#Get Objects
$Web = Get-SPWeb $WebURL
$List= $Web.Lists[$listName]
$Item = $List.GetItembyID($ItemID)

#Get MMS column Value
[Microsoft.SharePoint.Taxonomy.TaxonomyFieldValueCollection]$MMSFieldValueColl = $item[$FieldName]

#Concatenate each term in the value collection
$MMSFieldTerms=""
Foreach ($MMSFieldValue in $MMSFieldValueColl)
{
if($MMSFieldValue.label -ne $null)
{
$MMSFieldTerms+=$MMSFieldValue.label+"; "
}
}

write-host $MMSFieldTerms

Set Managed Metadata field Value:
Add-PSSnapin Microsoft.SharePoint.PowerShell -ErrorAction SilentlyContinue 

#Variables
$WebURL="https://portal.crescent.com"
$ListName="Deals"
$FieldName="Region"
$ItemID=1

#Get the web
$Web = Get-SPWeb $WebURL

#Get the Term from Term store
$TaxonomySession = Get-SPTaxonomySession -Site $web.Site
$TermStore = $TaxonomySession.TermStores["Managed Metadata Service"]
$TermGroup = $TermStore.Groups["Knowledge Portal"]
$TermSet = $TermGroup.TermSets["Regions"]
$Term = $Termset.Terms["America"]

#You can also get the term directly as: $Term = "15;#America|1c58d657-9bd1-4bff-b1b0-74e52eb717dd"
#Use SharePoint Manager

#Get the List and List Item
$List= $Web.Lists[$listName]
$Item = $List.GetItembyID($ItemID)

#Set MMS column Value
$MMSField = [Microsoft.SharePoint.Taxonomy.TaxonomyField]$Item.Fields[$FieldName]
$MMSField.setFieldValue($Item,$Term)
$Item.Update()

Write-host "Managed Metadata Field value updated!"

Update Managed Metadata Column value for Multiple Values
Add-PSSnapin Microsoft.SharePoint.PowerShell -ErrorAction SilentlyContinue 

#Variables
$WebURL="https://portal.crescent.com"
$ListName="Deals"
$FieldName="Region"
$ItemID=2

#Get the web
$Web = Get-SPWeb $WebURL

#Get the Term store, Group and Term Set
$TaxonomySession = Get-SPTaxonomySession -Site $web.Site
$TermStore = $TaxonomySession.TermStores["Managed Metadata Service"]
$TermGroup = $TermStore.Groups["Knowledge Portal"]
$TermSet = $TermGroup.TermSets["Regions"]

#Get the List, List Item and Field
$List= $Web.Lists[$listName]
$Item = $List.GetItembyID($ItemID)
$MMSField = [Microsoft.SharePoint.Taxonomy.TaxonomyField]$Item.Fields[$FieldName]

#Actual Term Values to update
$TermValuesColl = @("Africa","Asia","Europe")

#Create a Term field value collection
$MMSValueCollection = new-object Microsoft.SharePoint.Taxonomy.TaxonomyFieldValueCollection($MMSField)
#Form each Term
foreach($TermValue in $TermValuesColl)
{
$Term = $Termset.Terms[$TermValue]
$MMSFieldValue = new-object Microsoft.SharePoint.Taxonomy.TaxonomyFieldValue($MMSField)
$MMSFieldValue.TermGuid = $Term.Id
$MMSFieldValue.Label = $Term.Name
$MMSValueCollection.Add($MMSFieldValue)
}

#Set Multi-value MMS column Value
$MMSField.setFieldValue($Item,$MMSValueCollection)
$Item.Update()

Write-host "Managed Metadata Field value updated!"

The Database name located at the specified database server contains user-defined data.- Error in SharePoint Products Configuration Wizard

$
0
0
Error:
SharePoint Products Configuration Wizard:  
The Database name located at the specified database server contains user-defined data. Databases must be empty before they can be used. Delete all of the tables, stored procedures, and other objects, or use a different database.
The Database name located at the specified database server contains user-defined data

Root cause:
This is due to the fact, previous installation failed in between and left the SharePoint_Config database in SQL Server!

Solution:
Delete the SharePoint_Config database created by the previous installation!

SharePoint 2016 Installation Guide - Step by Step

$
0
0
SharePoint 2016 is in RTM finally with all new features. Lets walk-through SharePoint 2016 installation process step by step:

System Requirements: What's my Server Farm Configuration?
Here is my SharePoint 2016 farm's server configuration (Hardware/software).
  • Windows Server 2012 R2 Standard as Server Operating system and SQL Server 2014 Standard SP1 as my SQL Server instance. 
  • All my servers running with 24 GB of RAM (minimum requirement: 16 GB. For single server installation: 24 GB) and Quad core processors. (64 bit of course!) and 120 GB in system drive and 250 GB as secondary drive (Min: 80 GB for system drive and 100 GB for applications).
Service Accounts:
  • Crescent\SP16_Setup - Setup  account used for installation. You must manually assign Member of Local Administrator group on all SharePoint Servers and SQL server and SysAdmin role at SQL Server instance. (In fact, it just needs: DBcreator & SecurityAdmin server roles and DBO rights on each SharePoint Databases).
  • Crescent\SP16_Farm - Farm account / Database access account. Necessary rights will be automatically granted on the SQL Server instance when you run SharePoint products configuration wizard.
Whats new in SharePoint 2016 Installation?
Its pretty much same as SharePoint 2013 installation, except the "Server Role" selection page. MinRole is introduced newly in SharePoint 2016.

SharePoint 2016 Server installation steps at high level:
  1. Install SharePoint 2016 prerequisites
  2. Install SharePoint  Server 2016
  3. Run Products configuration wizard
    SharePoint 2016 Server Farm Topology:
    Here is my small server farm topology for SharePoint 2016 with three servers. All these servers joined to my domain: Crescent.com
    Where to start Installation? Start with your Application Server! Your Application server hosts SharePoint 2016 central administration site and other necessary service applications.

    Step 1: Install Prerequisites

    We need to install SharePoint 2016 prerequisites before installing SharePoint Server 2016. Login with Setup account and start your SharePoint Server 2016 installation by installing the prerequisites. Prerequisites installer will add all necessary server roles (Application Server Role, Web Server (IIS) Role) ,downloads and installs all necessary components for SharePoint 2016.
    • Mount the ISO on the drive, launch "default.hta" file (or prerequisiteinstaller.exe). You'll see the same old Splash screen! Click on "Install software prerequisites" link under "Install"
      sharepoint 2016 installation guide
    • Accept License agreement and click "Next" button
      sharepoint 2016 installation step by step
    • Wait for the installation to proceed
      sharepoint 2016 install instructions
    • Prerequisites installer takes some time and will prompt for restart. After restart, re-run the prerequisites again! Restart and resume back.
    • Wait for the installation completed message. Click on "Finish" button to complete prerequisites installation.
      sharepoint 2016 install standalone

    Step 2: SharePoint Server 2016 Installation

    • After completing prerequisites installation, run the splash.hta file again and click on "Install SharePoint Server". sharepoint 2016 installation steps
    • You'll be prompted to enter the product key. I've used the 180 day Trial key: NQGJR-63HC8-XCRQH-MYVCH-3J3QR
      how to install sharepoint 2016 step by step
    • Accept license agreement
      install sharepoint server 2016
    • Choose a file location: Choose a file location for SharePoint Server and Search server index. Make sure there is sufficient disk space on the selected drive. You can use your secondary drive to store search index files. Click on "Install Now" button to start the installation process.
    • Wait for installation to complete. The installation wizard takes few minutes to complete.
    • Once completed, You'll be taken to Run Configuration wizard page. Tick the "Run the SharePoint Products Configuration Wizard now" check box and click on Close.

    Step 3: Run SharePoint Products Configuration Wizard

    • You'll be presented with the "Welcome to SharePoint Products" wizard. Run SharePoint Products configuration wizard by clicking "Next" button.
    • Click Yes for products configuration wizard restart services confirmation
    • On Connect to a server farm, choose Create a new server farm. If you are already have an existing SharePoint farm created, you'll have to choose the option "connect to an existing server farm". We'll be selecting this when we run products configuration wizard on our WFE server.
    • Specify configuration database settings: Enter your Database server name and proposed SharePoint farm's configuration database names. Enter the Farm account which will be used for database access.
    • On Farm security settings page, enter the Passphrase. You'll need this when you need to join the new server to an existing SharePoint server farm.
    • Specify Server Role. There are six roles listed in this page. You can select whichever applicable to you. This is critical as in previous versions:  If you selected Single-Server Farm, then you can't scale out your SharePoint farm to Multi-Server environment! So if you plan to extend your farm to Multi-Server farm in future, make sure you have selected the Custom (MinRole) or Application server role. In my case, I've selected Application server role. Click on Next to proceed.
    • Enter the Port for SharePoint 2016 Central Administration site. Choose the authentication provider. Click Next to continue.
    • You'll see SharePoint products configuration wizard performing several tasks as in the below progress screen. Wait until all 10 installation tasks to complete.
    • Once completed, SharePoint products configuration wizard presents you the verify screen. You can click Back in case, you want to change any setting. Click Next to proceed.
    • Wait for the Configuration successful page. Click on "Finish" to complete SharePoint 2016 installation process.
    Once you click "Finish" button, you'll be taken to Initial Farm Configuration Wizard page in SharePoint 2016 Central Administration site.

    Repeat all these steps in your Web Front end Server. Choose "Front-End" Server role for Web Front end. Once done, you can proceed with creating web applications, Service applications and site collections.

    FAQ's and Known issues in SharePoint 2016 Installation:
    • Can I use a Single Server for SharePoint 2016 installation?
      Sure, You can use a single server. However, You need to have SQL Server 2014 installed on the server first! Unlike SharePoint 2013, SharePoint 2016 doesn't install SQL Server Express automatically as part of Single server mode.
    • Prerequisiteinstaller.exe: The system cannot find the drive specified
      This happens when you mount an ISO file and after server reboot, it doesn't get mounted automatically. Remedy is simple: Mount the ISO and run:Start "Launch SharePoint preparation tool" "E:\Prerequisiteinstaller.exe" /continue

    SharePoint Products Configuration Failed: Unable to create a Service Connection Point in the current Active Directory domain. Verify that the SharePoint container exists in the current domain and that you have rights to write to it.

    $
    0
    0
    Problem:
    After applying a service pack, Ran SharePoint Products Configuration Wizard. It failed with this error message: "An exception of type microsoft.sharepoint.postsetupconfiguration.postsetupconfigurationtaskexception was thrown. additional exception information: Failed to upgrade SharePoint Products."
    An exception of type microsoft.sharepoint.postsetupconfiguration.postsetupconfigurationtaskexception was thrown. additional exception information: Failed to upgrade SharePoint Products.

    Tried Running the PSconfig upgrade using command line, but that too failed:
    psconfig -cmd upgrade -inplace b2b -wait

    On scanning the log file it generated, found this error message:
    Unable to create a Service Connection Point in the current Active Directory domain. Verify that the SharePoint container exists in the current domain and that you have rights to write to it.

    Solution:
    Although, creating a service connection point container will resolve the problem, that require me to have Active Directory administrator rights! which is not possible In my case and we don't want to track SharePoint installations as of now!

    So, What's the solution? Run this command line: 
    psconfig -cmd upgrade -inplace v2v -passphrase "Type your Farm Pass Phrase" -wait
    This time, upgrade completed successfully!

    The Managed Metadata Service or Connection is currently not available. The Application Pool or Managed Metadata Web Service may not have been started. Please Contact your Administrator.

    $
    0
    0
    Error: The Managed Metadata Service or Connection is currently not  available. The Application Pool or Managed Metadata Web Service may not have been started.  Please Contact your Administrator.
    The Managed Metadata Service or Connection is currently not available.
     Steps to troubleshoot:
    • Check Managed Metadata Service is Running from SharePoint Central Administration site >> Manage services on server, Click on "Start" link next to "Managed metadata service"
    • Start MMS Service application pool from IIS 
    • Check IUSR is added in Anonymous Authentication in IIS: Open IIS, Click on your Server Name in left pane. Now open Authentication widget from the middle pane, Right Click on Anonymous Authentication and select Edit, Click on Specific User radio button and click on Set Button. Type IUSR in user name field and then click on OK.
    • Check the permissions on Managed Metadata Service Application to your Web application's app pool account: Go to SharePoint Central Administration >> Application Management  >> Service Applications >> Highlight Managed Metadata Service  >> Click on Permissions button from the ribbon >> Add the application pool account of your web application and provide at least "Read Access to Term Store"
    • Managed Metadata Service is associated with your web application?
      Go to Central Administration >> Application Management >> Configure service application associations >> Select your web application >> Check the Application Proxy Group and make sure that the Managed Metadata Service is listed there. 
    • Recreate MMS Service application with an Existing database: Here is how: Delete the existing MMS service application without deleting the MMS database, Create a new MMS service application, Go to the properties of the new Managed Metadata service application, point to the original database
    • Last but not least, Perform IISReset!

    How to Add Managed Metadata Column to SharePoint List using PowerShell

    $
    0
    0
    Requirement: Add a Managed Metadata Column to SharePoint List using PowerShell.

    PowerShell Script to Add Managed Metadata Column in SharePoint List:
    Add-PSSnapin Microsoft.SharePoint.PowerShell -ErrorAction SilentlyContinue 

    #Variables
    $WebURL="https://portal.crescent.com/sites/Sales/"
    $ListName="Team Docs"
    $FieldName="Regions"

    #Get the web and List
    $Web = Get-SPWeb $WebURL
    $List = $Web.Lists[$ListName]

    #Check if the column with same name exists in the list
    if(!($List.Fields.ContainsField($FieldName)))
    {
    #Get the Termset from Term store
    $TaxonomySession = Get-SPTaxonomySession -Site $web.Site
    $TermStore = $TaxonomySession.TermStores["Managed Metadata Service"]
    $TermGroup = $TermStore.Groups["Knowledge Portal"]
    $TermSet = $TermGroup.TermSets["Regions"]

    #Form the Taxonomy Field
    $TaxonomyField = $List.Fields.CreateNewField("TaxonomyFieldType", $TermSet.Name)
    $TaxonomyField.SspId = $TermSet.TermStore.Id
    $TaxonomyField.TermSetId = $TermSet.Id

    #Add the field to List
    $List.Fields.Add($TaxonomyField)
    $List.Update()

    Write-host "Managed Metadata column Added successfully!"
    }
    else
    {
    Write-host "Managed Metadata column with the specific name already exists!" -f RED
    }


    Export Document Library File-Folder-SubFolder Structure to CSV

    $
    0
    0
    Requirement:
    Get the complete structure of all folders-subfolder-files from a SharePoint document library and export to CSV file.

    PowerShell Script to Iterate through each folder and Sub-folder and get all files:
    Add-PSSnapin Microsoft.SharePoint.PowerShell -ErrorAction SilentlyContinue 

    #Custom Function to get all files of a folder
    Function GetFiles-ByFolder([Microsoft.SharePoint.SPFolder]$Folder)
    {
    write-host "Processing Folder:"$Folder.URL
    Foreach($File in $Folder.Files)
    {
    $content = $Folder.Name + "," + $Folder.URL +"," + $File.Name
    Add-content $OutPutFile $content
    Write-host $content
    }
    }

    #Variables
    $WebURL="https://portal.crescent.com/sites/sales/"
    $ListName="Team Docs"
    $OutPutFile = "C:\LibraryFiles.csv"

    #Delete the file if exists
    If (Test-Path $OutPutFile) { Remove-Item $OutPutFile }

    #Write CSV headers
    Add-Content $OutPutFile "Root Folder, URL, File Name"

    #Get site object
    $Web = Get-SPWeb $WebURL
    $List = $Web.Lists[$ListName]
    $Folder = $List.RootFolder

    #Call the function for Root folder
    GetFiles-ByFolder $Folder

    #Call the function for each subfolder - Excluding "Forms"
    $folder.SubFolders | Where {$_.Name -ne "Forms" } | foreach-Object {
    #Call the function Recursively!
    GetFiles-ByFolder $_
    }
    This exports the inventory of all files and folders structure to a CSV file!

    Get-Set Person or Group (People Picker) Field Value using PowerShell in SharePoint

    $
    0
    0
    Here is my collection of PowerShell scripts to work with People picker field values:

    Read People Picker Field Value using PowerShell:
    PowerShell script to get value of Person or Group field.
    Add-PSSnapin Microsoft.SharePoint.PowerShell -ErrorAction SilentlyContinue

    #Configuration Variables
    $SiteURL = "http://portal.abraaj.com/sites/Sales"
    $ListName = "Tasks"
    $FieldName="Assigned To"

    #Get site and List objects
    $web = Get-SPWeb $SiteURL
    $list= $web.lists[$listName]

    #Iterate through each row in the list
    foreach ($Item in $list.Items)
    {
    #Get the People picker field value
    $AssignedTo = New-Object Microsoft.Sharepoint.SPFieldUserValue($Web,$Item[$FieldName])

    #Get the Login Name of the user
    Write-host $AssignedTo.User.LoginName
    #Get the Email
    Write-host $AssignedTo.User.Email
    }

    Get Multi-valued People Picker Field Value (if Allow multiple selections enabled!) using PowerShell:
    Add-PSSnapin Microsoft.SharePoint.PowerShell -ErrorAction SilentlyContinue

    #Configuration Variables
    $SiteURL = "http://portal.abraaj.com/sites/Sales"
    $ListName = "Tasks"
    $FieldName="Assigned To"

    #Get site and List objects
    $web = Get-SPWeb $SiteURL
    $list= $web.lists[$listName]

    #Iterate through each row in the list
    foreach ($Item in $list.Items)
    {
    if($item[$FieldName])
    {
    #Get People picker field values collection
    $UserCollection = New-Object Microsoft.Sharepoint.SPFieldUserValueCollection($Web,$item[$FieldName].ToString())
    Write-host Item ID: $item["ID"]

    #Get each User from the Person or Group field
    foreach($User in $UserCollection)
    {
    #Get the Display Name of the user
    Write-host $User.LookupValue
    #Get the Login Name (Account ID)
    Write-host $User.User
    #Get the E-mail
    Write-host $User.User.Email
    }
    }
    }

    PowerShell script to Update Person or Group Field:
    Add-PSSnapin Microsoft.SharePoint.PowerShell -ErrorAction SilentlyContinue

    #Configuration Variables
    $SiteURL = "http://portal.abraaj.com/sites/Sales"
    $ListName = "Tasks"
    $FieldName="Assigned To"

    #Get site and List objects
    $web = Get-SPWeb $SiteURL
    $list= $web.lists[$listName]

    #Get the List Item to update
    $ListItem = $List.GetItemByID(2)

    #User Account to set
    $UserAccount="Crescent\Salaudeen"
    #To Add new List Item, use $Item = $List.AddItem()
    $User = Get-SPUser -Identity $UserAccount -Web $web
    $ListItem[$FieldName] = $User
    $ListItem.Update()

    Update Multiple Values People Picker Field using PowerShell script
    Add-PSSnapin Microsoft.SharePoint.PowerShell -ErrorAction SilentlyContinue

    #Configuration Variables
    $SiteURL = "http://portal.abraaj.com/sites/Sales"
    $ListName = "Tasks"
    $FieldName="Assigned To"

    #Get site and List objects
    $web = Get-SPWeb $SiteURL
    $list= $web.lists[$listName]

    #Get the List Item to update
    $ListItem = $List.GetItemByID(2)

    #User Account to set
    $UserAccounts="Crescent\Salaudeen; Crescent\Ravi"
    $UserAccountsColl = $UserAccounts -split ';'

    $UserCollection = new-object Microsoft.SharePoint.SPFieldUserValueCollection
    foreach($UserAccount in $UserAccountsColl)
    {
    #Get the User
    $User=$web.EnsureUser($UserAccount)

    #Add to collection
    $UserFieldValue = new-object Microsoft.SharePoint.SPFieldUserValue($Web, $User.ID, $User.LoginName)
    $UserCollection.Add($UserFieldValue)
    }

    #update the Multiple value Person or Group field
    $ListItem[$FieldName] = $UserCollection
    $ListItem.Update()

    Remove Field from View using PowerShell in SharePoint

    $
    0
    0
    In SharePoint, If you want to remove field from view programmatically using PowerShell, Here you go:

    SharePoint delete column from view using PowerShell:
    Add-PSSnapin Microsoft.SharePoint.PowerShell -ErrorAction SilentlyContinue 

    #Function: sharepoint powershell delete field from view
    Function Remove-FieldFromView([Microsoft.SharePoint.SPList]$List, [String]$ViewName, [string]$FieldInternalName)
    {
    #Get the view
    $View = $List.Views[$ViewName]
    #To Get the Default View: List.DefaultView

    if($view -eq $Null) {write-host "View doesn't exists!" -f Red; return}

    #Check if view has the specific field already!
    if($view.ViewFields.ToStringCollection().Contains($FieldInternalName))
    {
    #Remove field from view:
    $View.ViewFields.delete($FieldInternalName)
    $View.Update()
    write-host "Field Removed from the View!" -f Green
    }
    else
    {
    write-host "Field Doesn't Exists in the view!" -f Red
    }
    }

    #configuration parameters
    $WebURL="https://portal.crescent.com/projects/"
    $ListName="Project Milestones"
    $ViewName="All Items"
    $FieldName="ProjectDescription"

    #Get the Web and List
    $Web= Get-SPWeb $WebURL
    $List = $web.Lists.TryGetList($ListName)

    #Call the function to remove column from view
    Remove-FieldFromView $List $ViewName $FieldName

    This PowerShell script removes given field from the given view.

    How to Create a Cross-Site Lookup Site Column in SharePoint 2013

    $
    0
    0
    Lookup columns are used to get its value from a field in an another list in SharePoint sites. Lookup fields also provides a relationship between lists/libraries. Is it possible to create a lookup column from list on another site? sure, use site columns, so that you can utilize SharePoint 2013 lookup column from an different site!

    Site columns are available to its subsites, So create it in the Root site!

    SharePoint Site column Hierarchy:

    Create Cross-Site Lookup Site Column in SharePoint:
    Why to create Lookup as Site column? Because, If its created as a site column, it can be used at any subsite under the site collection while the lookup source list is at the parent site (or root site)! In short, create your lookup site column at parent site, so that it can be used on any underlying subsites of the site collection!

    Assuming, you have an existing list with all available lookup values in a "Single Line of Text" column, Here is how to create a cross site lookup site column in SharePoint 2013:
    1. Go to the root level site of your SharePoint site collection. Navigate to Settings >> Click on "Site Columns" link
      sharepoint cross site lookup column
    2. In Site columns page, Click on "Create" link
      sharepoint create lookup site column
    3. Provide Name, Column type, Group, Source List, Source Column values. Click on "OK" button once done.
      sharepoint lookup column from another site
    4. Navigate to your sub-site list >> Click on List settings >> Click on "Add from existing site columns" link
      cross site column lookup sharepoint 2013
    5. Choose the site column group in which you placed your site column, Select and Add the column, Click on "OK" button once done.
      sharepoint 2013 lookup column different site
    6. Now, In your sub-site list, You have the site column ready!
      sharepoint lookup column from list on another site

    Create Lookup Site Column from Subsite using PowerShell

    $
    0
    0
    Creating lookup field as site column was explained in my another post: Create a Cross-Site Lookup Site Column in SharePoint 2013. Now got a requirement to create a lookup site column from the subsite's list! Unfortunately, there is no UI to create a site column from subsite list values. Lookup site columns can be created only from the lists of the same site.

    PowerShell comes to rescue! We can create a lookup site column referencing any site of the site collection using PowerShell! Here is the PowerShell script to create a lookup column from list on another site.

    PowerShell script to create lookup site column from subsite's (or different site) list:
    Add-PSSnapin Microsoft.SharePoint.PowerShell -ErrorAction SilentlyContinue 

    #Where the Source List for Lookup Exists
    $ParentWebURL="https://portal.crescent.com/sales/"
    $ParentListName="Regions"
    $ParentLookupColumnName="Region"

    #Where the Lookup Site column Going to get created
    $ChildWebURL="https://portal.crescent.com"
    $ChildLookupColumnName="Sales Region"

    #Get the Parent and Child Webs and List
    $ParentWeb = Get-SPWeb $ParentWebURL
    $ParentList = $ParentWeb.Lists[$ParentListName]
    $ChildWeb = Get-SPWeb $ChildWebURL

    #Check if Field exists already
    if(!$ChildWeb.Fields.ContainsField($ChildLookupColumnName))
    {
    #Add Lookup Field
    $ChildLookupColumn = $ChildWeb.Fields.AddLookup($ChildLookupColumnName,$ParentList.id,$False)
    $ChildLookupColumn = $ChildWeb.Fields[$ChildLookupColumnName]

    #Setup lookup Field property
    $ChildLookupColumn.LookupWebId = $ParentWeb.ID
    $ChildLookupColumn.LookupField = $ParentList.Fields[$ParentLookupColumnName].InternalName
    #$ChildLookupColumn.AllowMultipleValues=$true
    $ChildLookupColumn.update()
    write-host "Lookup field added successfully!" -f green
    }
    else
    {
    write-host "Field Exists already!" -f red
    }
    This PowerShell script creates SharePoint lookup column from list on another site! BTW, Site columns must be created on Root web, so that it can be consumed by any subsite underneath.

    PowerShell to Update Multi-valued Peole Picker Field with New Users

    $
    0
    0
    Requirement: Update existing People Picker field value using PowerShell.

    PowerShell script to Add an new user to existing People Picker field:

    Add-PSSnapin Microsoft.SharePoint.PowerShell -ErrorAction SilentlyContinue

    #Configuration parameters
    $SiteURL = "http://portal.crescent.com/projects/"
    $ListName = "Projects"
    $FieldName= "ProjectTeamMembers"
    $UserToAdd="Crescent\Faris"
    $ItemID=431

    #Get site and List objects
    $web = Get-SPWeb $SiteURL
    $List = $web.Lists.TryGetList($ListName)

    if($List -ne $null)
    {
    #Get the Item
    $Item = $List.GetItembyID($ItemID)

    #Get Existing field value
    $MultiUserCollection = [Microsoft.SharePoint.SPFieldUserValueCollection]$item[$FieldName]

    #Prepre the user to add
    $User = $Web.EnsureUser($UserToAdd)
    $NewUser = new-object Microsoft.SharePoint.SPFieldUserValue($Web, $User.ID, $User.LoginName)

    #Update Multivalued people Picker field
    $MultiUserCollection.Add($NewUser)
    $item[$FieldName] = $MultiUserCollection
    $item.update()
    }
    write-host "New User Added and Existing People Picker field value updated!"

    Monitor SharePoint Services (Such as Timer Service) - Send Alert Email When They Goes Down!

    $
    0
    0
    In continuation to my post Monitor SharePoint App Pools using PowerShell Script ,  If certain Services on SharePoint server goes down, that could cause outages or service interruptions to your SharePoint environment! Although monitoring solutions such as SCOM can monitor services, they can't start the service automatically - when stopped. So, lets address this issue with the help of PowerShell! Here is my nifty PowerShell script to start required services when stopped and send alert emails .

    This script not only scans services availability, but also:
    • detects services status if its not in started state
    • Automatically starts the service if its in stopped state
    • Sends alert Email to SharePoint Admin team (or whoever configured!)
    PowerShell script to Monitor Services and Send Email notification:
    Add-PSSnapin microsoft.sharepoint.powershell -ErrorAction SilentlyContinue

    #Configuration variables
    $EmailFrom = "ServiceMonitor@crescent.com"
    $EmailTo = "SPAdmin@crescent.com" # Use commas for multiple addresses
    $EmailSubject = "Service(s) went down in SharePoint Server"

    #Services to Monitor
    $ServicesToMonitor = "IISADMIN", "SPTimerV4", "SPAdminV4", "SPTraceV4" , "SPUserCodeV4" , "SPWriterV4" , "OSearch14" , "W3SVC"

    #Get Outgoing Email Server of the SharePoint Farm
    $SMTP= (Get-SPWebApplication -IncludeCentralAdministration | Where { $_.IsAdministrationWebApplication } ) | %{$_.outboundmailserviceinstance.server.address}

    #Check the status of each service
    Foreach($ServiceName in $ServicesToMonitor)
    {
    #Get the service
    $Service = Get-Service -Name $ServiceName

    #Check the Service status
    if ($Service.Status -ne "Running")
    {
    Write-Host $Service.DisplayName Found Not running!

    Try
    {
    #Set the Error Action
    $ErrorActionPreference = "Stop"
    #Try to start the service
    Start-Service $ServiceName
    }
    catch
    {
    Write-Host "Attempt to start service failed. Find the Error Message below:" -ForegroundColor Red
    Write-Host $_.Exception.Message -ForegroundColor Red
    }
    finally
    {
    #Reset the Error Action to Default
    $ErrorActionPreference = "Continue"
    }

    #Send out the Alert E-mail
    $EmailBody = "Hi SharePoint Team, `n `n The Service: $($Service.DisplayName) was found in stopped state!. `n`nWe tried Re-starting it... Current State of the Service: $($Service.Status). `n`nPlease take necessary actions if its not started! `n `nThanks, `nSharePoint Monitoring Script."
    Send-MailMessage -From $EmailFrom -To $EmailTo -Subject $EmailSubject -Body $EmailBody -SmtpServer $SMTP -usessl
    }
    }
    How to Monitor services on each server of the SharePoint Farm?
    Just add parameter "-ComputerName $Server.Address" to "Get-Service" and "Start-Service" cmdlets.
    So, the code goes like:
    #Get all SharePoint Servers
    $ServersColl = Get-SPServer | where { $_.role -ne "Invalid"}

    Foreach($Server in $ServersColl)
    {
    #Wrap the above code
    }

    Schedule this PowerShell script in Windows Task scheduler in any Application server (or any other server will do!) to periodically scan App Pool status, Say once per 5 Min! run interval can be adjusted based on your application priority. Here is my another post on Scheduling PowerShell scripts using Windows Task scheduler: Create a Scheduled Task for PowerShell Script with Windows Task Scheduler

    Add Column to View in SharePoint using PowerShell

    $
    0
    0
    How to add a column to SharePoint list view using PowerShell?

    PowerShell Script to add a field to View:
    Add-PSSnapin Microsoft.SharePoint.PowerShell -ErrorAction SilentlyContinue

    #configuration parameters
    $WebURL="https://portal.crescent.com/projects"
    $ListName="Project Milestones"
    $ViewName="All Items"
    $FieldInternalName="ProjectDescription"

    Function Add-FieldToView([Microsoft.SharePoint.SPList]$List, [String]$ViewName, [string]$FieldInternalName)
    {
    #Get the view
    $View = $List.Views[$ViewName]
    #To Get the Default View: List.DefaultView

    if($view -eq $Null) {write-host "View doesn't exists!" -f Red; return}

    #Check if view has the specific field already!
    if(!$view.ViewFields.ToStringCollection().Contains($FieldInternalName))
    {
    $View.ViewFields.Add($FieldInternalName)
    #To Delete a field from view: $View.ViewFields.delete($FieldInternalName)
    $View.Update()
    write-host "Field added to View!" -f Green
    }
    else
    {
    write-host "Field Already Exists in the view!" -f Red
    }
    }

    #Get the Web and List
    $Web= Get-SPWeb $WebURL
    $List = $web.Lists.TryGetList($ListName)

    #If List Exists
    if ($List )
    {
    #Call the function
    Add-FieldToView $List $ViewName $FieldInternalName
    }

    Find Orphan User E-mails in List Items using PowerShell

    $
    0
    0
    Requirement: Our customized application for sending newsletters organizational wide, keeps its list of users to send e-mail in a SharePoint list called "Subscriptions". Users are configured in a people picker field of the list. Now, when someone leaves the organization, their account become orphan and their E-mails also goes invalid.

    So prior processing the E-mails column, we had to scan the people picker column in the list for orphaned user Emails.

    PowerShell script to scan for orphaned Users from their Emails:
    Add-PSSnapin Microsoft.SharePoint.PowerShell -ErrorAction SilentlyContinue
    Import-Module ActiveDirectory

    $Web= Get-SPWeb "https://portal.crescent.com/News/"
    $List = $Web.Lists["Subscriptions"]
    $FieldName="Members"

    foreach($item in $List.Items)
    {
    if($Item[$FieldName] -ne $null)
    {
    #Get People picker field values collection
    $UserCollection = New-Object Microsoft.Sharepoint.SPFieldUserValueCollection($Web,$Item[$FieldName].ToString())

    #Get each User from the Person or Group field
    foreach($UserObj in $UserCollection)
    {
    #Try to get the user from AD from Email
    $ADUser= Get-ADUser -Filter {mail -eq $UserObj.User.Email}

    #check if user email doesn't exist in AD
    if($ADUser -eq $null)
    {
    "https://portal.crescent.com/News/Pages/ViewUser.aspx?UserId=$($Item['ID'])" + $UserObj.User.LoginName + $UserObj.User.Email
    }
    }
    }
    }

    Add Single line of text / Multiple lines of text Fields to SharePoint List using PowerShell

    $
    0
    0
    How to programmatically Add a Single Line of Text field or Multiple Lines of text fields in SharePoint using PowerShell:
    #configuration parameters
    $WebURL="https://portal.crescent.com/"
    $ListName="Service Requests"

    #Get site and List objects
    $web = Get-SPWeb $WebURL
    $List = $web.Lists.TryGetList($ListName)

    #Check if List Exists
    if($List)
    {
    #Setup Field Properties
    $FieldName = "Overall Progress"
    $FieldType = [Microsoft.SharePoint.SPFieldType]::Text
    #For Multiple Lines of Text field, use:
    $FieldType = microsoft.sharepoint.SPFieldType]::Note
    $IsRequired = $False

    #Add the Field
    $NewField=$List.Fields.Add($FieldName,$FieldType,$IsRequired)
    }
    else
    {
    write-host "List not found!"
    }

    PowerShell Scripts to add Single line of text to SharePoint List:
    Lets make it a reusable function.
    #Function to Add a Single Line of Text
    Function Add-SPSingleLineOfTextField([Microsoft.SharePoint.SPList]$List, [string]$DisplayName, [string]$Name, [string]$Required)
    {
    if(!$List.Fields.ContainsField($DisplayName))
    {
    $FieldXML = "<Field Type='Text' DisplayName='"+ $DisplayName +"' Required='"+ $Required +"' MaxLength='255' Name='"+ $Name +"' />"
    $NewField=$List.Fields.AddFieldAsXml($FieldXML,$True,[Microsoft.SharePoint.SPAddFieldOptions]::AddFieldToDefaultView)
    write-host "New Field Added!" -f Green
    }
    else
    {
    write-host "Field exists already!" -f RED
    }
    }
    PowerShell to add Multiple lines of text field to SharePoint List
    #Function to Add Multiple Lines of Text
    Function Add-SPMultipleLinesOfTextField([Microsoft.SharePoint.SPList]$List, [string]$DisplayName, [string]$Name, [string]$Required, [string]$NumLines, [string]$RichText, [string]$RichTextMode)
    {
    if(!$List.Fields.ContainsField($DisplayName))
    {
    #Frame Field XML
    $FieldXML = "<Field Type='Note' DisplayName='"+ $DisplayName +"' Name='"+ $Name +"' Required='"+ $Required +"' NumLines='"+ $NumLines +"' RichText='" + $RichText +"' RichTextMode='"+ $RichTextMode +"' Sortable='FALSE'/>"
    #Add Field
    $NewField=$List.Fields.AddFieldAsXml($FieldXML,$True,[Microsoft.SharePoint.SPAddFieldOptions]::AddFieldToDefaultView)
    write-host "New Multiple Linex of Text Field Added!" -f Green
    }
    else
    {
    write-host "Field exists already!" -f RED
    }
    }

    Now, We can call the function to add single line of text:
    #configuration parameters
    $WebURL="https://portal.crescent.com/"
    $ListName="Service Requests"

    #Get site and List objects
    $web = Get-SPWeb $WebURL
    $List = $web.Lists.TryGetList($ListName)

    #Check if List Exists
    if($List)
    {
    #Call the function to add single line of Text
    Add-SPSingleLineOfTextField $List "Overall Progress" "Progress" $False
    }
    else
    {
    write-host "List not found!"
    }

    Lets call the function to add Multiple lines of text field:
    #configuration parameters
    $WebURL="https://portal.crescent.com/"
    $ListName="Service Requests"

    #Get site and List objects
    $web = Get-SPWeb $WebURL
    $List = $web.Lists.TryGetList($ListName)

    #Check if List Exists
    if($List)
    {
    #Add Plain Text
    #Add-SPMultipleLinesOfTextField $List "Stage Comments" "comments" $False 6 $False "Compatible"

    #Add Rich Text
    Add-SPMultipleLinesOfTextField $List "Stage Comments" "comments" "FALSE" 6 "TRUE" "Compatible"

    #Add Enhanced Rich Text
    #Add-SPMultipleLinesOfTextField $List "Stage Comments" "comments" "FALSE" "6" "TRUE" "FullHtml"
    }
    else
    {
    write-host "List not found!"
    }

    Add Lookup Field to SharePoint List using PowerShell

    $
    0
    0
    PowerShell script to add lookup field to SharePoint list programmatically:

    Scenario: You have a parent list called "Parent Projects" and child list "Project Milestones". The "Parent Project Name" field from child list is being looked up from the parent list's "Project Name" field.
    PowerShell Script to Add Lookup Field to SharePoint List:
    Add-PSSnapin Microsoft.SharePoint.PowerShell -ErrorAction SilentlyContinue 

    #configuration parameters
    $WebURL="https://portal.crescent/Projects/"
    $ParentListName="Parent Projects"
    $ChildListName="Project Milestones"

    $ParentLookupColumnName="Project Name"
    $ChildLookupColumnName="Parent Project Name"

    #Get the Parent and Child Lists
    $Web = Get-SPWeb $WebURL
    $ParentList = $web.Lists[$ParentListName]
    $ChildList = $web.Lists[$ChildListName]

    #Check if Field exists already
    if(!$childList.Fields.ContainsField($ChildLookupColumnName))
    {
    #Add Lookup Field
    $ChildLookupColumn = $ChildList.Fields.AddLookup($ChildLookupColumnName,$ParentList.id,$False)
    $ChildLookupColumn = $ChildList.Fields[$ChildLookupColumnName]

    #Setup lookup Field property
    $ChildLookupColumn.LookupField = $ParentList.Fields[$ParentLookupColumnName]
    #$ChildLookupColumn.AllowMultipleValues=$true
    $ChildLookupColumn.update()
    write-host "Lookup field added successfully!" -f green
    }
    else
    {
    write-host "Field Exists already!" -f red
    }

    Create Bulk Alerts from CSV File in SharePoint using PowerShell

    $
    0
    0
    Requirement: Create alerts on bunch of libraries in different site collections of a SharePoint Web application!

    Solution: Identified and exported list of Sites and Document Library names in the CSV file and used this PowerShell script to create multiple alerts.

    PowerShell script to crate bulk alerts from CSV File:
    Add-PSSnapin Microsoft.SharePoint.PowerShell -ErrorAction SilentlyContinue 

    #Function to Create alert on Given List to given users
    Function Create-Alert([Microsoft.SharePoint.SPList]$List,[Microsoft.SharePoint.SPUser]$User)
    {
    $newAlert = $user.Alerts.Add()
    $newAlert.Title = "Minitoring Alert for: "+$List.Title
    $newAlert.AlertType=[Microsoft.SharePoint.SPAlertType]::List
    $newAlert.List = $List
    $newAlert.DeliveryChannels = [Microsoft.SharePoint.SPAlertDeliveryChannels]::Email
    $newAlert.EventType = [Microsoft.SharePoint.SPEventType]::Add
    $newAlert.AlertFrequency = [Microsoft.SharePoint.SPAlertFrequency]::Immediate
    $newAlert.Update()
    }

    #Configuration parameters
    $CSVPath= "C:\Alerts.csv"
    $UserAccount= "Crescent\Salaudeen"

    #Get the CSV Data
    $CSVData = Import-CSV -path $CSVPath

    #Iterate through each Row in the CSV
    foreach ($row in $CSVData)
    {
    Write-host Creating Alerts on $Row.URL, Library: $Row.LibraryName
    #Get the Web and List
    $Web = Get-SPWeb $Row.URL.TRIM()
    $List = $Web.Lists[$Row.LibraryName.Trim()]
    $user = $web.EnsureUser($UserAccount)

    #Call the function to create Alert
    Create-Alert $List $User
    }
    Here is my CSV File:
    Create Bulk Alerts from CSV File in SharePoint using PowerShell
    Viewing all 1058 articles
    Browse latest View live