Quantcast
Channel: SharePoint Diary
Viewing all 1058 articles
Browse latest View live

Find Installed SharePoint Product Edition using PowerShell

$
0
0
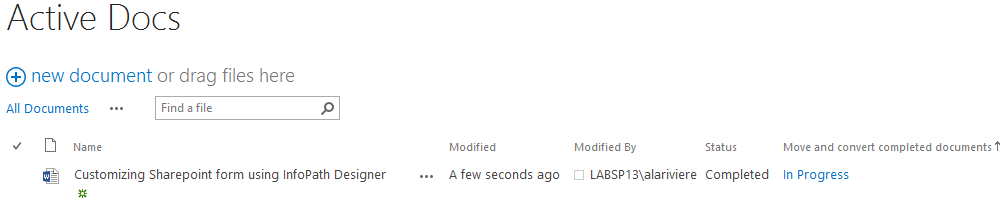
To determine SharePoint edition installed , use this PowerShell script:
Add-PSSnapin Microsoft.SharePoint.PowerShell -ErrorAction SilentlyContinue

#Hashtable to define Installed product from its GUID
#Based on: https://msdn.microsoft.com/en-us/library/office/jj659075.aspx and
#https://msdn.microsoft.com/en-us/library/ff721969.aspx

$SharePointProducts = @{
"BEED1F75-C398-4447-AEF1-E66E1F0DF91E" = "SharePoint Foundation 2010"
"1328E89E-7EC8-4F7E-809E-7E945796E511" = "Search Server Express 2010"
"B2C0B444-3914-4ACB-A0B8-7CF50A8F7AA0" = "SharePoint Server 2010 Standard Trial"
"3FDFBCC8-B3E4-4482-91FA-122C6432805C" = "SharePoint Server 2010 Standard"
"88BED06D-8C6B-4E62-AB01-546D6005FE97" = "SharePoint Server 2010 Enterprise Trial"
"D5595F62-449B-4061-B0B2-0CBAD410BB51" = "SharePoint Server 2010 Enterprise"
"BC4C1C97-9013-4033-A0DD-9DC9E6D6C887" = "Search Server 2010 Trial"
"08460AA2-A176-442C-BDCA-26928704D80B" = "Search Server 2010"
"84902853-59F6-4B20-BC7C-DE4F419FEFAD" = "Project Server 2010 Trial"
"ED21638F-97FF-4A65-AD9B-6889B93065E2" = "Project Server 2010"
"926E4E17-087B-47D1-8BD7-91A394BC6196" = "Office Web Companions 2010"
"35466B1A-B17B-4DFB-A703-F74E2A1F5F5E" = "Project Server 2013"
"BC7BAF08-4D97-462C-8411-341052402E71" = "Project Server 2013 Preview"
"C5D855EE-F32B-4A1C-97A8-F0A28CE02F9C" = "SharePoint Server 2013"
"CBF97833-C73A-4BAF-9ED3-D47B3CFF51BE" = "SharePoint Server 2013 Preview"
"B7D84C2B-0754-49E4-B7BE-7EE321DCE0A9" = "SharePoint Server 2013 Enterprise"
"298A586A-E3C1-42F0-AFE0-4BCFDC2E7CD0" = "SharePoint Server 2013 Enterprise Preview"
"D6B57A0D-AE69-4A3E-B031-1F993EE52EDC" = "Microsoft Office Web Apps Server 2013"
"9FF54EBC-8C12-47D7-854F-3865D4BE8118" = "SharePoint Foundation 2013"
}

#Get currently installed product's GUID
$InstalledProducts = (Get-SPFarm).Products

#Determine the product edition based on GUID from the HASH Table
$InstalledProducts | ForEach-Object { write-host $SharePointProducts.Get_Item($_.GUID) }

Please note, You'll always get "SharePoint Foundation" as installed product along with all other SharePoint products such as "SharePoint Server 2013 Enterprise".  Also, Office Web Apps doesn't work as its installed separately from SharePoint server farm.

Related posts:

How to Configure Excel Services in SharePoint 2013 - Step by Step

$
0
0
SharePoint 2013 enterprise edition offers Excel Services service application that enables browser-based rendering of Excel workbooks. Not just for rendering, but its primary used in business intelligence scenarios for its excel calculation & analysis capabilities, ability to query external data sources, etc. Lets walk-through the steps of configuring Excel Services to SharePoint Server 2013 farm.

How to Configure Excel Services in SharePoint 2013:
Here are the steps in high-level to configure Excel Services
  • Start Excel Calculation Services Service Instance
  • Create Excel Services Service Application
  • Grant Database Access to Excel services service Account 
  • Suppress Office Web Apps to enable Excel services 
  • Configure trusted file location.
Prerequisites - We need a managed account for Excel Services service application. Create a new managed account if you don't have one configured already!. Configuring Managed Accounts in SharePoint 2013

Step 1: Start Excel Calculation Services Service Instance:
Excel Services application relays on excel calculation service. To start the excel calculation service, Navigate to
  • Central Administration >> System Settings >> Manage Services on server
  • Select the server where you want to start the Excel Services. Typically, this will be one of your application server. You can run it on multiple servers for better performance and availability.
  • In the services list, Click on "Start" link next to "Excel calculation services"
excel services sharepoint 2013 configuration
Once its been started, the next step is to create an Excel Services service application.

Step 2: Create Excel Services Service Application
Here is how to create new "Excel services" service application
  • Go to Central Administration >> Application Management >>  Manage service applications
  • Click "New" button and select "Excel Services Application"install and configure excel services sharepoint 2013
  • Enter the Name of your excel service application in create new excel service application page.
  • Select "Create new application pool" option, enter the application pool name.
  • Select the "Configurable" option and specify the service account to run the application pool. This will be a managed account registered already in your farm.
  • Remember to Select "Add this service application's proxy to the farm's default proxy list." 
  • Click on "OK" button to create new excel services service application.sharepoint 2013 excel services step by step

Step 3: Grant Database access to "Excel Services" Service Application's service account.
The Excel Services application pool account must be granted access to SharePoint content databases. This can be done either by directly from SQL Server management studio or with PowerShell.

Grant Database access to Excel Services Application Pool account with PowerShell:
$WebApp = Get-SPWebApplication "http://intranet.crescent.com"

$WebApp.GrantAccesstoProcessIdentity("Crescent\SP13_ServiceApps")

Which grants "SPDataAccess" Membership roles on all content databases of the Web Application to the Service Application App Pool account! Please note, You must rerun these cmdlets, If you add new content databases in future!

Step 4: Suppress Office Web Apps to enable Excel services
If office web apps is enabled for your SharePoint environment, You must suppress it for Excel files in order to enable Excel services. Run these cmdlets to suppress Excel Office Web Application.
New-SPWOPISuppressionSetting -Extension "XLSX" -Action "view"

New-SPWOPISuppressionSetting -Extension "XLS" -Action "view"

#To Check current suppression settings: Get-SPWOPISuppressionSetting
#To Revert : Remove-SPWOPISuppressionSetting -Extension "XLSX" -Action "view"
#Remove-SPWOPISuppressionSetting -Extension "XLS" -Action "view"
From now on, opening any Excel file in SharePoint should launch Excel Services, instead of Excel Web Apps. Watch out the URL when you launch any Excel file from SharePoint. It should be something like "/_layouts/15/xlviewer.aspx" Instead of "/_layouts/15/WopiFrame.aspx"

Step 5: Configure Trusted File Locations
The final step to complete configuring Excel services is to add trusted file location. Here is how:
  • Navigate to Central Administration >> Application management >> Click on "Manage Service Applications" link
  • In the Manage service applications page, click on the Excel Services service application that we created.
  • From "Manage Excel Services Application" page, click on "Trusted File Locations" link.
    configure excel services in sharepoint 2013
  • Click on "Add Trusted File Location". In the Address column, Enter the URL of your SharePoint Site/Library. Set other options accordingly.
  • Click "OK" to save your changes.
Test everything works as expected!
So now, we've finished configuring Excel Services for SharePoint 2013. Lets test it out.
  • Go to any of your SharePoint site with "Enterprise Features" turned ON. Click on "Edit page" from Site Actions gear. 
  • Click on Insert >> Web part >> Select "Excel Web Access" web part.
  • Set the web part properties to fetch any Excel file from SharePoint document library location.
  • Save and Publish the page. You should see the Excel file rendering in the web part.
Technet article: Overview of Excel Services in SharePoint Server 2013

Sorry, we couldn't find your license to use this feature. If you know who manages the licenses for your organization, tell them you'd like a license to use 'Excel Services'.

$
0
0
Problem: 
SharePoint Excel Services failed with an error message: "Sorry, we couldn't find your license to use this feature. If you know who manages the licenses for your organization, tell them you'd like a license to use 'Excel Services'."
Sorry, we couldn't find your license to use this feature. If you know who manages the licenses for your organization, tell them you'd like a license to use 'Excel Services'.

Solutions:


Make Sure SharePoint Enterprise Feature is enabled
Excel Services is part of SharePoint Enterprise feature in SharePoint 2013. So, Make sure "SharePoint Server Enterprise Site Collection features" is enabled both at site level and Site collection levels. If activated already, Try Deactivate-Activate again!

Have you upgraded from Standard to Enterprise? Enable Features on Existing sites!
When SharePoint Server license is upgraded from Standard to Enterprise, it applies only to new sites we are going to create. For existing sites, we must use "Enable Features on Existing Sites" feature once, under "Upgrade and Migration" in SharePoint 2013 Central Administration site.

SharePoint 2013 User Licensing is Enabled?
Another cause and solution is: If you have enabled SharePoint User Licensing to restrict Enterprise edition features or Office web apps edit, You have to add mapping to "Enterprise" license and add the user in appropriate AD security group! Refer: SharePoint 2013 User Licensing Enforcement

Create a SharePoint Group using PowerShell

$
0
0
Here is my script to create new SharePoint group using PowerShell:
Add-PSSnapin Microsoft.SharePoint.PowerShell –ErrorAction SilentlyContinue

#Custom Function to Create new SharePoint Group
function Create-SPGroup
{
param ($SiteURL, $GroupName, $PermissionLevel, $GroupDescription)

try
{
#Get the Web
$web = Get-SPWeb -Identity $SiteURL

if($web -ne $null)
{
#Check if Group Exists already
if ($web.SiteGroups[$GroupName] -ne $null)
{
write-Host "Group $GroupName exists Already!" -ForegroundColor Red
}
else
{
#Create SharePoint Group
$Web.SiteGroups.Add($GroupName, $web.Site.Owner, $web.Site.Owner, $GroupDescription)
#Get the newly created group and assign permission to it
$Group = $web.SiteGroups[$groupName]
$roleAssignment = new-object Microsoft.SharePoint.SPRoleAssignment($group)
$roleDefinition = $web.Site.RootWeb.RoleDefinitions[$permissionLevel]
$roleAssignment.RoleDefinitionBindings.Add($roleDefinition)
$web.RoleAssignments.Add($roleAssignment)
$web.Update()

write-Host "Group: $GroupName created successfully!" -ForegroundColor Green
}

$web.Dispose()
}
}
catch [System.Exception]
{
write-host $_.Exception.ToString() -ForegroundColor Red
}
}

#Call the function to create Sharepoint group
Create-SPGroup "http://sales.crescent.com" "Sales Managers" "Edit" "Group for Sales Managers"

Import Users from Excel (CSV) to SharePoint using PowerShell

$
0
0
Requirement: Import list of users from Excel .CSV file to SharePoint and add them into appropriate groups.

Solution: Lets import users from Excel to SharePoint using PowerShell. Here is my CSV file with list of users and their target groups in SharePoint:
sharepoint import users from excel csv

PowerShell script to Import users from CSV to SharePoint 2013:
Add-PSSnapin Microsoft.SharePoint.PowerShell –erroraction SilentlyContinue

#Variables
$UserListCSV = "C:\UsersToImport.csv"
$SiteURL ="http://Sales.Crescent.com"

# Import the CSV file
$UserList = Import-CSV $UserListCSV #-header("GroupName","UserAccount") - If CSV doesn't has headers

#Get the Web
$Web = Get-SPWeb $SiteURL

#Iterate through each user from CSV file
foreach ($user in $UserList)
{
#Get the Group and User
$Group = $web.SiteGroups[$User.GroupName]
$User = $web.Site.RootWeb.EnsureUser($User.UserAccount)
#Add user to Group
$Group.AddUser($User)

Write-Host "$($User) Added Successfully!" -ForegroundColor Green
}

#Dispose web object
$Web.Dispose()

Export "User Information List" to Excel in SharePoint

$
0
0
At one point of time, I needed to export all users of a site collection to Excel and my trick to export user information list to excel as follows:

Export user information list to excel in SharePoint 2013:
Follow these steps to export user information list.
  • Navigate to Site Settings >> People and Groups. Now your browser URL should be something like: "http://SHAREPOINT-SITE.com/_layouts/15/start.aspx#/_layouts/15/people.aspx?MembershipGroupId=22". Just replace the value for "MembershipGroupId" to "0" to get "All People" view which lists all users of the site (which is nothing but "User Information List").
  • From here, Get the GUIDs of your User Information List and view. Here is How to Get the GUID of SharePoint list or View.
  • Replace "List GUID" and "View GUID" of yours in this URL and copy-paste it in the browser:
    http://SHAREPOINT-SITE-URL.com/_vti_bin/owssvr.dll?CS=109&Using=_layouts/query.iqy&List={LIST-GUID}&View={VIEW-GUID}&CacheControl=1
  • Navigate to the above URL, it should open the query, launch Microsoft Excel and Import all users from User Information List to Excel!
Alternate method:
Export User Information List to CSV using PowerShell:
Add-PSSnapin Microsoft.SharePoint.PowerShell –ErrorAction SilentlyContinue

#Variables
$SiteUrl="http://intranet.crescent.com"
$OutPutFile = "C:\UserInfoList.csv"

#Get Web and User Information List
$web = Get-SPWeb $siteUrl
$UserInfoList = $Web.Site.RootWeb.Lists["User Information List"]

#Array to Hold Result - PSObjects
$ListItemCollection = @()

#Get All List items where Status is "In Progress"
$UserInfoList.Items | foreach {
$ExportItem = New-Object PSObject
$ExportItem | Add-Member -MemberType NoteProperty -name "User Name" -value $_["Name"]
$ExportItem | Add-Member -MemberType NoteProperty -Name "Department" -value $_["Department"]
$ExportItem | Add-Member -MemberType NoteProperty -name "Job Title" -value $_["Job Title"]
$ExportItem | Add-Member -MemberType NoteProperty -name "About Me" -value $_["About Me"]

#Add the object with property to an Array
$ListItemCollection += $ExportItem
}
#Export the result Array to CSV file
$ListItemCollection | Export-CSV $OutPutFile -NoTypeInformation
Write-host "User Information List Exported to $($OutputFile) for site $($SiteURL)"

$web.Dispose()

This exports all users and groups of the site collection to CSV file.

How to Use JSLink with List View Web Part in SharePoint 2013

$
0
0
What is JsLink in SharePoint 2013:
JSLink is a new method of combining JavaScript, CSS and HTML elements together to customize the look and feel of SharePoint Fields, List Items, List views, List forms and web parts.
 
How to use JSLink in SharePoint 2013?
Here is the SharePoint 2013-jslink example. Lets customize the look and feel of static "% Complete" to bar chart with the help of JSLink. At high-level, here are the steps:
  1. Create a JavaScript override file
  2. Upload the JavaScript file to the "Master Page Gallery >> Display Templates", Set the content type and properties of the file.
  3. Set the JS Link property of the List view web part to point to the JavaScript file we've uploaded.

Step 1: Create your custom JS file to render SharePoint list field
As the first step, We'll have to create a new js file which customizes the rendering of our field. Here is what I've created "TaskListDT.js".
(function () {
var overrideCtx = {};
overrideCtx.Templates = {};
overrideCtx.Templates.Fields = {
'PercentComplete': { 'View': renderPercentComplete }
};
SPClientTemplates.TemplateManager.RegisterTemplateOverrides(overrideCtx);
})();

function renderPercentComplete(ctx) {

var fieldVal = ctx.CurrentItem[ctx.CurrentFieldSchema.Name];
var percentComplete = fieldVal.toString().replace(" ", "");

var html = '';
html += "<div style='width:100%;height:20px;border:1px solid #AEAEAE;position:relative;'>";
html += "<div style='background-color:#0072C6;height:100%;width:" + percentComplete + ";'></div>";
html += "<p style='width:100%;text-align:center;position:absolute;top:0px;left:0px;margin:0px;'>";
html += percentComplete;
html += "</p>";
html += "</div>";

return html;
}

Step 2: Upload the JS file to Display Templates Folder
Navigate to Site Settings >> Click on "Master pages" link. >> Navigate to "Display Templates" folder >> Upload your custom JS file. (It could be uploaded to anywhere in the site!)

While uploading, Make sure you set the properties of the JS file. Set the content type as "JavaScript Display Template" and supply other required parameter values as in the below screen.sharepoint 2013 how to use jslink

Step 3: Set JS Link property of List View Web part in SharePoint 2013
The next step is to specify the location of your JavaScript file in the List view web part property. Be sure you follow the "~sitecollection/Your-JS-File-complete-Path" format! (Can also use: ~site, ~layouts, ~siteLayouts, ~siteCollectionLayouts tokens)
jslink list view sharepoint 2013

Here is the Typical "% Complete" column from SharePoint 2013 task list:
sharepoint 2013 jslink property
and Here is our output - Bar charts for "% Complete" column.
sharepoint 2013 list view webpart jslink
In earlier versions of SharePoint (SharePoint 2007, SharePoint 2010), we used to customize XSL for such requirements. Here is one among them: Building Bar chart to Display Progress in Task List

Word cannot register your account. The provider where you are trying to publish is unavailable. Contact your provider for assistance.

$
0
0
Problem:
Tried publishing a blog post to SharePoint blog from Microsoft Word 2013 from "File >> Share >> Publish to Blog". While registering a new SharePoint blogging account, got this error message "Word cannot register your account. The provider where you are trying to publish is unavailable. Contact your provider for assistance."
Solution: 
Go to SharePoint 2013 Central Administration >> Manage Web Applications >>Web Application General Settings >> Set the option for "Allow user name and password from the API" to Yes.
Another cause and solution:
If your current logged in Windows user account isn't the same as your SharePoint account, You may get this error! Set your Internet Explorer's settings to prompt of user name and password. Delete your cookies and try again. You should get this "Account registration successful" message.

Open a Page in Popup Modal Dialog Window in SharePoint 2013

$
0
0
Requirement: Open a page in Modal Popup window in a SharePoint 2013 web site.
JavaScript to open popup in sharepoint 2013

Solution:
Requirement is to open "Terms and Conditions" page in popup window on clicking the link. Used this HTML code to open a page in modal popup window in SharePoint 2013:
<a href="#" onclick="OpenPopUpPageWithTitle('http://crescent.com/sitepages/terms.aspx', null, 600, 600,'Terms & Conditions')"/> Terms and Conditions </a>
and here is the result:
SharePoint 2013 open page in popup

Increase SharePoint 2013 Lookup Column Width

$
0
0
Requirement: Increase SharePoint 2013 multi-lookup field width

Solution: Use CSS styles to set lookup field width in SharePoint! Here is how:
  • Navigate to: http://your-sharepoint-site.com/Lists/Your-List/editform.aspx
  • Click on "Site Settings" gear >> Edit Page
  • Click on "Add Web Part" link and then choose "Script Editor "from "Media and Content" group
  • Click on "Edit Snippet" link script editor and Paste the below CSS in it. Save and close the page.
<style>
.ms-formtable table.ms-long {
width:600px !important;
}

.ms-formtable table.ms-long .ms-input>select {
width:300px !important;
}
</style>

Before:
sharepoint lookup column width
After:
sharepoint multi lookup field width

Configuration Failed: Failed to create the configuration database in SharePoint Products Configuration Wizard

$
0
0
Problem:
Experiencing "Configuration Failed" error message while running SharePoint SharePoint 2013 Products Configuration Wizard right after new installation/patching. It got stuck while performing configuration task 3 of 10. Creating the configuration database...

Which ended with an error message:
"Configuration Failed: 
Failed to create the configuration database.
An exception of type System.Security.Principal.IdentityNotMappedException was thrown. Additional exception information: Some or all identity references could not be translated."
Configuration Failed: Failed to create the configuration database in SharePoint Products Configuration Wizard
Solutions:
  • Make sure SQL Server is running on a service account which is granted with local administrator access rights! (Not running on accounts such as: local service, network service!)
    If so, update the Log On account of SQL Server Service in your database server.
  • Check TCP/IP and Named Pipes protocols are enabled in SQL Server. 
  • Check your Firewall. Turn it off for time being. Check your event logs for any antivirus related blocks.  
  • Make sure your setup account (or the account you are currently logged in and running the SharePoint Products Configuration Wizard) is granted with : dbcreator, securityadmin and sysadmin access rights in SQL Server.
  • Check the application pool identity for "SharePoint central administration" site! It should be your Farm account and not  "network service"
  • Do not use your service account username has with more than 20 characters (SharePoint uses the pre-windows 2000 username)
  • If all fails, Run PSConfig command line, and then Try running the Products configuration Wizard GUI again!
    psconfig -cmd configdb <-create/connect> -server <db-servername> -database <database name> -user <service-account-username> -password <password> -admincontentdatabase <content database name>
  • Delete the config database in Database Server. Delete the Central admin site and App Pool in IIS. and try running the wizard again.
Run the SharePoint Configuration wizard again, after fixing with the above workarounds.

Hide "Focus on Content" Button in SharePoint 2013

$
0
0
Requirement: Hide Focus on Content button in SharePoint 2013!

As the name suggests, Focus on content button in SharePoint 2013 removes left & top navigation and lets you to focus on the site content once you click on it. In case you want to remove that button, here is the trick:
sharepoint 2013 remove focus on content

Solution: Hiding focus on content in SharePoint 2013 can be done with CSS. Simply follow these steps to hide focus on content in SharePoint 2013: Go to your target page, Edit and Add a script editor web part, insert the below CSS in it.

<style>
Span#fullscreenmodebox
{
display:none;
}
</style>

You can also place the above CSS code in your Master page to hide focus on content button in SharePoint 2013.

Disable Alerts on SharePoint 2013 List using PowerShell

$
0
0
Requirement: Temporarily disable Alert Emails on a SharePoint list.

Solution:
SharePoint Alert objects have "Status" property which can be turned ON or OFF. As there is no UI to disable or enable alerts in SharePoint directly from the browser, we can do it programmatically with PowerShell. Here is my PowerShell script to disable alerts on SharePoint 2010/2013 listor library.

PowerShell script to Disable alerts on SharePoint list
Add-PSSnapin Microsoft.SharePoint.PowerShell –ErrorAction SilentlyContinue

#Function to Disable All Active Alerts on a Given List
Function Disable-ListAlerts($WebURL, $ListName)
{
#Get the Web and List objects
$Web = Get-SPWeb $WebURL
$List = $web.Lists.TryGetList($ListName)

#Get All Alerts created in the list - Which are Active
$ListAlerts = $Web.Alerts | Where-Object {($_.List.Title -eq $List.Title) -and ($_.Status -eq "ON")}

Write-host "Total Number of Active Alerts Found in the list: $($ListAlerts.Count)"

#Iterate through each alert and turn it OFF
foreach($Alert in $ListAlerts)
{
$Alert.Status="OFF"
$Alert.Update()
write-host "Disabled the Alert' $($Alert.Title)' Created for User '$($Alert.User.Name)'"
}

#Dispose web object
$Web.Dispose()
}

#Function to Enable all Disable Alerts on a Given List
Function Enable-ListAlerts($WebURL, $ListName)
{
#Get the Web and List objects
$Web = Get-SPWeb $WebURL
$List = $web.Lists.TryGetList($ListName)

#Get All Alerts created in the list - Which are in Disabled State
$ListAlerts = $Web.Alerts | Where-Object { ($_.List.Title -eq $List.Title) -and ($_.Status -eq "OFF")}

Write-host "Total Number of Disabled Alerts Found in the list: $($ListAlerts.Count)"

#Iterate through each alert and turn it OFF
foreach($Alert in $ListAlerts)
{
$Alert.Status="ON"
$Alert.Update()
write-host "Enabled the Alert' $($Alert.Title)' Created for User '$($Alert.User.Name)'"
}

#Dispose web object
$Web.Dispose()
}

#Variables
$WebURL = "http://operations.crescent.com/"
$ListName="Proposal Documents"

#Call the function Appropriately to Disable or Enable Alerts
Disable-ListAlerts $WebURL $ListName

#To Enable it back
#Enable-ListAlerts $WebURL $ListName

Related Posts:

Product Review: Virto SharePoint Calendar Web Part

$
0
0

Introduction:

Virto SharePoint Calendar Web Part enables users to view all of their events from multiple data sources such as SharePoint Lists, Exchange Calendar, Google Calendar, SalesForce Calendar, SQL Tables or XML and have different views for your easy navigation and reference in one single calendar/or Microsoft Exchange calendars and even from SalesForce Calendars.

Virto SharePoint Calendar replaces the existing SharePoint calendar view's functionality by allowing users to specify the list or view, color code the displayed items by category of events such as internal or external, view day, week, month, year, and Gantt view.


Roll up Multiple calendars from different data sources into one Single calendar

The main added value of the SharePoint Calendar web part is the opportunity to have all the events from different data sources displayed in a single SharePoint calendar view, sparing the necessity to switch between multiple views. You can also combine all events from different SharePoint Sites into one calendar!It can show all your events from different SharePoint 2013, 2010 or 2007 lists too.  So you can manage events from different data sources in one calendar.
 
You don't have to synchronize all your calendars from SharePoint, Google, Microsoft Exchange, SalesForce and etc. Install Virto SharePoint Calendar web part and show all the events from multiple data sources in a single place. Use as SharePoint Calendar data sources SharePoint lists from different site collections, SQL tables, Google calendar, XML source, SharePoint lists from other farm, Exchange calendar, SalesForce calendar. This is in comparison to most other SharePoint calendars that can only use one data source, and be displayed in only one view. To distinguish events from different sources in Virto SharePoint Calendar Web Part, one can use multi-level color coding.


Different calendar views (Day, Week, Work Week, Month, Year, Task)

Use appropriate timescale for showing your calendar events. Task view allows to control the status of tasks in your SharePoint Calendar web part. If you need to change the duration of the event, modify the size of the cell to the required direction and length. To change the date, simply select the appropriate date in the mini calendar. All of these features will help you save time and complete your calendar tasks with the greatest convenience. 
 
Virto provides editing features that will make working with SharePoint easy and pleasant. If you need to change the date of the event, simply drag and drop it to the appropriate calendar cell. To change the event in time frame in SharePoint Calendar, simply expand the event to incorporate the correct duration of the event.

Color coded data sources

You can visualize the events from your calendars. Customize calendar with special colors for each of data sources and your events will not join anymore! This feature is especially essential when you have more than 2 data sources in one calendar. Use any combination of RGB for coloring events according to their category.

Using Virto SharePoint Calendar Web Part
Virto Calendar implemented in a modern style. The component is fully ready for Windows 8 and SharePoint 2013. Installation is simple and only requires a small amount of time. Currently, Virto supports English, German, Spanish, French, Russian and Chinese Simplified languages. It provides color coding feature that displays items in their SharePoint Calendar web part by category of events (such as internal or external, view day, week, month, year, and Gantt view).

You can contact Virto, If you'd like to add another one language to support SharePoint Calendar Web Part!


Key Features & Advantages of Virto Calendar Web Part:

Virto SharePoint Web Part Calendar can be used instead of built-in SharePoint Calendar. It provides you with powerful capabilities for more convenient events calendaring, e.g.:
  • Integrate events from different data sources into one single calendar (from SharePoint Lists, SQL Tables and Microsoft Exchange 2013,  2010 and 2007 Calendars)
  • Add, delete and edit events with drag & drop feature 
  • Multi-level color coding - You can add color legend to remember which colors refer to your events. Event coloring according to event data source, according to event type,
  • Day, Year, Month, Week, Work Week, Task (Days), Task (Hours) views
  • Audience Targeting Support 
  • Advanced filtering, displaying only items satisfied to the specific criteria 
  • Print any Calendar View 
  • Adding Event with a single click
  • Event Coloring according to List Type
  • Date Picker for quick and easy navigation
  • Event duration editing with a simple resizing action
  • Event date changing with a just drag and drop
  • Single aggregated view of all your events from different SharePoint Lists not only single SharePoint Site
  • Resizing to accommodate your web page design

System requirements

Virto SharePoint Calendar web part is available in SharePoint versions 2013, 2010 and 2007. Both in Microsoft SharePoint Foundation 2013 and Microsoft SharePoint Server 2013 (or Windows SharePoint Services v3 SP2 or Microsoft Office SharePoint Server 2007) . 

Conclusion:

Virto SharePoint Calendar enables SharePoint users to plan their activities in a fastest way. The functionality and features of the calendar helps to save the time for real business instead of dying under events and other activities.

Virto SharePoint Calendar Web Part is user friendly and has a simple interface, allowing users to easily create new calendar events with a single click! Included with Virto are editing features that will make working with SharePoint easy and pleasant. You can download it a free 30-days trial at: Virto SharePoint Calendar Web Part

Also, VirtoSoftware releases in the next month a new SharePoint Calendar app for Office 365. Useful options and great quality on the new platform! Find the latest news on www.virtosoftware.com

How to convert Word documents to PDF by a SharePoint workflow using HarePoint Workflow Extensions.

$
0
0
Introduction
One of the main purposes of SharePoint is collaboration: a group of people can conveniently work with shared documents, making teamwork especially efficient. Usually, text documents are created and edited using Microsoft Word, but when the work is complete, it is convenient to convert the resulting document to PDF. This gives two advantages:
  • No further changes to a document are possible, so it can be safely shared
  • The PDF document can be easily viewed on any device
A Word document can be saved manually as a PDF file right from Microsoft Word’s Save As… menu, but if we talk about tens or even hundreds of documents per week, it would obviously be preferable to have this conversion running automatically. Another thing is that if we browse the short list of workflow actions in SharePoint Designer, we won't find anything related to document conversion. This is where HarePoint Workflow Extensions can help.

Scenario
In this article, we will follow this scenario:
  1. While the team actively works with a document in the document library Active Docs, it has the status "Work in progress". As soon as the job is done the status is set to Completed.
  2. The workflow triggers and converts this Word document to PDF.
  3. When the PDF file has been created, the workflow moves the original Word document to Document Sources library. Only selected team members (such as managers, etc) have access to this document library.
  4. As a result, only the PDF file remains in the original document library, so everyone can view and share this document. This way, the document can be opened easily (also on any mobile device), and at the same time no deliberate or inadvertent changes can be made.
As was mentioned in Introduction, we’re going to use HarePoint Workflow Extensions to perform this automated Word to PDF conversion. So we have the product installed (detailed information about HarePoint Workflow Extensions and its deployment is available on the product homepage: https://www.harepoint.com/Products/HarePointWorkflowExtensions/ and we are ready to go.

Creating a workflow
We can start creating a workflow. This is performed with SharePoint Designer, like we are used to. On the ribbon click New List Workflow for Active Docs list:
A dialog window for creation of a new list workflow will be displayed. Enter a workflow name and optionally a description.  
Important: select the SharePoint 2010 Workflow Platform Type in the drop-down menu, since HarePoint Workflow Extensions uses the 2010 platform type.
Since in our scenario the workflow will be launched every time the document is changed (but not when created), the first action we need to check is whether the document has the Status set to Completed (otherwise no action should be taken).

Add condition If any value equals value:
In the first parameter select Current Item:Status using the lookup:
The second parameter remains equals.

In the third parameter, select Completed:
Now we can add what should be done when this condition is met.

Add a Convert Document action from the HarePoint Activities – Document Conversion category:
In first parameter, select Current Item. Other parameters can be left as default:
The document conversion is not an immediate process, so in order to find out when the conversion has completed, we need to use the Wait Conversion Job action from HarePoint Activities – Document Conversion category:
In the parameter, select Variable:ConversionJobId (it’s the variable that is used in the previous workflow action) using the lookup:   
The workflow will stay on this action until the conversion is completed.
Finally, we will move the original document to Document Sources library that is accessible only for selected team members.

Add action Copy or Move Document from HarePoint Activities – Document Library:
Switch the action from Copy to Move.

In the second parameter (document URL) specify Current Item: Encoded Absolute URL using the lookup:
In the third parameter specify the full URL of the target library:
(typically that looks like http://servername/sitename/subsitename/.../documentlibraryname/)
 Here’s what we have in SharePoint Designer:
Save the workflow. Modify the workflow Start Options in SharePoint Designer to make it run every time the document is changed, but not when created:
Save and Publish the workflow.

Testing a workflow
Now we can make a test. Add a Word document to Active Docs library.

The document will have an empty status field by default (this is how the Status field is set up).
When the work on this document begins, team members edit the document and set the status to Work In Progress:
The workflow triggers, but completes with no actions taken, just as expected.

Now, change the status of the document to Completed:
 First, we notice the workflow status is now In Progress:
 After some time, all the Word document is gone and only the converted PDF remains in Active Docs:
Then, if we take a look at the Document Sources folder (where only selected team members have access), we see the original Word document:
Conclusion
In this article we have reviewed an example of rather simple but efficient workflow for a Team working with shared documents, and have seen how quickly and easily the solution can be achieved by using HarePoint Workflow Extensions– just a couple of actions in SharePoint Designer and no code at all.

SharePoint Online: Add Site Collection Administrator using PowerShell

$
0
0
SharePoint site collection administrators have Full access rights to manage all sites under a site collection. When creating a site collection, Global Administrator or SharePoint Online Administrator will automatically become the primary site collection admin. A SharePoint online site collection can have several administrators, but only one primary administrator, unlike SharePoint on-premises.

Its possible to add multiple site collection admins for any SharePoint site collection. To add additional site collection administrator in SharePoint online, you must be either Global Administrator or SharePoint online Site Collection Administrator of the particular site collection.

SharePoint online add site collection administrator
  • Navigate to your SharePoint Online administration center (E.g. https://crescent-admin.sharepoint.com/_layouts/15/online/SiteCollections.aspx )
  • Select the site collection, Click on "Owners" button from the ribbon and then click on "Manage Administrators" menu item.
  • This brings "Manage Administrators" page where you can add multiple site collection administrators. Also provides the option to change primary site collection administrator.
  • Now you can add new admins into the Site Collection Administrators box.
  • Once you have added the new user press OK to save the changes and any new Site Collection Administrator will have full rights to every site and sub-site within that Site Collection
Alternatively, Once the site collection is created, You can also navigate to Site Settings >> Site collection administrators link to add additional site collection administrators.

Quite easy, isn't it? Well, Its easy for one single site collection. However there is a problem when you have large number of site collections. Say, you have 100's of SharePoint online site collections, You can't simply select all of your site collections and add a site collection administrator to all of them at one shot!

In SharePoint Online, site collection administrators to be added on a site collection by site collection basis, as there is no web application level users policies can be set from Central Administration as we do in SharePoint on-premises.

So, the solution is: Using PowerShell to add site collection administrator in SharePoint online!

PowerShell Script to Add Site Collection Administrator in SharePoint Online:
#Variables for processing
$AdminURL = "https://crescent-admin.sharepoint.com/"
$AdminName = "salaudeen@crescent.onmicrosoft.com"
$SiteCollURL = "https://crescent.sharepoint.com/sites/Sales/"
$SiteCollectionAdmin = "mark@crescent.onmicrosoft.com"

#User Names Password to connect
#$SecurePWD = read-host -assecurestring "Enter Password for $AdminName"
$SecurePWD = ConvertTo-SecureString "Password1" –asplaintext –force
$Credential = new-object -typename System.Management.Automation.PSCredential -argumentlist $AdminName, $SecurePWD

#Connect to SharePoint Online
Connect-SPOService -url $AdminURL -credential $Credential

#Add Site collection Admin
Set-SPOUser -site $SiteCollURL -LoginName $SiteCollectionAdmin -IsSiteCollectionAdmin $True

To Add Site collection Admin to All SharePoint Online Sites, use:
#Get All Sites collections
$Sites = Get-SPOSite
Foreach ($Site in $Sites)
{
Write-host "Adding Site Collection Admin for:"$Site.URL
Set-SPOUser -site $SiteCollURL -LoginName $SiteCollectionAdmin -IsSiteCollectionAdmin $True
}
Change Primary Site Collection Administrator using PowerShell:
#Variables for processing
$AdminURL = "https://crescent-admin.sharepoint.com/"
$AdminName = "salaudeen@crescent.onmicrosoft.com"
$SiteCollURL = "https://crescent.sharepoint.com/sites/Sales"
$NewSiteAdmin = "mark@crescent.onmicrosoft.com"

#User Names Password to connect
$SecurePWD = ConvertTo-SecureString "Password1" –asplaintext –force
$Credential = new-object -typename System.Management.Automation.PSCredential -argumentlist $AdminName, $SecurePWD

#Connect to SharePoint Online
Connect-SPOService -url $AdminURL -credential $Credential

#Change Site Collection Primary Admin
Set-SPOSite -Identity $SiteCollURL -Owner $NewSiteAdmin -NoWait

Related Articles:

Create AD Security Group/Distribution List from All SharePoint Users of the Farm

$
0
0
Have you ever had to send out an E-mail to all SharePoint users of your SharePoint Farm? Ever wanted to create a global AD security group which comprises of all SharePoint users? Well, I'm sure, You will at some point of time. E.g. during scheduled maintenance, Grant access to a global site, etc. Your SharePoint farm may have multiple web applications with lot of users accessing it. We can't keep a AD group or distribution list in sync up to date with all SharePoint users, isn't it? But we can create a AD security group or distribution list on-demand which includes all users from the entire SharePoint farm. By this way, it will be more accurate and update.

The idea is: Loop through each web application-site-collection-site in SharePoint farm to retrieve and add members to a security group or distribution list in AD.

PowerShell script to Add All SharePoint Users to an AD Security Group:
Add-PSSnapin Microsoft.SharePoint.PowerShell –ErrorAction SilentlyContinue
Import-Module ActiveDirectory

#Variables
$ADGroup="SP13 Authors" #Existing AD Security Group
$ReportPath="D:\SP13_Users.csv"

#Get all Webs from Entire FARM
$WebsCollection = Get-SPWebApplication | Get-SPSite -Limit All | Get-SPWeb -Limit All

#Array to hold user data
$UserDataCollection = @()

foreach($Web in $WebsCollection)
{
#Get all users from web programmatically
$UsersColl = $Web.AllUsers

#Get all users E-mails
foreach ($User in $UsersColl)
{
if( ($User.IsDomainGroup -eq $false) -and ($user.Email.ToString() -ne ""))
{
$UserData = New-Object PSObject
$UserData | Add-Member -type NoteProperty -name "EmailID" -value $user.Email.ToString()
$UserDataCollection += $UserData
}
}
}
#Remove duplicates
$UserDataCollection = $UserDataCollection | sort-object -Property {$_.EmailID } -Unique

Write-host "Total Number of Unique Users found:"$UserDataCollection.Length

#Export to CSV
$UserDataCollection | Export-Csv -LiteralPath $ReportPath -NoTypeInformation

#Add each user to AD Group
$UserDataCollection | ForEach-Object {
#Get the user from Email id
$UserEmail = $_.EmailID
$ADuser = Get-ADUser -filter { EmailAddress -eq $UserEmail }

#Ignore Orphans
if($ADuser -ne $null)
{
#Add User to AD Aroup
Add-ADGroupMember -Identity $ADGroup -Members $ADuser
}
}
Run this script once. It will fetch and add all SharePoint users to the given AD group. To make it distribution list, Head on to AD, Find and locate the AD Group, Go to its properties, Assign an Email and change the Group type to "Distribution" if you need DL instead of Security group.

SharePoint 2016 IT Preview Released

$
0
0
SharePoint 2016 IT preview has been released! Cloud first infrastructure, Large file support (10GB!), Durable links, Zero downtime on patching, App launcher, Cloud hybrid search are some new exciting features!!

You can download the SharePoint 2016 IT Preview at: http://www.microsoft.com/en-us/download/details.aspx?id=48712

As per Microsoft, SharePoint Server 2016 will become available in Q2 2016, with a public beta planned for Q4 2015:http://blogs.office.com/2015/04/16/sharepoint-server-2016-update/

Set Default Value for Hyperlink or Picture Column in SharePoint

$
0
0
Problem:
There is no provision for specifying default value in Hyperlink or Picture type columns in SharePoint! In some scenarios, we may want to specify SharePoint 2010/2013 hyperlink column default value. But there is no option in SharePoint web UI to enter hyperlink field default value!
sharepoint 2010 hyperlink field default value

Solution: Set SharePoint hyperlink column default value with PowerShell! Use this PowerShell script to specify default value for hyperlink or picture type fields.

Add-PSSnapin Microsoft.SharePoint.PowerShell –ErrorAction SilentlyContinue

#Variables
$WebURL="http://intranet.crescent.com"
$ListName="Proposal Documents"
$ColumnName="Reference URL"
$DefaultValue="http://externalsites.crescent.com"

#Get the Web
$web = Get-SPWeb $WebURL

#Get the List
$list = $web.Lists.TryGetList($ListName)

If($list -ne $null)
{
#Get the column
$column = $list.Fields[$ColumnName]

if($column -ne $null)
{
#Set Default Value
$column.DefaultValue = $DefaultValue
$column.Update()
$list.Update()
Write-Host " Default value set for the column!"
}
}
$web.Dispose()

Here is the output for SharePoint 2013 list hyperlink default value specified programmatically:
 sharepoint 2013 hyperlink column default value

How to Add Calculated Column to SharePoint List using PowerShell

$
0
0
Requirement: Add new Calculated field to SharePoint list programmatically using PowerShell script.

PowerShell to add calculated column in SharePoint list or library:
Add-PSSnapin Microsoft.SharePoint.PowerShell –ErrorAction SilentlyContinue

#Variables
$WebURL="http://projects.crescent.com"
$ListName="Proposal Documents"
$CalculatedColumnName="Created Month-Year"

#Get the Web
$web = Get-SPWeb $WebURL

#Get the List
$list = $web.Lists.TryGetList($ListName)

#Add new calculated column
$list.Fields.Add($CalculatedColumnName, "Calculated", $false)

#Get the column
$CalculatedCol = $List.Fields.GetField($CalculatedColumnName)
#Set Formula for calculated column
$CalculatedCol.Formula='=TEXT(Created,"mmm-YYYY")'
$CalculatedCol.OutputType="Text"
$CalculatedCol.Update()

$web.Dispose()

Script in action: Create calculated column in SharePoint 2013 using PowerShell
create calculated column in sharepoint 2013 using powershell
Viewing all 1058 articles
Browse latest View live


<script src="https://jsc.adskeeper.com/r/s/rssing.com.1596347.js" async> </script>