Quantcast
Channel: SharePoint Diary
Viewing all 1058 articles
Browse latest View live

Arrange Choice Field Radio Buttons Horizontally in SharePoint List Forms

$
0
0
Requirement is to arrange choice fields of Radio buttons to horizontally in a SharePoint 2013 custom list form:
How to arrange choice field options Horizontally?
Step 1: Create new Custom list form, Wrap your choice field in <Span> tag to give it a ID. E.g.
<span id="optReqType">
<SharePoint:FormField runat="server" id="ff3{$Pos}" ControlMode="New" FieldName="Change_x0020_Request_x0020_Type" __designer:bind="{ddwrt:DataBind('i',concat('ff3',$Pos),'Value','ValueChanged','ID',ddwrt:EscapeDelims(string(@ID)),'@Change_x0020_Request_x0020_Type')}"/>
<SharePoint:FieldDescription runat="server" id="ff3description{$Pos}" FieldName="Change_x0020_Request_x0020_Type" ControlMode="New"/>
</span>

Step 2: In the custom list form, find the tag <AdditionnalPageHead> and add this code just below it.
<script src="https://ajax.googleapis.com/ajax/libs/jquery/1.3.2/jquery.min.js" type="text/javascript"></script>
<script language="javascript" type="text/javascript">

$(document).ready(function() {
var firstRadio = $("#optReqType table tbody tr td .ms-RadioText:eq(0)");
$("#optReqType table tbody tr td .ms-RadioText:gt(0)").appendTo($(firstRadio));

});
</script>
When you have multiple choice fields in the form, its better to create a function to arrange them horizontally.
<asp:Content ContentPlaceHolderId="PlaceHolderAdditionalPageHead" runat="server">

<script src="https://ajax.googleapis.com/ajax/libs/jquery/1.3.2/jquery.min.js" type="text/javascript"></script>
<script language="javascript" type="text/javascript">

function alignOptions(fieldName)
{
var firstRadio = $("#"+fieldName +" table tbody tr td .ms-RadioText:eq(0)");
$("#"+fieldName +" table tbody tr td .ms-RadioText:gt(0)").appendTo($(firstRadio));
}

$(document).ready(function() {

//Call function to arrange Radio buttons horizontally
alignOptions("optChgImpact");
alignOptions("optChgPriority");

});
</script>
Here is my screen:
SPServices Framework also offers this functionality:
http://spservices.codeplex.com/wikipage?title=%24%28%29.SPServices.SPArrangeChoices

Cancel Workflows in SharePoint using PowerShell

$
0
0

Requirement: There was a large list with workflow attached to it. SharePoint Development team came with a requirement of cancelling multiple workflows running on these list items, nearly 2000!

While cancelling workflows on individual item is pretty straight forward, How about cancelling workflows on 1000's of items? Would be a daunting task, isn't it?

PowerShell Solution:
Well, PowerShell can help to cancel workflows in SharePoint. If you ever have to cancel multiple running workflows on all list items, use this PowerShell script:

Cancel all workflows on a list:
$web = Get-SPWeb "http://your-sharepoint-site-url"

#List Name
$list = $web.Lists["Your-List-Name"]

# Iterate through all Items and all Workflows on Items
foreach ($item in $list.Items)
{
foreach ($wf in $item.Workflows)
{
#Cancel Workflows
[Microsoft.SharePoint.Workflow.SPWorkflowManager]::CancelWorkflow($wf)
}
}
To cancel all errored workflows use the condition as:
foreach ($item in $list.Items) 
{
foreach ($wf in $item.Workflows)
{
if($wf.InternalState -match 'Error')
{
#Cancel Workflows
[Microsoft.SharePoint.Workflow.SPWorkflowManager]::CancelWorkflow($wf);
}
}
}
Lets target a particular workflow:
Add-PSSnapin Microsoft.SharePoint.PowerShell -ErrorAction SilentlyContinue

$web = Get-SPWeb "http://your-sharepoint-site-url"

#Get the List
$list = $web.Lists["Your-List-Name"]

#Get the specific workflow, Associated with the list
$WorkFlowToCancel = "Approval Workflow"

# Iterate through all Items and all Workflows on Items
foreach ($item in $list.Items)
{
foreach ($wf in $item.Workflows)
{
#Check for the particular workflow
if( ($wf.ParentAssociation.Name -eq $WorkFlowToCancel) -and ($wf.IsCompleted -ne $true) -and($wf.StatusText -ne "Canceled" ))
{
write-host "Previous workflow status:" $wf.InternalState
#Cancel Workflow
[Microsoft.SharePoint.Workflow.SPWorkflowManager]::CancelWorkflow($wf)
write-host "Workflow Cancelled at $($list.title)! "
}
}
}

Related Post: How to Start a SharePoint Workflow using PowerShell

Hide "Recent" from SharePoint 2013 Quick Launch Navigation

$
0
0
Recent section gets added automatically through a Web Control on SharePoint pages. 'Recent' menu is individual to each user! meaning everyone gets their own recent section with links to their recent activities! If you have a requirement to remove (or hide) the "Recent" menu header from the left navigation of SharePoint 2013, Here are some solutions:
sharepoint 2013 hide recent in quick launch
In Publishing sites, You can remove "Recent" section manually by going to : Site Settings >> Look and Feel >> Navigation (or Quick launch on Non-publishing sites!) .
hide recent in sharepoint 2013
How to hide recent in SharePoint 2013 using jQuery:
Edit the page, Add a script editor web part and place this code in it (or master page html)
<script src="http://code.jquery.com/jquery-latest.min.js" type="text/javascript"></script>

<script type="text/javascript">
jQuery(document).ready(function() {
jQuery(".ms-core-listMenu-item:contains('Recent')").parent().hide();
});
</script>

Hide recent heading in SharePoint 2013 Quick launch with PowerShell:
 You can also remove "Recent" section using PowerShell by deleting recent header.

PowerShell script to delete recent group in SharePoint 2013 left navigation:
Add-PSSnapin Microsoft.SharePoint.PowerShell -ErrorAction SilentlyContinue

$web = Get-SPWeb "http://your-sharepoint-site-url"

#Process Quick launch
for ($i = $web.Navigation.QuickLaunch.Count-1; $i -ge 0; $i--)
{
$node = $web.Navigation.QuickLaunch[$i];

if($node.Title -eq "Recent")
{
$node.Delete();
Write-host "Recent section removed from $($web.Title)"
}
}

Copy Permissions from One User to Another in SharePoint using PowerShell

$
0
0
Permission management in SharePoint is always a complex task especially on large environments. Granting permissions in SharePoint becomes cumbersome when you are in a situation to clone an existing user's access rights. Consider this scenario: You have an existing user in a department granted access to various SharePoint web applications, sites, lists, files, etc. and when a new user joins to this department, You-SharePoint Administrator get the requirement of adding new user to all of the places with same access rights as the existing team member!

How will you compare access rights of an existing team member and grant access in bulk? He may be granted permission on various levels with different access rights. It would become very time-consuming to find and grant same level of permissions to multiple users on multiple SharePoint objects. Existing user may be grated access as part of:
  • Farm Administrator group and/or as part of web application policies
  • Member of Site collection administrator group
  • Permissions granted at site level either as part of SharePoint group or with direct permissions
  • Permissions granted to list or libraries by breaking inheritance 
  • Access rights may be via List item or folder level permissions.
In short, permissions can be granted at the following levels in SharePoint:
sharepoint copy permissions from one user to another
Well, To copy permissions from one user to another user on above levels, I've written this PowerShell script - It just scans all possible levels for given source user's access rights and grants permission to the target user.

PowerShell script to clone SharePoint User Permissions:
Important: You must run this script as Farm Administrator! Otherwise, you'll get "Access Denied" error!!
This script iterates through each levels as in the above image and copies permissions between given users at List Item/Folder, Lists, site, Site Collection, Web Application and Farm levels. Just change the parameters for variables $SourceUserl, $TargetUser and $WebAppURL accordinly and run the script. You'll find the script outputs logs on the screen, on wherever it copies permissions.

Add-PSSnapin Microsoft.SharePoint.PowerShell -ErrorAction SilentlyContinue

#Function to copy user permissions
Function Copy-UserPermissions($SourceUserID, $TargetUserID, [Microsoft.SharePoint.SPSecurableObject]$Object)
{
#Determine the given Object type and Get URL of it
Switch($Object.GetType().FullName)
{
"Microsoft.SharePoint.SPWeb" { $ObjectType = "Site" ; $ObjectURL = $Object.URL; $web = $Object }
"Microsoft.SharePoint.SPListItem"
{
if($Object.Folder -ne $null)
{
$ObjectType = "Folder" ; $ObjectURL = "$($Object.Web.Url)/$($Object.Url)"; $web = $Object.Web
}
else
{
$ObjectType = "List Item"; $ObjectURL = "$($Object.Web.Url)/$($Object.Url)" ; $web = $Object.Web
}
}
#Microsoft.SharePoint.SPList, Microsoft.SharePoint.SPDocumentLibrary, Microsoft.SharePoint.SPPictureLibrary,etc
default { $ObjectType = "List/Library"; $ObjectURL = "$($Object.ParentWeb.Url)/$($Object.RootFolder.URL)"; $web = $Object.ParentWeb }
}

#Get Source and Target Users
$SourceUser = $Web.EnsureUser($SourceUserID)
$TargetUser = $Web.EnsureUser($TargetUserID)

#Get Permissions of the Source user on given object - Such as: Web, List, Folder, ListItem
$SourcePermissions = $Object.GetUserEffectivePermissionInfo($SourceUser)

#Iterate through each permission and get the details
foreach($SourceRoleAssignment in $SourcePermissions.RoleAssignments)
{
#Get all permission levels assigned to User account directly or via SharePOint Group
$SourceUserPermissions=@()
foreach ($SourceRoleDefinition in $SourceRoleAssignment.RoleDefinitionBindings)
{
#Exclude "Limited Accesses"
if($SourceRoleDefinition.Name -ne "Limited Access")
{
$SourceUserPermissions += $SourceRoleDefinition.Name
}
}

#Check Source Permissions granted directly or through SharePoint Group
if($SourceUserPermissions)
{
if($SourceRoleAssignment.Member -is [Microsoft.SharePoint.SPGroup])
{
$SourcePermissionType = "'Member of SharePoint Group - " + $SourceRoleAssignment.Member.Name +"'"

#Add Target User to the Source User's Group
#Get the Group
$Group = [Microsoft.SharePoint.SPGroup]$SourceRoleAssignment.Member

#Check if user is already member of the group - If not, Add to group
if( ($Group.Users | where {$_.UserLogin -eq $TargetUserID}) -eq $null )
{
#Add User to Group
$Group.AddUser($TargetUser)
#Write-Host Added to Group: $Group.Name
}
}
else
{
$SourcePermissionType = "Direct Permission"

#Add Each Direct permission (such as "Full Control", "Contribute") to Target User
foreach($NewRoleDefinition in $SourceUserPermissions)
{
#Role assignment is a linkage between User object and Role Definition
$NewRoleAssignment = New-Object Microsoft.SharePoint.SPRoleAssignment($TargetUser)
$NewRoleAssignment.RoleDefinitionBindings.Add($web.RoleDefinitions[$NewRoleDefinition])

$object.RoleAssignments.Add($NewRoleAssignment)
$object.Update()
}
}
$SourceUserPermissions = $SourceUserPermissions -join ";"
Write-Host "***$($ObjectType) Permissions Copied: $($SourceUserPermissions) at $($ObjectURL) via $($SourcePermissionType)***"
}
}
}

Function Clone-SPUser($SourceUserID, $TargetUserID, $WebAppURL)
{
###Check Whether the Source Users is a Farm Administrator ###
Write-host "Scanning Farm Administrators Group..."
#Get the SharePoint Central Administration site
$AdminWebApp = Get-SPwebapplication -includecentraladministration | where {$_.IsAdministrationWebApplication}
$AdminSite = Get-SPWeb $AdminWebApp.Url
$AdminGroupName = $AdminSite.AssociatedOwnerGroup
$FarmAdminGroup = $AdminSite.SiteGroups[$AdminGroupName]

#enumerate in farm adminidtrators groups
foreach ($user in $FarmAdminGroup.users)
{
if($User.LoginName.Endswith($SourceUserID,1)) #1 to Ignore Case
{
#Add the target user to Farm Administrator Group
$FarmAdminGroup.AddUser($TargetUserID,"",$TargetUserID , "")
Write-Host "***Added to Farm Administrators Group!***"
}
}

### Check Web Application User Policies ###
Write-host "Scanning Web Application Policies..."
$WebApp = Get-SPWebApplication $WebAppURL

foreach ($Policy in $WebApp.Policies)
{
#Check if the search users is member of the group
if($Policy.UserName.EndsWith($SourceUserID,1))
{
#Write-Host $Policy.UserName
$PolicyRoles=@()
foreach($Role in $Policy.PolicyRoleBindings)
{
$PolicyRoles+= $Role
}
}
}
#Add Each Policy found
if($PolicyRoles)
{
$WebAppPolicy = $WebApp.Policies.Add($TargetUserID, $TargetUserID)
foreach($Policy in $PolicyRoles)
{
$WebAppPolicy.PolicyRoleBindings.Add($Policy)
}
$WebApp.Update()
Write-host "***Added to Web application Policies!***"
}

### Drill down to Site Collections, Webs, Lists & Libraries, Folders and List items ###
#Get all Site collections of given web app
$SiteCollections = Get-SPSite -WebApplication $WebAppURL -Limit All

#Convert UserID Into Claims format - If WebApp is claims based! Domain\User to i:0#.w|Domain\User
if( (Get-SPWebApplication $WebAppURL).UseClaimsAuthentication)
{
$SourceUserID = (New-SPClaimsPrincipal -identity $SourceUserID -identitytype 1).ToEncodedString()
$TargetUserID = (New-SPClaimsPrincipal -identity $TargetUserID -identitytype 1).ToEncodedString()
}

#Loop through all site collections
foreach($Site in $SiteCollections)
{
#Prepare the Target user
$TargetUser = $Site.RootWeb.EnsureUser($TargetUserID)

Write-host "Scanning Site Collection Administrators Group for:" $site.Url
###Check Whether the User is a Site Collection Administrator
foreach($SiteCollAdmin in $Site.RootWeb.SiteAdministrators)
{
if($SiteCollAdmin.LoginName.EndsWith($SourceUserID,1))
{
#Make the user as Site collection Admin
$TargetUser.IsSiteAdmin = $true
$TargetUser.Update()
Write-host "***Added to Site Collection Admin Group***"
}
}

#Get all webs
$WebsCollection = $Site.AllWebs
#Loop throuh each Site (web)
foreach($Web in $WebsCollection)
{
if($Web.HasUniqueRoleAssignments -eq $True)
{
Write-host "Scanning Site:" $Web.Url

#Call the function to Copy Permissions to TargetUser
Copy-UserPermissions $SourceUserID $TargetUserID $Web
}

#Check Lists with Unique Permissions
Write-host "Scanning Lists on $($web.url)..."
foreach($List in $web.Lists)
{
if($List.HasUniqueRoleAssignments -eq $True -and ($List.Hidden -eq $false))
{
#Call the function to Copy Permissions to TargetUser
Copy-UserPermissions $SourceUserID $TargetUserID $List
}

#Check Folders with Unique Permissions
$UniqueFolders = $List.Folders | where { $_.HasUniqueRoleAssignments -eq $True }
#Get Folder permissions
foreach($folder in $UniqueFolders)
{
#Call the function to Copy Permissions to TargetUser
Copy-UserPermissions $SourceUserID $TargetUserID $folder
}

#Check List Items with Unique Permissions
$UniqueItems = $List.Items | where { $_.HasUniqueRoleAssignments -eq $True }
#Get Item level permissions
foreach($item in $UniqueItems)
{
#Call the function to Copy Permissions to TargetUser
Copy-UserPermissions $SourceUserID $TargetUserID $Item
}
}
}
}
Write-Host "Permission are copied successfully!"

}
#Define variables for processing
$WebAppURL = "http://sharepoint.crescent.com"

#Provide input for source and Target user Ids
$SourceUser ="Crescent\TonyW"
$TargetUser ="Crescent\Salaudeen"

#Call the function to clone user access rights
Clone-SPUser $SourceUser $TargetUser $WebAppURL

Copy User Permissions at list level:
This script is broken into two functions: Copy-UserPermissions and Clone-SPSuer for convenience. Lets say, you want to copy permissions at list level, then you can utilize the Copy-UserPermission function as:

$WebURL = "http://sharepoint.crescent.com/sites/sales"

$web = Get-SPWeb $WebURL

$SourceUser ="i:0#.w|Crescent\TonyW"
$TargetUser ="i:0#.w|Crescent\Salaudeen"

$list = $Web.Lists["Invoice"]

#$folder = $list.Folders[0]
#$ListItem = $list.Items[0]

#Call the function to copy user permissions programmatically at LIST level
Copy-UserPermissions $SourceUser $TargetUser $list

This script just clone's user permissions at list level (copies at only list level, no drill-down to Folders and Items!).

Please note, This script doesn't clone permissions which are granted via Active Directory Security groups!

Delete Button Missing in SharePoint Column? Here is How to Delete them.

$
0
0
How to delete a Column when Delete Buttonis missing:
Unable to delete list column in SharePoint since there is no delete button in field properties? In some cases, columns added through "Add existing columns" doesn't provide the option to delete! To make them deletable, just revert these two properties: AllowDeletion & Sealed
sharepoint column no delete button - sharepoint list sealed and non-deletable columns
Here is how to delete SharePoint list column programmatically with PowerShell: 
#Get the Web
$web = Get-SPWeb "http://sharepoint.crescent.com/sites/pmo"

#Get the List
$list = $web.Lists["Design Documents"]

#Get the column
$column = $list.Fields["Category"]

#Disable Delete
$column.AllowDeletion = $true
$column.Sealed = $false
$column.Update()

#To delete a SharePoint list column in PowerShell, use: $column.Delete()

$web.Dispose() 
sharepoint column delete button missing
We can also make fields to Sealed, So that nobody can change the field settings.

SharePoint Manager tool  can be used to set these properties. Just navigate to the site, list or library and set the "AllowDeletion" property to false, save the changes. This hides delete option in SharePoint list. sharepoint list column enable disable delete option

Here is my another post to make a column non-deletable: How to Prevent SharePoint List or Columns from Deletion

Application Pool Monitoring for SharePoint using PowerShell Script

$
0
0
If SharePoint Application Pools are stopped that would cause outages to your SharePoint environment!  While SCOM can monitor SharePoint IIS web application's application pool status, it makes bit more noisy with alerts and doesn't start the application pool automatically. So, lets address this issue with the help of PowerShell! Here is my nifty PowerShell script to monitor application pools on all SharePoint web front end servers.

This script not only scans IIS Application Pool status on SharePoint Web-Front end servers, But also:
  • Logs application Pool status if its not in Started state
  • Automatically starts AppPool if its in stopped state
  • Sends out an Alert-Email to SharePoint Admin team (or whoever configured!)
PowerShell script to Monitor IIS Application Pool statues:
Import-Module WebAdministration

#Array to hold Server names - Change it to YOUR SharePoint front end servers
$WFEServers =("HS-WFE01", "HS-WFE02", "HS-WFE03")

#Log file location
$LogFile = "D:\Scripts\AppPool-Log.txt"

#Loop through each server and Check Application Pool status
foreach ($Server in $WFEServers)
{
$ServerMgr = [Microsoft.Web.Administration.ServerManager]::OpenRemote($Server)

#Get all Application Pools which are not in Started State
$AppPoolColl = $ServerMgr.ApplicationPools | Where-Object {$_.State -ne "Started"}

foreach($AppPool in $AppPoolColl)
{
#Get the time to Log
$now = Get-Date –f "yyyy-MM-dd HH:mm:ss"

#Log to file
"`n Found Application Pool: $($AppPool.name) in stopped state at the server : $($Server) on $($now)" >> $LogFile
"Trying to Start the application Pool...">> $LogFile

#Try Starting the application Pool
$AppPool.Start()
Start-Sleep -s 10
"Application Pool's current Status: $($AppPool.State)" >> $LogFile

#Send Alert-Mail message
$emailFrom = "AppPoolMonitor@crescent.com"
# Use commas for multiple addresses
$emailTo = "SPAdmins@crescent.com"
$subject = "Application Pool: $($AppPool.Name) in stopped state in Server: $($Server) at $($now)"
$body = "Hi SharePoint Team, `n `n The Application Pool $($AppPool.name) was in stopped state in server: $($server). `n`n We tried Re-starting it... Current State of the Application Pool: $($AppPool.State). `n`n Please take necessary actions if its not started !. `n `nThanks, `nSharePoint AppPool Monitoring Script."
$smtpServer = "smtp.crescent.com" #IP or HOST Name of SMTP Server
$smtp = new-object Net.Mail.SmtpClient($smtpServer)
$smtp.Send($emailFrom, $emailTo, $subject, $body)
}
}
Here is the sample alert from IIS AppPool monitoring script:

Schedule this PowerShell script in Windows Task scheduler in any Application server (or any other server will do!) to periodically scan App Pool status, Say once per 5 Min! run interval can be adjusted based on your application priority.

Here is my another post on Scheduling PowerShell scripts using Windows Task scheduler: Create a Scheduled Task for PowerShell Script with Windows Task Scheduler

How to Hide Share, Follow and Sync Buttons in Sharepoint 2013

$
0
0
We got a requirement to remove Share, Follow and Sync buttons in SharePoint 2013. Let me summarize various ways to disable these buttons.
sharepoint 2013 disable share, follow, sync buttons
How to disable "Share" button in SharePoint 2013?
Share button is relying on "Access requests" configuration of the site. To disable "Share button" in SharePoint 2013, simply disable access requests.
  • Go to Site settings page of your SharePoint site.
  • Click on "Site Permissions" link under "Users and Permissions" group
  • Click on "Access Request Settings" in the ribbon.
  • Uncheck "Allow access request" and click on "Ok" to save your changes. This should hide Share button in SharePoint 2013.sharepoint 2013 disable share button
Remember, You will have to do this change for each site! However, Share button will still be visible for Site owners and administrators!

How to Disable Sync buttons in SharePoint 2013
To disable sync, Navigate to  Site settings >> Click on "Search and offline availability" >> set offline client availability to "No". There are few more ways discussed in my another article: Hide Sync Button in SharePoint 2013

How to disable "Follow" button in SharePoint 2013?
To disable "Follow" button in SharePoint 2013, You'll have to disable a feature called "Following Content". Navigate to:
  • Site Settings >> Click on "Manage Site Features"
  • Click on "Deactivate" on " Following Content" feature
This removes following button in SharePoint 2013. If you want to disable "Following" feature at Farm level, disable "ContentFollowingStapling" feature at Farm features page in SharePoint 2013 Central Administration.

Disable Access Request, Deactivate Features using PowerShell:

  • Share: To disable access requests on all sites using PowerShell, refer: Disable access request in SharePoint 2013
  • Following: To deactivate "Following content" feature using PowerShell as:
    Disable-SPFeature -identity "FollowingContent" -URL "http://your-sp-site.com/" 
  • Sync: To exclude from offline client, run:
    Get-SPSite -limit all | get-SPWeb -limit all | Foreach { $_.ExcludeFromOfflineClient=1; $_.Update()} 

Remove Share, Follow, Sync buttons at Master page level:

These promoted action buttons are in master page as follows:
Share Button:
Follow Button:
<SharePoint:DelegateControl ID="DelegateControl2" runat="server" ControlId="PromotedActions" AllowMultipleControls="true" />
Sync Button:
<SharePoint:SPSyncPromotedActionButton ID="SPSyncPromotedActionButton1" runat="server" />
To hide these controls, simply move them inside Comment block. <!--  -->. Do not delete this controls from the Master page! You'll end-up in crash!!

CSS to hide Share, Follow and Sync Buttons:

Lets hide them based on their IDs. You can place this CSS code with "Script Editor" web part or you can place it in Master page.
  • Sync button's id: ctl00_SyncPromotedAction
  • Follow button id: site_follow_button
  • Share button's id:  ctl00_site_share_button
<style type="text/css">

a[id$=site_share_button], a[id$=SyncPromotedAction], a#site_follow_button
{
display: none !important;
}

</style>
Tips: This hides Share button from promoted actions section. But share button is present in ECB/Callout menu and in list view quick control also. To hide them all as well, use selectors:  a[id$="site_share_button"], a.ms-calloutLink[title="Share"], button.js-listview-qcbShareButton.

"Upgrade Required" Status in SharePoint 2013 Central Administration Servers in Farm

$
0
0
Getting "Upgrade Required" error message in SharePoint 2013? Well, Ideally, We have to run the SharePoint Products Configuration Wizard on the server(s) right after installing the service pack/patches.

In Windows Server 2012, SharePoint updates are part of Windows Server Update. It installs patches but never runs Products configuration wizard automatically! You still have to run psconfig wizard to complete patching!
sharepoint 2013 upgrade required error
SharePoint Patching is a two-step process:
  1. Install the patch binaries
  2. Run psconfig wizard manually.
Launch and run SharePoint configuration wizard to perform the configuration tasks. Once its finished, You should see  "No action Required" message in farm information status instead of upgrade required.
sharepoint 2010 central administration upgrade required
If you get any errors while running psconfig, the next step is to force SharePoint upgrade with this command line:
psconfig.exe -cmd upgrade -inplace b2b -force -cmd applicationcontent -install -cmd installfeatures

If you are using SQL aliases, make sure its configured in Every SharePoint server!

To apply patches on SharePoint 2013, Follow my step by step guide at: SharePoint 2013 Patching Guide - Step by Step

How to Disable "Open with Explorer" View in SharePoint 2013

$
0
0
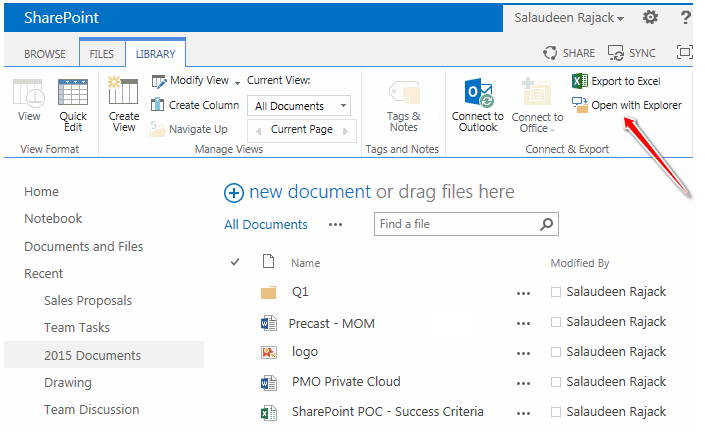
Requirement: Got a requirement to Hide "Open with Explorer" button from a particular library's ribbon menu due to some security reasons.

Solution: Open with Explorer button can be disabled in multiple approaches.
  1. Disable "Client Integration" from Web Application's Authentication Providers.
  2. Remove permissions "Use Remote Interfaces" which also removes "Use Client Integration Features" from permission levels.
  3. Edit the "CustomDefalutTemplates.ascx" file located at: C:\Program Files\Common Files\microsoft shared\Web Server Extensions\15\TEMPLATE\CONTROLTEMPLATES. Find and Replace PermissionString from "UseClientIntegration" to PermissionString="MangeWeb" of nodes with ID "OpenInExplorer"
  4. CSS/JavaScript-jQuery methods to Turn-Off explorer view.
  5. Create a custom action with EMPTY CommandUIDefinition, so that it overrides existing ribbon button.
Lets stick with the last one!

Add Custom Action to Hide Open with Explorer:
While any ribbon button, group, tab can be hidden by overriding the specific custom action using Visual Studio based solution as in How to Hide SharePoint 2010 Ribbon Button, Group, Menu, Tab, Here I'm using PowerShell to add/remove custom action to hide Open with Explorer view in SharePoint 2013.
disable open with explorer in sharepoint 2013
Add custom action to disable Open with Explorer button in SharePoint 2013:
Add-PSSnapin Microsoft.SharePoint.PowerShell -ErrorAction SilentlyContinue

#Variables
$SiteUrl="http://operations.crescent.com/Monitoring"
$ListName = "2015 Documents"

#Get Web and List objects
$web = Get-SPWeb $SiteURL
$list = $web.Lists[$ListName]

#Add an empty Custom Action to Override default custom action
$CustomAction = $list.UserCustomActions.Add()

$CustomAction.Title = "Hide Explorer View"
$CustomAction.Location = "CommandUI.Ribbon"
$CustomAction.commandUIExtension = "
<CommandUIExtension>
<CommandUIDefinitions>
<CommandUIDefinition
Location='Ribbon.Library.Actions.OpenWithExplorer' />
</CommandUIDefinitions>
</CommandUIExtension>"

$CustomAction.Update();

write-host "Custom Action has been Added successfully!"
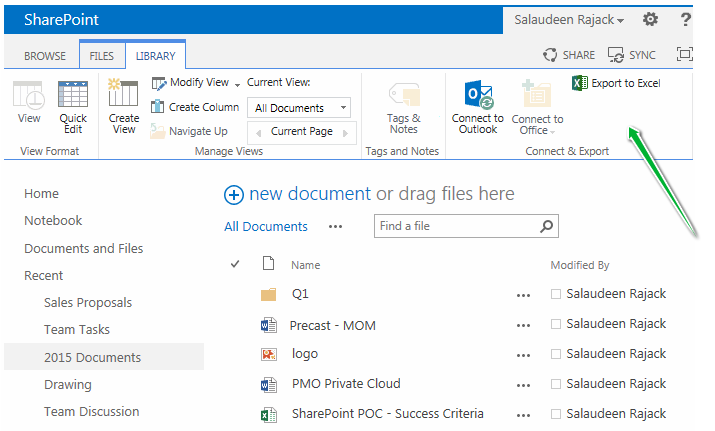
and our Output! hide open with explorer button in SharePoint 2013
Delete the custom action from list:
Lets remove the custom action we've created to hide Open with Explorer button.
Add-PSSnapin Microsoft.SharePoint.PowerShell -ErrorAction SilentlyContinue

#Variables
$SiteUrl="http://operations.crescent.com/Monitoring"
$ListName = "2015 Documents"
$CustomActionTitle = "Hide Explorer View"

#Get Web and List objects
$web = Get-SPWeb $SiteURL
$list = $web.Lists[$ListName]

#Get the custom action
$CustomAction = $list.UserCustomActions | where {$_.title -eq $CustomActionTitle}

#Delete the custom action from list
if ($CustomAction)
{
$CustomAction.Delete()
}

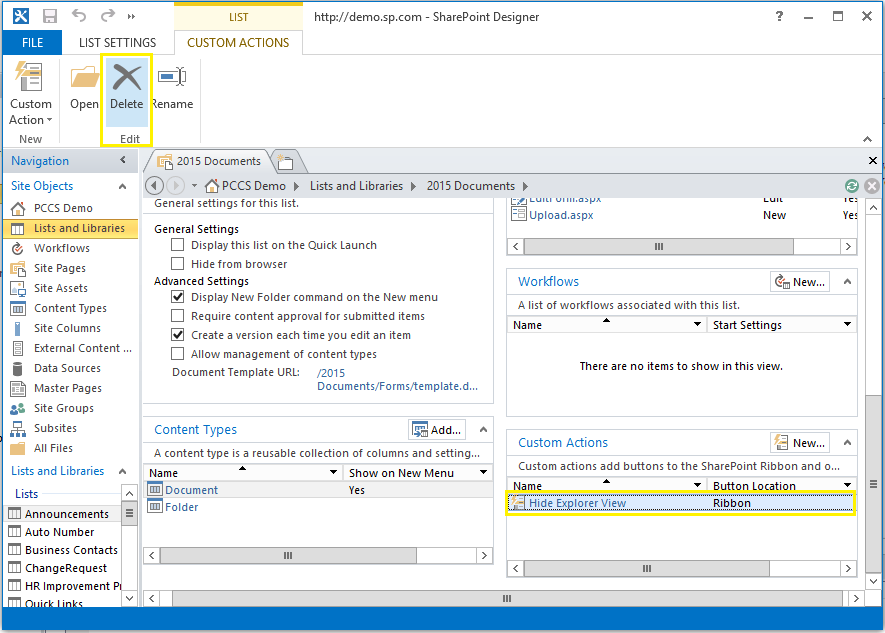
You can also remove a custom action from SharePoint list via SharePoint designer, as in below screen:
remove custom action from sharepoint designer 2013

Required Field Validation Based on Another Column's Value in SharePoint 2013

$
0
0
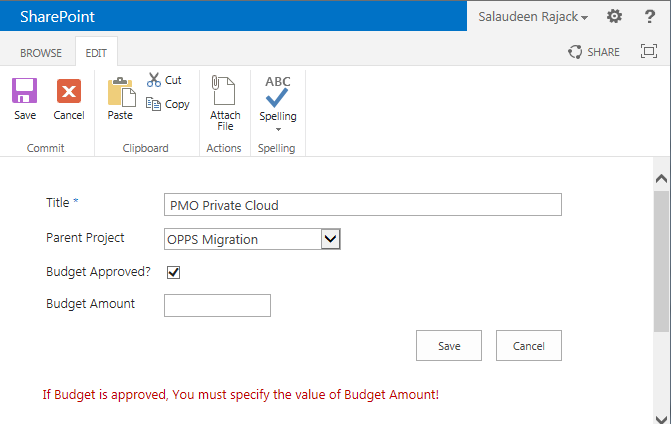
Requirement: In a custom SharePoint 2013 list, User's requirement is to validate a field based on another fields value.

E.g. In a "Project Cost" list, user must fill "Budget Amount" field value if "Budget Approved" field's value is set to "True".

Solution: Here is how to implement a required field validation based on other column's value in SharePoint 2013.
  • Head on to List Settings
  • Click on "Validation settings" under "General Settings"
  • Enter the validation formula as: =IF([Budget Approved?]=TRUE,IF([Budget Amount]="",FALSE,TRUE),TRUE)
  • Enter the error message accordingly. sharepoint 2013 required field validation
  • Click "OK" to save your changes
and the result in action:
Required Field Validation Based on Another Column's Value in SharePoint 2013

How to Uninstall SharePoint 2013 - Complete Steps

$
0
0
Its a pretty common question and we stuck here often: How to Uninstall SharePoint 2013 completely from the server? Remove Server option From Central Administration >> Servers in Farm page? NO!! You can't uninstall SharePoint 2013 with this option. Remove server option must be used only when a particular server is no longer available and you want to remove it from your SharePoint farm.

Follow these steps to uninstall SharePoint 2013.
  • Go to Control Panel (Shortcut: Appwiz.cpl ), Pick Microsoft SharePoint Foundation 2013 (or Server!) and click on "Change" button.uninstall sharepoint server 2013
  •  In the Change your installation of Microsoft SharePoint Server 2013 page, Choose Remove, and then click Continue.how to uninstall sharepoint 2013
  • A confirmation message appears. Click Yes to remove SharePoint 2013.
     uninstall sharepoint 2013 server
  • A warning message appears. Click OK to continue.
     uninstall sharepoint 2013 manually
  • Watch the uninstall progress..
    how uninstall sharepoint 2013
  • Wait for the "Successfully uninstalled" message.
But wait! When you uninstall SharePoint 2013 with above steps, most of the files and folders are deleted. However, There are objects that needs our manual intervention.

Clear IIS Sites and Virtual Folders. Remove physical files 
We got to manually delete web applications created in IIS and their virtual folders from the file system.

Delete Search Index Files:
In search index servers, remove the search index manually. To get search index files location, Run these PowerShell cmdlets:
$SearchInstance = Get-SPEnterpriseSearchServiceInstance
$SearchInstance.Components

Delete IIS Log Files:

Delete 14/15 Hive customizations:
 
Delete the SharePoint Databases from Database Server:
Uninstalling SharePoint 2013 dismounts SharePoint databases from its web applications. But it doesn't remove any physical file stored in the database server. So, remove them all!

Technet reference on Uninstall SharePoint 2013: https://technet.microsoft.com/en-us/library/cc262874.aspx

Restrict Office Web Apps Edit License within a AD Group

$
0
0
Requirement: SharePoint 2013 Office Web Apps "Edit in Browser" feature needs to be limited to users who has Microsoft Office Volume license.

Solution: License Enforcement in Office Web Apps 2013
The overall ideafor the solution is: Create a new security group in AD, Add users to it - who are allowed to use edit option in Office web Apps. From SharePoint, Enable user licensing and map this AD group with the "Office Web Apps Edit" license.

Step 1: Create a AD Security Group
Login to your domain controller, Create new security group to hold users who are allowed to use Edit feature in office Web Apps. Add members to it. Here is mine: OWA Editors!
office web apps edit in browser

Step 2: Configure OWA and SharePoint to Enforce Licensing:
Login to your Office Web Apps Server, Create a new Office Web Apps Farm with "EditingEnabled" Switch.
New-OfficeWebAppsFarm -InternalUrl "http://was.crescent.com" -ExternalUrl "https://was.crescent.com" -CertificateName "Crescent Hosting Certificate" -AllowHTTP -SSLOffLoaded -EditingEnabled

For Existing OWA Farms, Set Editing Enabled Switch:

Set-OfficeWebAppsFarm -EditingEnabled

From SharePoint Server, Enable User licensing Enforcement and Add new Mapping: 
Check whether the licensing enforcement is enabled with the cmdlet: Get-SPUserLicensing , If its false, Enable it with:
Enable-SPUserLicensing
Once its enabled, verify the licenses created:
Get-SPUserLicense
This should return user licenses:Enterprise, Standard, Project, OfficeWebAppsEdit, etc.
 office web apps edit license

Now, you can map the AD security group with the Office Web Apps Edit license:
$LicenseMapping = New-SPUserLicenseMapping -SecurityGroup "OWA Editors" –License OfficeWebAppsEdit
$LicenseMapping | Add-SPUserLicenseMapping

Result: 
Users who are member of the AD group "OWA Editors" will get "Edit" options from Office Web Apps. Rest gets only "View" option.

Office Web Apps with View Option:
 office web apps 2013 edit in browser

Office Web Apps with Editing Option enabled:
sharepoint 2013 office web apps edit in browser

Important: Adding users to AD Security group will not take effect immediately!
This is by design! When you add/remove users to the dedicated AD group, it doesn't take effect immediately, because SharePoint does this sync in every 10 hours! To overcome, you can change these time intervals as in : SharePoint - Active Directory Security Group Membership Sync Problem and Solution

Co-Authoring Feature in SharePoint 2013 - FAQs

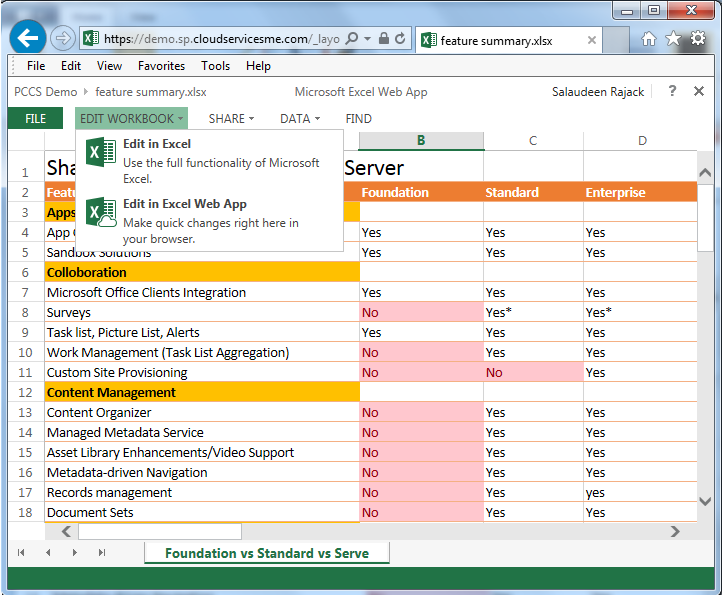
$
0
0
What is co-authoring exactly means?
Co-Authoring is an amazing feature in SharePoint - Office Web Apps which allows multiple users to edit and collaborate concurrently in real time. Yes, You heard it right! Multiple authors can edit one document (Word, Excel, PowerPoint, etc) and simultaneously other user's changes will be reflecting to everyone! Its definitely a great productivity boosting feature.

Multiple users can work on a same document at the same time while they see each other works in the document, so they don't make any conflicts as they make edits. There is no limit in number of users. Any number of people can work on the same document at the same time.

How to use Co-Authoring in SharePoint 2013 with Office Web Apps:

Here is how the Co-authoring works in Excel documents with SharePoint 2013 - Office Web Apps:

Step 1: Navigate to any document library/folder where your Excel files are stored. Click on the context menu button and click on More options as in the below screen.
co authoring in sharepoint 2013

Step 2: Choose “Edit in Browser” menu item from the context menu.
 excel co authoring sharepoint 2013
Step 3: This launches your Excel Sheet in Edit mode in the browser. You can get the changes as soon as it’s made by any other user - concurrently editing the document.

When more than one person are working on the same file, You'll get all author's name at the bottom right section.

co-authoring office web apps sharepoint 2013
Alternatively, You can just click on the document to launch it in read-only mode in the browser and then click on "Edit in Browser" command from the ribbon.

Please note, Co-Authoring feature is not available through on all office clients (E.g. Co-authoring is available only through Excel Web Apps for Excel spreadsheets. For word documents, Co-Authoring is available via Microsoft Office Word Application). Also, It doesn't work when you enable check-in/check out functionality! Refer this technet link for supported clients: Overview of co-authoring in SharePoint 2013

Check In All Documents in a SharePoint Library using PowerShell

$
0
0
Requirement: Check-in All files which are checked out in a SharePoint document library.

How to Check In all checked out documents in SharePoint 2013:
SharePoint 2013 makes it simpler by providing context sensitive ribbon buttons to check in multiple files in bulk. Simply select all files which are checked-out and click on "Check In" button from the ribbon.
check in multiple documents in SharePoint 2013
Butthis method doesn't work when you have any required field with no default value assigned!

Check In All Documents in a SharePoint Library using PowerShell
When you do Multiple file upload (bulk upload or through explorer view) and your required column doesn't has any default value in it, then your files will be checked-out automatically. The "Check In" button won't work when you miss-out any required fields in the library.
You must fill out all required properties before checking in this document.

So, our solution is: PowerShell.

PowerShell script to check in all documents in the library:
Add-PSSnapin Microsoft.SharePoint.PowerShell -ErrorAction SilentlyContinue

#Variables for Site URL and Library Name
$WebURL="http://sharepoint.crescent.com/sites/sales"
$LibraryName="Proposal Documents"

#Get Site and Library
$Web = Get-SPWeb $WebURL
$DocLib = $Web.Lists.TryGetList($LibraryName)

#Get all Checked out files
$CheckedOutFiles = $DocLib.Items | Where-Object { $_.File.CheckOutStatus -ne "None"}

#Check in All Checked out Files in the library
ForEach($item in $CheckedOutFiles)
{
#If you want to update fields
#$item["Field"] = "value"
#$item.SystemUpdate()

#check in file programmatically
#$item.TakeoverCheckout()
$DocLib.GetItemById($item.Id).file.CheckIn("Checked in by Admin")
write-host "File:'$($item.Name)' has been checked in!"
}

Its possible to check-in file without supplying required field values through PowerShell!

If you want to do this for all libraries in your entire SharePoint web application, use: Find All Checked Out Files and Check-In them Back

Run PowerShell Script as Administrator (Elevated Privileges) by Default

$
0
0
Its a common SharePoint Administrator's pitfall - Forget to run PowerShell script using "Run as Administrator" option, failing so could lead to many *weird* issues while running PowerShell scripts in SharePoint, such as: "The local farm is not accessible. Cmdlets with FeatureDependencyId are not registered.".
Solution:
Solution is pretty simple! just right click the SharePoint 2013 PowerShell Snap-in and choose the option "Run as Administrator".
 run as administrator powershell script

Enable "Run as Administrator" elevated privilege for SharePoint 2013 Management Shell by default:
To run PowerShell script as administrator automatically, Create a shortcut to your PowerShell console on your desktop
  • Right-click the "SharePoint 2013 Management Shell" shortcut and click Properties
  • Click "Advanced" button under Shortcut tab
  • Enable "Run as Administrator" and click on "OK" button.
powershell script always run as administrator
Now you can run PowerShell in elevated mode by simply double-clicking the new shortcut on your desktop.

Run PowerShell as administrator in scheduled tasks:
If you are scheduling a PowerShell script, make sure you select the "Run With Highest Privileges" check box. Otherwise your scheduled task which invokes a UAC prompt may fail to run unattended.

Handle Run as Administrator with in PowerShell script:
Lets handle it in our PowerShell code itself, even you forget to use "Run as Administrator" option!
Function Check-RunAsAdministrator()
{
#Get current user context
$CurrentUser = New-Object Security.Principal.WindowsPrincipal $([Security.Principal.WindowsIdentity]::GetCurrent())

#Check user is running the script is member of Administrator Group
if($CurrentUser.IsInRole([Security.Principal.WindowsBuiltinRole]::Administrator))
{
Write-host "Script is running with Administrator privileges!"
}
else
{
#Create a new Elevated process to Start PowerShell
$ElevatedProcess = New-Object System.Diagnostics.ProcessStartInfo "PowerShell";

# Specify the current script path and name as a parameter
$ElevatedProcess.Arguments = "& '" + $script:MyInvocation.MyCommand.Path + "'"

#Set the Process to elevated
$ElevatedProcess.Verb = "runas"

#Start the new elevated process
[System.Diagnostics.Process]::Start($ElevatedProcess)

#Exit from the current, unelevated, process
Exit

}
}

#Check Script is running with Elevated Privileges
Check-RunAsAdministrator

#Place your script here.
write-host "Welcome"
add this code at the beginning of your script.

Run as a Different User in PowerShell scripts:
$credential = New-Object System.Management.Automation.PsCredential("Domain\UserID", (ConvertTo-SecureString "Password" -AsPlainText -Force))
Start-Process powershell -Credential $credential -NoNewWindow
 
How to run PowerShell as administrator from the command line? 
To run PowerShell as administrator in command line:
  1. Type : PowerShell to enter into PowerShell console
  2. Now, Type: Start-Process PowerShell -Verb RunAs
BTW, There could be some more reasons for "The local farm is not accessible. Cmdlets with FeatureDependencyId are not registered" issue such as:
Another solution to address this issue: Disable UAC! Here is how - How to Disable UAC in Windows Server 2012/2008

Disable Throttling on SharePoint List using PowerShell

$
0
0
Throttling feature helps to avoid performance hits in SharePoint. We set throttling limits for entire web application. Its not possible to set throttling limits on specific SharePoint list or library. But we can disable/enable throttling on SharePoint lists.

PowerShell to disable list throttling:
Use the below script to disable list throttling in SharePoint 2010 using PowerShell
Add-PSSnapin Microsoft.SharePoint.PowerShell -ErrorAction SilentlyContinue

#Variables for Site URL and List Name
$WebURL = "http://sales.crescent.com"
$ListName = "Proposal Documents"

#Get the Site and List objects
$web = Get-SPWeb $WebURL
$List = $Web.Lists[$ListName]

#Disable throttling on the list
$list.EnableThrottling = $false
$List.Update()

Related post: Configure Resource Throttling in SharePoint 2013 using PowerShell

How to Rename SharePoint 2013 Content Databases with PowerShell

$
0
0
Requirement: To follow standard naming conventions, We got to rename SharePoint content databases in our SharePoint 2013 environment.

Solution:
You can rename a SharePoint content database in these three steps as explained in my another post: How to Rename SharePoint 2013/2010 Central Admin Database and Remove GUID
  1. Detach SharePoint content database from SharePoint web application
  2. Rename the content database in SQL Server
  3. Attach the renamed content database back to SharePoint
rename sharepoint content database powershell

With the help of PowerShell, Lets automate these manual steps.

Rename SharePoint content database with PowerShell:
Add-PSSnapin Microsoft.SharePoint.PowerShell -ErrorAction SilentlyContinue

#Load the assemblies required for the SQL database rename.
[void][System.Reflection.Assembly]::LoadWithPartialName("Microsoft.SqlServer.ConnectionInfo")
[void][System.Reflection.Assembly]::LoadWithPartialName("Microsoft.SqlServer.SMO")
[void][System.Reflection.Assembly]::LoadWithPartialName("Microsoft.SqlServer.SmoExtended")

#Function to Rename Database in SQL Server
function Rename-SQLDatabase($DBServerName, $OldDatabaseName, $NewDatabaseName)
{
try
{
Write-host Establishing connection with SQL Server... -foregroundcolor "Yellow"
#Connect to the server
$Server = new-Object Microsoft.SqlServer.Management.Smo.Server($DBServerName)

Write-host Getting the Database in SQL Server... -foregroundcolor "Yellow"
#Get the database
$Database = $Server.Databases.Item($OldDatabaseName)

#Kill all active connections to the SQL database
$Server.KillAllprocesses($OldDatabaseName)

Write-host Renaming Database in SQL Server... -foregroundcolor "Yellow"
#Rename the database
$Database.Rename($NewDatabaseName)
Write-host Database Renamed from $OldDatabaseName to $NewDatabaseName in SQL Server -ForegroundColor Green
}

catch
{
Write-Error $_.Exception.Message
Write-Error "Error in Renaming Database in SQL Server!"
}
}

#Function to Rename content database in SharePoint
function Rename-ContentDatabase($OldDBName, $NewDBName)
{
try
{
Write-host Getting SharePoint Content Database ... -foregroundcolor "Yellow"
$ContentDB = Get-SPContentDatabase | Where-object {$_.Name -eq $OldDBName}

#Get Content Database settings
$WebApp = $ContentDB.WebApplication.Url
$DBServer = $ContentDB.Server
$MaximumSites = $ContentDB.MaximumSiteCount
$WarningSites = $ContentDB.WarningSiteCount

#Dismount Content Database
Write-host Dismounting Content Database ... -foregroundcolor "Yellow"
Dismount-SPContentDatabase $OldDBName -Confirm:$False


Write-host Renaming Database: $OldDBName to $NewDBName in SQL Server -foregroundcolor "Yellow"

#Call function to rename Database in SQL Server
Rename-SQLDatabase $DBServer $OldDBName $NewDBName

Write-host Mounting SharePoint content Database... -foregroundcolor "Yellow"
#Mount the database back
Mount-SPContentDatabase -Name $NewDBName -WebApplication $WebApp -DatabaseServer $DBServer -MaxSiteCount $MaximumSites -WarningSiteCount $WarningSites | out-null

Write-host Done!Content Database Renamed from $OldDBName to $NewDBName!! -ForegroundColor Green
}
catch
{

Write-Error $_.Exception.Message
}
}

#Call the function to rename database
Rename-ContentDatabase "WSS_Content_310d122490c4303b1c0b3f2f695e7" "HostingFarm_Content_Hosting01"


Configure Resource Throttling in SharePoint 2013 using PowerShell

$
0
0
What is Resource throttling?
Large lists are always performance killers in SharePoint. Luckily starting from SharePoint 2010, There is a feature called "Throttling" introduced to address this issue. 

Any operation such as data retrieval, update, delete of more than 2000 rows results low performance in SharePoint 2007 days. Throttling defines the Maximum number of rows user can query at a time. Any operation beyond this count displays an error message. The default value for this setting in SharePoint 2010 is 5000.

We manage resource throttling settings in SharePoint 2013 by navigating to:
  • Central Administration >> Manage Web Applications >> select the target web application
  • From the ribbon, Click on General settings >> Resource Throttling

Configure List throttling settings with PowerShell:
Use the below script to configure resource throttling settings for SharePoint 2013 using PowerShell
Add-PSSnapin Microsoft.SharePoint.PowerShell -ErrorAction SilentlyContinue

#Function to set Resource throttling values in SharePoint 2013
Function Set-ResourceThrottling
{
param (
[parameter(Mandatory=$true)] [string]$WebAppURL,

[parameter(Mandatory=$true)] [string]$ListViewThreshold,

[parameter(Mandatory=$true)] [boolean]$AllowOMOverride,

[parameter(Mandatory=$true)] [string]$ListViewThresholdForAdmins,

[parameter(Mandatory=$true)] [string]$MaxLookupFields
)

#Get the Web Application
$WebApp = Get-SPWebApplication $WebAppURL

#Set List View Threshold
$WebApp.MaxItemsPerThrottledOperation = $ListViewThreshold

#Enable Object Model Override
$WebApp.AllowOMCodeOverrideThrottleSettings= $AllowOMOverride

#Set List View Threshold for Admins
$WebApp.MaxItemsPerThrottledOperationOverride = $ListViewThresholdForAdmins

#Set List View Lookup Threshold
$WebApp.MaxQueryLookupFields = $MaxLookupFields #List View Lookup Threshold

$WebApp.Update()

Write-Host "Throttling settings has been updated on" $WebApp.URL
}

#Call the function to configure resource throttling values
Set-ResourceThrottling "http://intranet.crescent.com" "6000" $true "25000" "10"

Enable/Disable Throttling at List level:
We can't set throttling limits on specific SharePoint list or library. But we can disable/enable throttling on it. Here is my PowerShell script to disable resource throttling on a particular list: Disable list throttling to access large lists in SharePoint 2010/2013

Reset SharePoint List View Filters with PowerShell

$
0
0
Requirement: Reset SharePoint view filters.

Solution: To reset SharePoint view in bulk, we can use this PowerShell script.

PowerShell script to reset SharePoint view.
Add-PSSnapin Microsoft.SharePoint.PowerShell -ErrorAction SilentlyContinue

$WebURL = "http://sales.crescent.com"
$ListName = "Proposal Documents"
$ViewName = "All Proposals"

#Get the Site, List and View objects
$web = Get-SPWeb $WebURL
$List = $Web.Lists[$ListName]
$View = $List.Views | ? {$_.title -eq $ViewName}

#Reset SharePoint View - By default sort by Name
$View.Query = "<OrderBy><FieldRef Name='FileLeafRef' /></OrderBy>"
$View.Update()
$List.Update()
This script removes Sorting and Filters applied to the given SharePoint list view.

Move SharePoint Web Application's IIS Physical Path to a New Location

$
0
0
Requirement: Move SharePoint web application's IIS physical location from system drive (c:\) to application drive (d:\) due to new server support policies!

Solution:
SharePoint web applications, by default placed under: "C:\inetpub\wwwroot\wss\VirtualDirectories" when we create them. There is no UI/direct way to change the physical location of SharePoint IIS web sites later. However, these three steps can be utilized to move SharePoint web application's IIS physical directory to a new location:
  1. Copy all contents from the current virtual directory to new directory
  2. Change IIS website's physical path
  3. Update SharePoint web application to point to the new directory path.
Lets automate these manual steps with PowerShell.

PowerShell Script to Move IIS Web Site to New Physical Location:
Add-PSSnapin Microsoft.SharePoint.PowerShell -ErrorAction SilentlyContinue

#Import IIS Module
Import-Module WebAdministration

#Variables
$WebAppURL="http://intranet.crescent.com/"
$NewPath="D:\IIS\VirtualDirectories\Intranet.Crescent.com"
$IISSiteName = "Crescent Intranet"

#Get Web Applications' IIS Settings
$WebApp = Get-SPWebApplication $WebAppURL
$IISSettings = $WebApp.IisSettings[[Microsoft.SharePoint.Administration.SPUrlZone]::Default]
$OldPath = $IISSettings.Path

#Check if destination folder exists already. If not, create the folder
if (!(Test-Path -path $NewPath))
{
$DestFolder = New-Item $NewPath -type directory
}

#***** Step 1 - Copy Current Virutal Directory to new location **** #
Copy-Item -Path $OldPath\* -Destination $NewPath -Force -Recurse

#***** Step 2 - Change IIS Web Site's Physical path ******
Set-ItemProperty "IIS:\Sites\$($IISSiteName)" -name PhysicalPath -value $NewPath

#***** Step 3 - Update SharePoint Web Application ******
#Change the Web App path
$IISSettings.Path = $NewPath
#Update Web Application
$WebApp.Update()
Please note, You'll have to repeat steps 1 and 2 in all SharePoint web front end servers.
Viewing all 1058 articles
Browse latest View live


<script src="https://jsc.adskeeper.com/r/s/rssing.com.1596347.js" async> </script>