What is Managed Account in SharePoint? Why We Need Managed Accounts? SharePoint uses service accounts for operations such as Farm account, application pools and for service applications. You have to keep a track of all service accounts with their password in a secured file in your system. If the password for any one of those accounts has been changed, the service which uses that specific service account will stop functioning, until you manually update them in SharePoint.
So, The solution comes with SharePoint 2010 and 2013 is you can register your service accounts as a Managed accounts, and you don't have to keep-up the passwords once you register them in your farm and you can manage those managed accounts centrally from SharePoint central administration.
SharePoint centrally stores managed accounts and passwords and it can change the password regularly-automatically, if needed. If there is a password expiry policy set on Active Directory, Then SharePoint automatically detects and changes the password before the scheduled date. (If automatic password change is enabled!). SharePoint also provides Email notification options prior changing the passwords.
In short, Managed accounts are active directory accounts whose credentials are managed by SharePoint
Not all accounts needs to be a managed accounts. E.g. In Search Service Application: Default content access account, which is used to crawl content is usually an un-managed account. Because, when SharePoint changes the password automatically, the content source its crawling may not get that, if its not a SharePoint content source.
How to Create a New Managed Account in SharePoint 2010/2013:
Before creating a managed account, They must be already created in your Active directory and you should create Managed accounts before provisioning web applications and service accounts, as you'll be prompted to choose managed account while creating a web application or service application. To create a new managed account with Central Administration, follow these steps:
- Go to Central Administration, Click Security >> Click on Configure Managed Accounts.
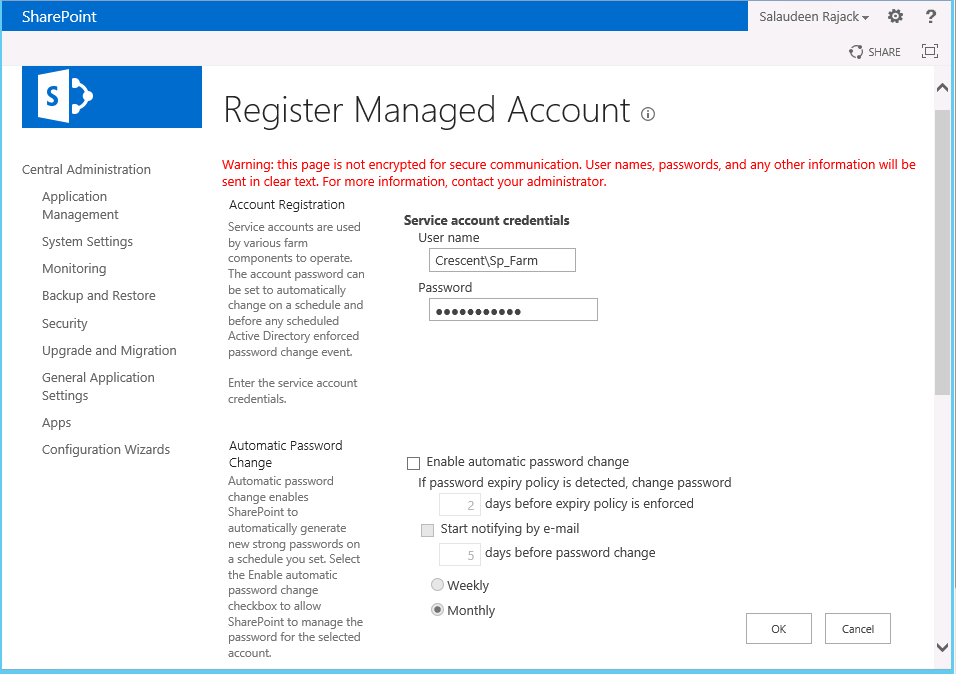
- Click the Register Managed Account link to create a new managed account.
- Enter the Service account's AD user name in domain\username format. Specify the account's password.
- If you want SharePoint to automatically change this account’s password on a regular schedule, check the "Enable Automatic Password Change" check box and specify when to change password in accordance to the password expiry policy of your AD.
- Check the "Start Notifying By E-mail" check box and specify the number of days before the password change you want to be notified.
- Specify the schedule for your password change. You can change the password weekly or monthly.
You should set changes to occur during scheduled downtime or during light usage, because the password changes will cause momentary service interruptions as application pools are restarted.
- Click OK to save the new managed account.
![]()
SharePoint sends password change notifications to a single email address, which can be configured via Under: Security >> Configure Password Change Settings >> Notification E-Mail Address.
Add managed account in SharePoint 2013 using PowerShell:To create a managed account using PowerShell, use the
New-SPManagedAccount cmdlet. Here is how to add new managed accounts in SharePoint 2013 using PowerShell:
Configuring Managed Accounts in SharePoint 2013If you have created a new managed account or want to change the mapping of managed Accounts, Go to:
- Central Administration >> Security
- Under the General Security section, click Configure service accounts.
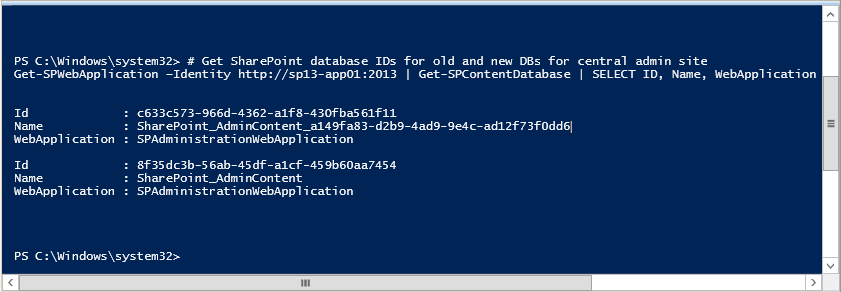
Get All Managed AccountsTo view existing Managed Accounts using SharePoint Central Administration:
- Select Security from the SharePoint Central Administration page.
- On the Security page select Configure managed accounts under General Security.
- The Managed Accounts page will list all Managed Accounts registered in SharePoint.
This page lists all of the managed accounts. The date and time for the next password change is shown if you enabled Automatic Password Change.
To view existing Managed Accounts using Windows PowerShell, open the SharePoint 2013 Management Shell and enter
Get-SPManagedAccount cmdlet.
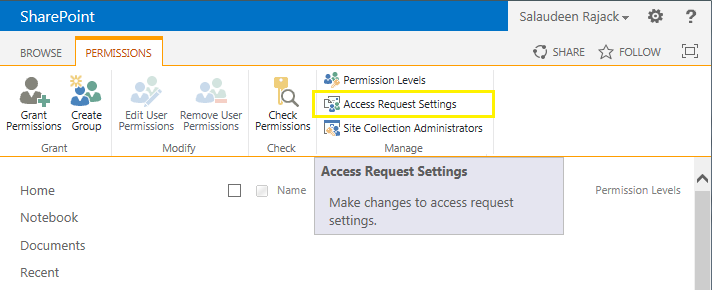
Edit a Managed Account- To edit an existing managed account using Central Administration, follow these steps:
- Click Security and then select Configure Managed Accounts.
- The list of existing managed accounts is displayed. To make changes to the account, Click the edit icon for the managed account.
- Click OK to save your changes.
To edit a managed account using PowerShell, use the
Set-SPManagedAccount cmdlet. Here is how to change managed accounts password using PowerShell:
How to Change Managed Account Password in SharePoint 2013Removing a Managed AccountBefore removing a managed account, you should first make sure this managed account is not associated with any SharePoint services or application pools. To determine if it is in use, edit the managed account and look at the Account Information section to see what farm components are using this account.
Once you’ve confirmed the account is not in use, here is how you can use Central Administration to remove the account.
- Click Security and then select Configure Managed Accounts.
- Click the delete icon for the managed account you want to remove.
- In the Remove Managed Account page, confirm the correct account is selected and click OK.
To remove a managed account using PowerShell, use the
Remove-SPManagedAccount cmdlet. E.g.
Remove-spmanagedaccount "Crescent\SP_Farm"
The above cmdlet, Un-registers the account from SharePoint farm. But doesn't do any delete operation on AD!
![]()