Introduction:Active directory federation services is the solution for extending enterprise identity beyond corporate firewall. It simplifies sharing identities between trusted partners across organizations. Its a common requirement in a typical business scenario, users in one organization wants to access a secured application/website from an another organization. Without ADFS, we'd end-up re-creating user logins for the partner company in our AD. But that introduces the problem of maintaining and managing two separate identities for the partner company users. Here is where ADFS comes to the picture. It solves the problem by federating identities and establishing single sign-on capability. SharePoint 2013 - ADFS integration is seamless as its natively supported.
Generally, in SharePoint world, ADFS is used in these three scenarios:
- Domains which are not part of your AD forest (Such as acquired companies without trusts established, with network connectivity between them in place): User in one organization accesses an application in another organization, so that you can collaborate across organizational boundaries. Say for E.g. Your company is running an internal SharePoint site/application and your partner company/acquired company wants to make use of the same. across organizational boundaries without duplicating user logins.
- Extranet setups for partners/customers - Accessing SharePoint application via the Internet, which extends the first scenario to include remote Internet access who are outside the organization. The external domain is still responsible for validate provided credentials and pass it on the SharePoint.
- Office 365/Cloud - You are running a SharePoint farm either in Cloud or in Office 365 and want to provide access to the users of your company without re-creating their identities in the cloud.
How the ADFS - SharePoint authentication process works?- User types SharePoint site URL and picks the relevant authentication provider from the sign-in page
- SharePoint redirects to the respective ADFS server configured already, User promoted for credentials.
- ADFS handles the authentication by Verifying the provided user name and password from the identity provider - AD
- ADFS creates a Token, Signs and puts it in a cookie. Redirects to SharePoint with that cookie
- SharePoint STS validates and extracts the claims from the token
- SharePoint performs authorization and connects the user to the web application.
There are Three steps involved in integrating ADFS with SharePoint 2013:
- Install ADFS Server
- Create a trusted relying party for SharePoint 2013 in ADFS
- Configure SharePoint 2013 to trust ADFS
Prerequisites:There are certain prerequisites to be addressed for ADFS SharePoint 2013 configuration.
- SSL Certificates: Obtain SSL certificates for your SharePoint 2013 web application, and at least two certificates for ADFS Service communication and for ADFS token signing of 2048-bits.
- Default Web Site in IIS - Make sure, in your ADFS Server, the default web site is running in IIS. This site to be SSL enabled with ADFS communication certificate.
- SharePoint Web Application requirements: Your web app must be SSL enabled and authentication mode must be "Claims Based" - which is default in SharePoint 2013. Security Token Service must be up and running.
- DNS Entries: Make sure DNS entries (or host file entries, at least!) are created for both SharePoint and ADFS servers, So that both ADFS and SharePoint can identify and communicate between them selves.
- Service account - Have a dedicated service account for ADFS service - Must be a Local Admin account and SPN to be set on the service account: setspn -a host/adfs.crescent.com crescent\AdfsSvc
Here is our environment setup:In production environments, ADFS infrastructure is created as a separate farm with ADFS Proxy server. For evaluation purpose, I'm using below configurations:
- ADFS Server - ADFS.Crescent.com
- SharePoint Farm - Web Application: Intranet.Crescent.com
- Certificates
- Intranet.Crescent.com - SharePoint web application certificate
- ADFS.Crescent.com - Certificate for ADFS server to communicate securely.
- TokenSigning.Crescent.com - ADFS Token signing certificate.
Step 1: Install ADFS Server Instance
In windows server 2008 R2, ADFS 2.0 was available as a separate download, But windows Server 2012 is built-in with ADFS capability. So, all you have to do is: Add AD FS server role by running the "Add server role wizard!". ADFS Server can be installed as a standalone or as a ADFS farm with multiple servers. if standalone, it uses "Windows Internal database", SQL Server is used otherwise.
Although its possible to have the ADFS server in Same SharePoint box, Microsoft doesn't recommends it.
Lets begin installing ADFS Server role.
- Login to your proposed ADFS server. Make sure its already joined to the AD Domain. Open Server Manager
- Click on "Add roles and features" link from Dashboard section of the Server Manager.
- You'll be presented with "Add Roles and Features Wizard" . Click "Next" to start
- Choose "Role-based or feature-based installation" on installation Type and click "Next"
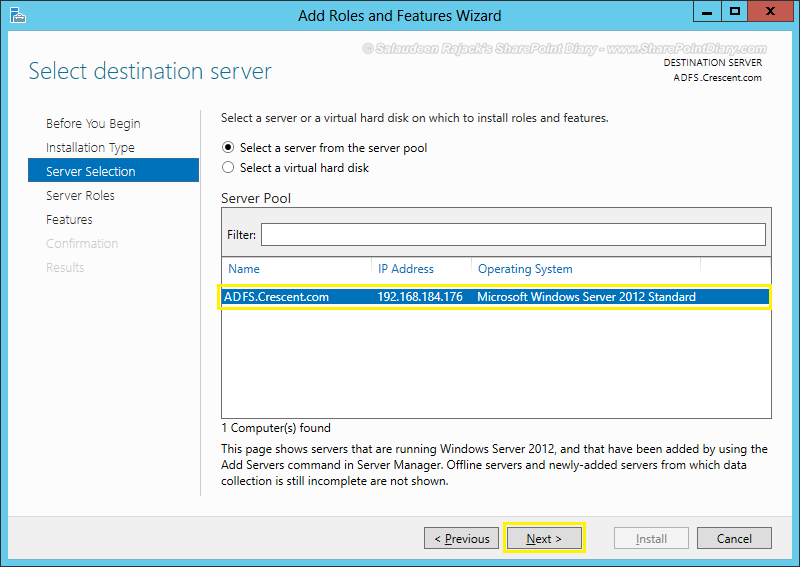
- Select the appropriate Server in server selection
![]()
- Check "Active Directory Federation Services" Server Roles and click "Next"
![]()
- In Features page, Make sure ".Net Framework 3.5" is already installed. if not, Select that check box.
![]()
- Click "Next" on AD FS page
![]()
- Choose "Federation Service" under Role Services section
![]()
- Click on "Install" button to start installing ADFS Server role.
![]()
- Wait for the installation to complete. Click on "Close" button to exit from the wizard.
![]()
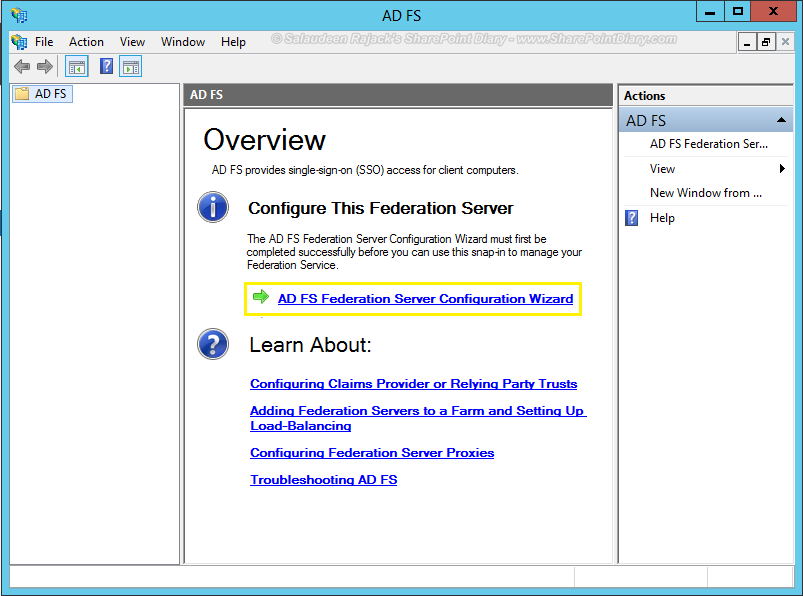
Configure ADFS Server:- Go to Server Manager, Click on "AD FS" tab. There will be a notification at the top saying "Configuration required for Federation service". Click on "More" link, that pops up a message.
- Click on "Run the AD FS Management snap-in" link to run Post-deployment configuration wizard.
![]()
- Now, we got into ADFS snap-in. Click on "AD FS Federation Server configuration Wizard" link to start configuring ADFS.
![]()
- Choose "Create a new Federation Service" option in welcome screen.
![]()
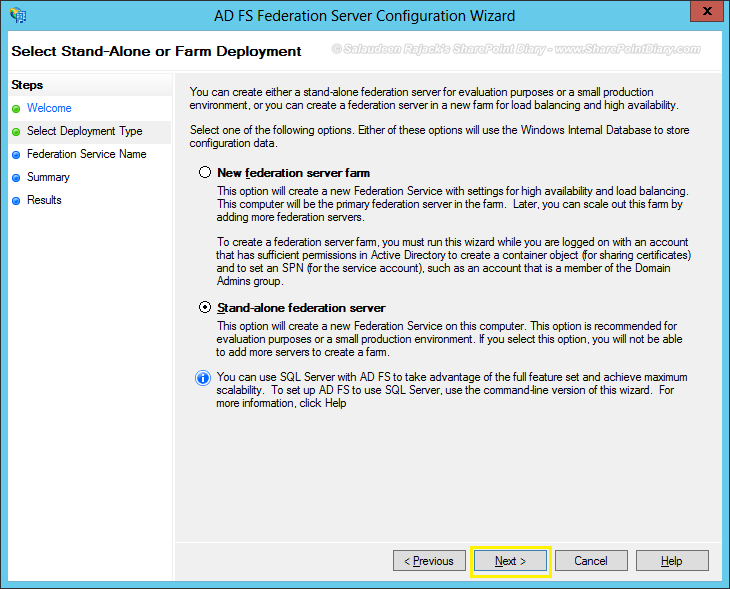
- Select the deployment type as "Stand-alone Federation Server"
![]()
- Choose the appropriate SSL Certificate for ADFS communication
![]()
- Click "Next" on the summary page
![]()
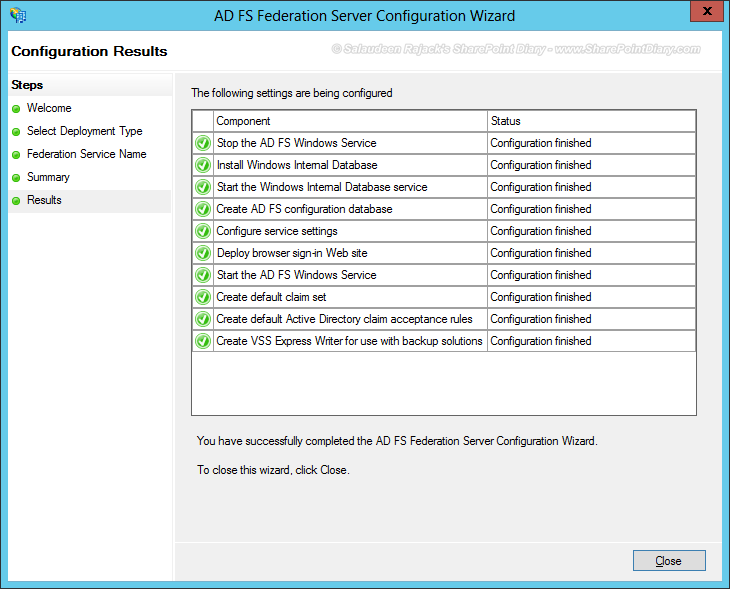
- Wait for the AD FS configuration to complete.
![]()
Verify ADFS installation:Try navigating to any of the below URL. You should get a XML file.
- https://YourADFS-Server.com/adfs/ls/IdpInitiatedSignon.aspx
- https://<<servername>>/FederationMetadata/2007-06/federationmetadata.xml
Step 2: Create trusted relying party in ADFS
Now, the next step is to add new trusted relying party (in our case, its our SharePoint site URL). We'll have to set up ADSFS to allow our SharePoint web sites as a Relying Parties so that SharePoint will consume claims from ADFS server.
Configure ADFS for SharePoint 2013:
Lets Add SharePoint Web Application URL as a Trusted Relying Party:
- Go to Server Manager, Click on "AD FS Management" from tools menu.
- From AD FS snap-in, Click on "Required: Add a trusted replying party" link. You can also click on "Add Relying party Trust" to get the same.
![]()
- Click "Start" button to initiate relying party trust wizard.
![]()
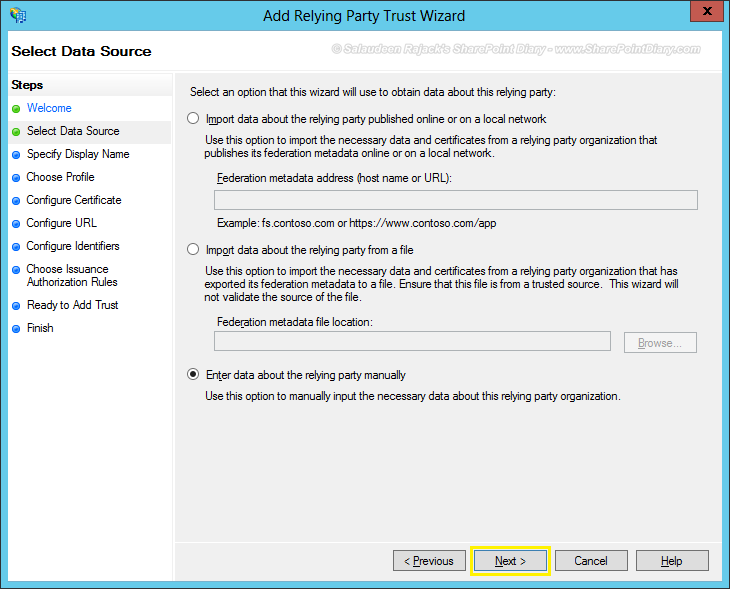
- In "Select Data Source" tab, choose "Enter data about the relying party manually" and click "Next"
![]()
- Give a display name to the relying party.
![]()
- Choose profile as "AD FS Profile"
![]()
- Token signing certificate is optional. So, we can skip it by pressing "Next" button
![]()
- Here is an important step: Configure URL! Select "Enable support for the WS-Federation Passive protocol" check-box. Enter the relying party WS-Federation passive protocol URL by appending : /_trust/ with your SharePoint web application. In my case, My web application is: https://intranet.crescent.com. So, I'm entering: https://intranet.crescent.com/_trust/
![]()
- Configure identifiers: Enter the relying party trust identifier. It uses the naming convention of : URN:Your-Web-App. Lets enter "urn:intranet:crescent" and click on "Add" button
![]()
- For issuance authorization rules, choose "Permit all users to access this relying party" and click Next.
![]()
- Click "Next" on the summary page.
![]()
- Enable "Open the Edit Claim Rules dialog for this relying party trust when the wizard closes" check box, and click on "Close" button.
![]()
Edit Claims Rule:SharePoint Claims-based authentication - authenticates users based on these set of claims, such as User principle name, E-Mail address, etc.
- Click on "Add Rules" button in Edit Claim Rules window.
- Choose the Claim rule template as: "Send LDAP Attributes as Claims"
![]()
- Give a Name to your claim rule, Choose the attribute store as "Active Directory", Map the attributes to be sent to SharePoint from Active Directory via ADFS. I've selected "Email-Addresses" with "E-Mail Address" and "User-Princila-Name" with "UPN". Click "Finish" button once done.
![]()
Repeat the relying party wizard for all of your web applications.
Change the Token Signing Certificate in ADFS Server We must have different SSL certificates for "ADFS communication certificate" , "ADFS token signing certificate"
. we have to disable the AD FS automatic certificate rollover feature to add a token signing certificate.
Open PowerShell on the Federation Server (VSrvFs) and run the following command:
Set-ADFSProperties -AutocertificateRollover $false
Now, from the ADFS console Service >> Certificates >> Add Token-Signing Certificate >> You'll be prompted with a menu to choose a certificate >> Select the "TokenSigning.crescent.com" certificate and mark it as primary.
Remember, You must export this ADFS token signing certificate to all SharePoint servers to establish trust.
Private Key Permissions: The service account needs to have "Read" permissions at least on the private key of the Token signing certificate. From the certificates snap-in, Browse to personal >> certificates. Right click Your token signing certificate > All Tasks > Manage Private Keys >> Grant "Read" permission to the service account
Export this ADFS token signing certificate to all SharePoint server(s)
ADFS Token signing certificate must be exported from ADFS server and used while creating trust in SharePoint Server. Here is how:
- From ADFS console, Expand "Certificates" folder, Right Click on your ADFS token signing certificate and choose "View Certificate".
- Under the "Details" tab, Click on "Copy to file" button.
- For Export Private key section, choose "No, do not export the private key"
- Click "Next". Choose export file format as "DER Encoded binary x.509 (.CER)"
- This will export the certificate from ADFS.
Step 3: Configure SharePoint 2013 to Trust ADFS
As a final step, Lets create a trusted identity token issuer pointing to ADFS as the claims provider, using PowerShell
Add-PSSnapin "Microsoft.SharePoint.PowerShell" -ErrorAction SilentlyContinue

#Register the Token Signing certificate from ADFS Server to establish Trust between SharePoint and ADFS server
$cert = New-Object System.Security.Cryptography.X509Certificates.X509Certificate2("C:\ADFS.TokenSigning.cer")
New-SPTrustedRootAuthority -Name "ADFS Token Signing Certificate" -Certificate $cert

#Map the claims attributes
$EmailMap = New-SPClaimTypeMapping -IncomingClaimType "http://schemas.xmlsoap.org/ws/2005/05/identity/claims/emailaddress" -IncomingClaimTypeDisplayName "EmailAddress" -SameAsIncoming

$UPNMap = New-SPClaimTypeMapping -IncomingClaimType "http://schemas.xmlsoap.org/ws/2005/05/identity/claims/upn" -IncomingClaimTypeDisplayName "UPN" -SameAsIncoming

$realm = "urn:intranet:crescent"

#Sign-in URL will be ADFS Server instance
$signInURL="https://adfs.crescent.com/adfs/ls"

#Create new trusted identity token issuer
$TrustedIdentity = New-SPTrustedIdentityTokenIssuer -Name "Crescent.com" -Description "ADFS Trusted users from Crescent.com Domain" -realm $realm -ImportTrustCertificate $cert -ClaimsMappings $EmailMap,$upnMap -SignInUrl $signInURL -IdentifierClaim $Emailmap.InputClaimType
The first two lines of the above code, registers the certificate in SharePoint certificate store. Moreover, You may have to do this for Root Certificate Authority as well. You can see them under "Manage Trusts" link in security section of central administration.
Realm - is a identifier which helps ADFS to load respective configuration for a particular profile. which uses the convention of: urn:yourwebapp:yourdomain (can be anything, technically. It just uniquely identifies between multiple web applications)
IdentifierClaim - is the unique ID that identifies users in SharePoint. So,when users logged in via ADFS, they'll be identified by Email id in this case. Also, when granting access to SharePoint sites from ADFS, we'll have to use this identifier as user names. Make sure that the mapped claims exists in the source. E.g. If E-mail is mapped as Identifierclaim, then It must be exists in AD. In other worlds, E-mail field must contain a value, shouldn't be null!
SharePoint 2013 ADFS with multiple web applications So, You have established trusted identity provider for your primary web applications, and all other web apps as well, say for e.g. My sites. Now, You'll have to add them in your trusted identity provider with this PowerShell code:
Add-PSSnapin "Microsoft.SharePoint.PowerShell" -ErrorAction SilentlyContinue

$TrustedIdentifyProvider = Get-SPTrustedIdentityTokenIssuer "Crescent.com"

$uri = New-Object System.Uri("https://mysites.crescent.com/")

$TrustedIdentifyProvider.ProviderRealms.Add($uri, "urn:mysite:crescent")

$TrustedIdentifyProvider.Update()
Configure SharePoint Web Application:Next step is to enable ADFS claims in SharePoint.
- Go to Central Administration > Application Management > Manage Web Applications.
- Click on "Authentication Providers" button from the ribbon
- Select the "Default" link from the list
![]()
- Scroll down and pick the authentication provider we just created.
![]()
- Click "Ok" to save your changes.
Grant ADFS users Permission to the SharePoint web applicationWhen you add permission for the user in SharePoint you have to add it as the IdentifierClaim (for example if the identifier is the email - you should add the user as user@contoso.com from SharePoint side and login with Domain\userName format.). If you skip this step, users from ADFS will get: access denied!
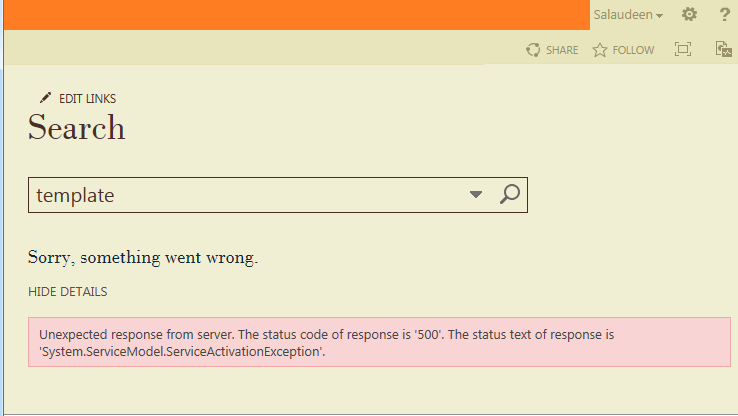
and when users hit SharePoint URL, They'll be presented with the default sign-in page
Troubleshooting?Errors? Event log is the best place to start debugging!.
![]()