SharePoint 2013 & SharePoint 2016 brought new social networking capabilities to the SharePoint collaboration space. With My Sites users can store documents, keep-up their profile information, news feed, contribute to the organization via blogs, follow activities on sites, people, tags, documents, etc! In short: My Site is the personal space for individual users in an organization. At high level, configuring my sites in SharePoint 2016 involves following steps:
Prerequisites:
Before you create My Sites in SharePoint, you need to have the following services properly configured.
![create my site host sharepoint 2013]()
Create My Site Host Site Collection in SharePoint 2016:
Once the web application is created, proceed with creating a site collection in the root of the web application.
![create my site host sharepoint 2016]()
Optional: Set up interval for activity feed timer job
Create My Sites in SharePoint 2016:
So, we completed all configurations to get My sites up and running. Lets perform a quick test.
Setup Storage Quota for My Sites! By default, this setting is unlimited. - But you don't want your SQL disks get filled by My Sites, isn't it?
By default, The maximum number of site collections created per content database is 5000. If you are planning for 10,000 My Sites, of 100 GB each you'll need 1000 TB disk space! So, plan to adhere Content database sizing recommendation - 200 GB or less per content database for better performance.
Technet reference: Configure My Sites in SharePoint Server 2016![]()
- Create a dedicated web application & My Site host site collection
- Add a wildcard inclusion managed path to the web application
- Enable self-service site creation for the web application
- Create a permission policy & Grant everyone permission to My Site web application
- Configure My Site settings for the User Profile service application
Prerequisites:
Before you create My Sites in SharePoint, you need to have the following services properly configured.
- User Profile Service application - SharePoint My Sites depends on UPS! User Profile Service Application will be used to map the My Sites with the User Profiles.
- Managed Metadata service application - My Site users Keywords! so have MMS created & configured prior setting up My Sites.
- Search service application - not mandatory, but best practice for people search results!
Also make sure User Profile Service Application, Managed Metadata Service, and Search Service Application are up running and they are connected to your My site web application through service connections in Central Admin.
Step 1: Create New web application for My Sites
Although you can use an existing web application, its a best practice to create a dedicated web application for My sites for reasons like security, performance, etc. So, To start with, lets create a dedicated web application to host our my sites in SharePoint 2016.- Open SharePoint 2016 Central Administration site.
- From Application Management >> Click the Manage Web Applications >> Click New to Create New Web Application.
- Provide a Name, Port, Host Header, and fill the rest of the new web application form. Hit OK to create new web application.

Create My Site Host Site Collection in SharePoint 2016:
Once the web application is created, proceed with creating a site collection in the root of the web application.
- From SharePoint 2016 Central Administration, select Application Management and then select Create site collections
- Select the Web application we created in the previous step.
- Provide a name and description to the site collection.
- Choose the "My Site Host" as template.
- Provide a primary site collection administrator.
- Leave the quota option default.
- Click the OK button to create the site collection.

Step 2: Add new managed path to the My Site Web Application:
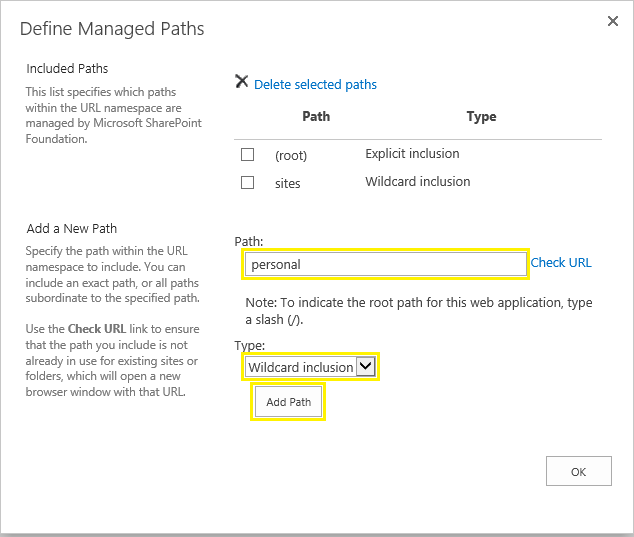
Managed paths defines the location to host site collections within a web application.In our environment, When SharePoint users provision their My Sites, we would like them to reside at http://mysite.crescent.com/personal/name-of-person/. So, We defined a wildcard managed path for "/personal/" as follows:- From SharePoint Central Administration >> Manage Web Application >> Select the My Site Host Web Application you just created.
- In the ribbon click the Managed Paths button >> Define Managed Paths dialog, Add a new path called "personal" (or "my" or whatever you like!) and make it Wildcard inclusion. Click "Add Path" and then OK once done.
- Optionally, You can delete the OOTB "Sites" managed path from My site web application.
![sharepoint mysite configuration]()
Step 3: Enable self-service site creation for the web application
Self-service site creation option enables the end user to create their own My site collection automatically.- Select your web application from Manage Web Applications page of Central Administration site.
- Click on "Self Service Site Creation" button for the web application
![configure my site sharepoint 2013]()
- Select "On" for Site Collections and "Prompt users to create a team site" under Start a Site. Provide the managed path we created ("/personal"). Leave the rest default.
![sharepoint 2013 my site step by step]()


Step 4: Add Permission Level Policy & User Permission to My Site Web Application:
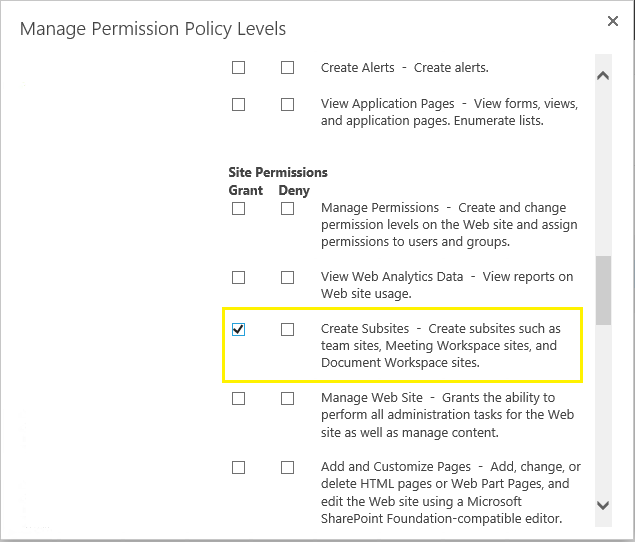
Create a permission level policy for "Create Subsites" permission.- Select your My Site web application and Click on the "Permission Policy" button from the ribbon. In the "Manage Permission Policy Levels", click on "Add Permission Policy Level" link.
![sharepoint 2016 mysite web application]()
- Under Permissions, scroll to Site Permissions, select the Grant option for "Create Subsites - Create subsites such as team sites, Meeting Workspace sites, and Document Workspace sites". Now, the new permission policy level should appear among other policy levels.
![sharepoint 2016 my sites configuration]()
- You need to grant that policy level to all users. Highlight your my site web application, Click on the "User Policy" button from the ribbon.
- Click on "Add users" link >> Choose All zones and enter the users as "Everyone". Click OK to commit your changes.
![sharepoint 2013 my site creation]()


Step 5: Configure My Site URL in the User Profile Service Application
Alright, Now you have a My Site Web Application, My Site Host root site collection, wildcard managed path and self-service enabled for the web application. The only remaining thing would be to set up My Site URL on User Profile Service Application, So that user profile service knows where to create new site collections for user My Sites.- Go to Central Administration >> Application Management >> Manage service applications.
- Select your User Profile Service Application >> On the Manage User profile service page, in My Site Settings section, click on "Setup My Sites" link.
![sharepoint 2013 my site step by step]()
- Enter the My Site Host URL and click Save.
- Specify other settings like Personal Site Location, Site Naming Format, Secondary Owner, etc.

Optional: Set up interval for activity feed timer job
- Go to the Central Administration >> Monitoring >> Timer Job >> Review job definitions
- Find "User Profile Service Application - Activity Feed Job", and set up the activity feed sync time according to your needs. By default, its set to run for every 10 Minutes.
Create My Sites in SharePoint 2016:
So, we completed all configurations to get My sites up and running. Lets perform a quick test.
- Go to any of the SharePoint site in the farm and select "About Me" link from the welcome menu.
- You will redirected to your personal My Site home page if all fine, Where you can edit Your personal details like profile picture, contact information etc.
![sharepoint my site configuration]()

Setup Storage Quota for My Sites! By default, this setting is unlimited. - But you don't want your SQL disks get filled by My Sites, isn't it?
By default, The maximum number of site collections created per content database is 5000. If you are planning for 10,000 My Sites, of 100 GB each you'll need 1000 TB disk space! So, plan to adhere Content database sizing recommendation - 200 GB or less per content database for better performance.
Technet reference: Configure My Sites in SharePoint Server 2016