How to create a design package in SharePoint 2016:
The design package is a .wsp file that can be created through the Design Manager in SharePoint 2013 or SharePoint 2016, contains branding assets that are stored in Design Manager. With the packaging feature of Design manager, we can package all our branding artifacts into Re-deployable package (wsp) without using Visual studio.
Creating the design package is quite simple.
Step 3: SharePoint 2013 import design package (wsp)
Once the design package is ready, can be imported to any site through the "Import design package" option in Site Settings. we can port it to anywhere and apply the new design through this package. Here are the steps to apply the design package in the target site.
![]()
The design package is a .wsp file that can be created through the Design Manager in SharePoint 2013 or SharePoint 2016, contains branding assets that are stored in Design Manager. With the packaging feature of Design manager, we can package all our branding artifacts into Re-deployable package (wsp) without using Visual studio.
Refer this article to create a custom master page using SharePoint 2016 design manager: How to Create a Custom Master Page Using Design Manager in SharePoint 2016 - Step by Step
Here are the steps to create and apply a design package:- Create a design package using Design Manager in SharePoint 2016
- Export design package WSP file from the source site collection
- Import & Apply design package to the target site
Creating the design package is quite simple.
- Go to Site Settings >> Design Manager
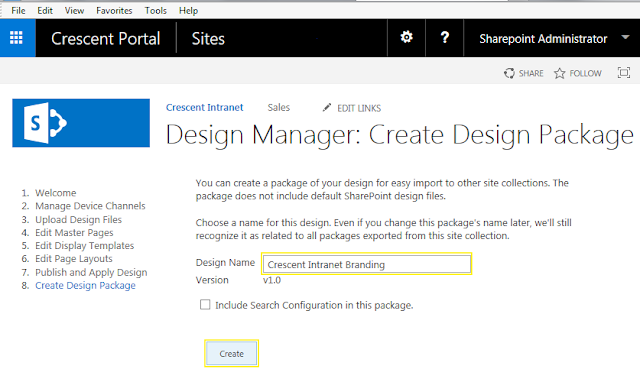
- Clickon "Create Design Package" link from the design manager left navigation
![sharepoint 2013 create a design package]()
- Design manager gives the name and version number for you automatically - You can rename it if required. Optionally you can include the Site Collection search configuration in the package. Click on "Create" button to create the WSP package.
![create a design package in sharepoint 2016]()
- Wait for a while it generates the WSP package with all branding artifacts, including: MasterPages, Page Layouts, Display Templates, CSS Style Sheets, JavaScript files, Images, etc. Once the package creation is completed, you'll get the link to download the wsp file. This generates a WSP file that will live in the Solutions gallery
- Export design package: Click on "Your Package is ready. Click here to download" link to download the wsp.
![sharepoint 2013 design package download]()


Step 3: SharePoint 2013 import design package (wsp)
Once the design package is ready, can be imported to any site through the "Import design package" option in Site Settings. we can port it to anywhere and apply the new design through this package. Here are the steps to apply the design package in the target site.
Make sure the destination site collection is a publishing site or have Publishing feature enabled!
- Navigate to the site settings of the target site. Click on "Import Design Package" link under "Look and Feel" section
![upload design package sharepoint 2013]()
- Click on "Browse" button and select the WSP file generated from the previous step. Click on "Import" button once.
![sharepoint 2013 import design package powershell]()
- Wait for a while til it gives the message "import of package "your package name" succeeded".
![sharepoint online import design package]()


