SharePoint 2013 object cache stores metadata about SharePoint Server objects like SPSite, SPWeb, SPList, etc. on the Web Front Ends. SharePoint features such as publishing, content query web part, navigation, search query box , metadata navigation, etc fetches data from object cache, instead of hitting SQL Server when data needs to be retrieved from SharePoint objects to optimize page rendering.
For the object caching to work properly in SharePoint, We need to perform below tasks:
Object Cache: The super user account utilized by the cache is not configured. This can increase the number of cache misses, which causes the page requests to consume unnecessary system resources.
Event ID: 7362: The super user account utilized by the cache is not configured
Step 1: Create user accounts for "Portal Super Reader" and "Portal Super User" in your active directory
Go to your active directory, create two user accounts. In my case, I've created these accounts in my domain: "Crescent" as:
Step 2: Grant web application policy on Super User, Super Reader accounts on all web applications
After account are created, we have to grant permissions at web application level. Navigate to
PowerShell script to grant web application user policy on all web applications:
This adds "Full Control" user policy to all of your web applications for the Super User account and "Full Read" user policy to Super Reader account. You can go back to Web application user policies page to verify that these accounts are added to web applications.
Step 3: Associate super user and super reader accounts to web applications
Once web application policies are created, We've to associate Super User and Super Reader accounts with Web applications either with classic STSADM or using PowerShell commands.
stsadm -o setproperty -propertyname portalsuperuseraccount -propertyvalue Crescent\sps_superuser -url "Web-app-url"
Same can be done with PowerShell as,
![]() Technet reference: Configure object cache user accounts in SharePoint Server 2013
Technet reference: Configure object cache user accounts in SharePoint Server 2013 ![]()
For the object caching to work properly in SharePoint, We need to perform below tasks:
- Create user accounts for "Portal Super Reader" and "Portal Super User" in your active directory
- Grant web application policy on these user accounts on web applications.
- Associate super user and super reader user accounts to web applications
Object Cache: The super user account utilized by the cache is not configured. This can increase the number of cache misses, which causes the page requests to consume unnecessary system resources.
Event ID: 7362: The super user account utilized by the cache is not configured
Step 1: Create user accounts for "Portal Super Reader" and "Portal Super User" in your active directory
Go to your active directory, create two user accounts. In my case, I've created these accounts in my domain: "Crescent" as:
- SPS_SuperUser
- SPS_SuperReader
Import-Module ActiveDirectory -ErrorAction SilentlyContinue

#Set configurations
$AccountPassword = "Password1"
#Convert to Secure string
$Password = ConvertTo-SecureString -AsPlainText $AccountPassword -Force

$Domain = "YourDomain.com"
#Specify the OU
$AccountPath= "ou=SharePoint,DC=YourDomain,DC=com"

#Create Super Reader Account
$Account="SPS_SuperReader"
New-ADUser -SamAccountName $Account -name $Account -UserPrincipalName $Account@$domain -Accountpassword $Password -Enabled $true -PasswordNeverExpires $true -path $AccountPath -OtherAttributes @{Description="SharePoint 2013 Super Reader Account for object cache."}

#Create Super User Account
$Account="SPS_SuperUser"
New-ADUser -SamAccountName $Account -name $Account -UserPrincipalName $Account@$domain -Accountpassword $Password -Enabled $true -PasswordNeverExpires $true -path $AccountPath -OtherAttributes @{Description="SharePoint 2013 Super User Account for object cache."}
Step 2: Grant web application policy on Super User, Super Reader accounts on all web applications
After account are created, we have to grant permissions at web application level. Navigate to
- SharePoint Central administration >> Application Management >> Manage web applications.
- Select your web application >> From the ribbon, click on User Policy button.
- Click on "Add" button from the User policies page.
![]()
- From the zones list, select "All zones" and click on next.
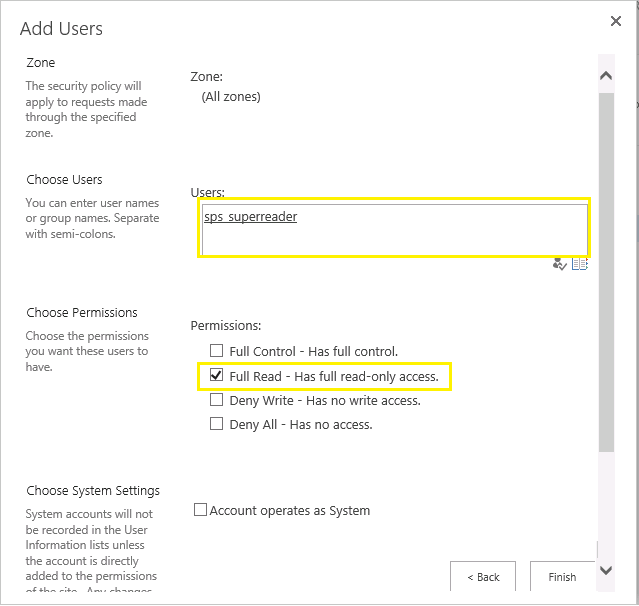
- In the Add users page, Enter the Super Reader user name. Under Permissions, Select "Full Read" option and Click on Finish button.
![]()

PowerShell script to grant web application user policy on all web applications:
Add-PSSnapin Microsoft.SharePoint.PowerShell -ErrorAction SilentlyContinue

Function Grant-UserPolicy($UserID, $WebAppURL, $Role)
{
    #Get the Web Application
    $WebApp = Get-SPWebApplication $WebAppURL

    #Convert UserID to Claims - If Web App is claims based! Domain\SPS_SuperReader to i:0#.w|Domain\SPS_SuperReader
    if($WebApp.UseClaimsAuthentication)
    {
        $UserID = (New-SPClaimsPrincipal -identity $UserID -identitytype 1).ToEncodedString()
    }

    #Crate FULL Access Web Application User Policy
    $ZonePolicies = $WebApp.ZonePolicies("Default")
    #Add sharepoint 2013 web application user policy with powershell
    $Policy = $ZonePolicies.Add($UserID,$UserID)
    #Policy Role such as "FullControl", "FullRead"
    $PolicyRole =$WebApp.PolicyRoles.GetSpecialRole($Role)
    $Policy.PolicyRoleBindings.Add($PolicyRole)
    $WebApp.Update()

    Write-Host "Web Application Policy for $($UserID) has been Granted!"
}

#Get all Web Applications
$WebAppsColl = Get-SPWebApplication
foreach($webApp in $WebAppsColl)
{
    #Call function to grant web application user policy
    Grant-UserPolicy "Crescent\SPS_SuperReader" $webapp.URL "FullRead"
    Grant-UserPolicy "Crescent\SPS_SuperUser" $webapp.URL "FullControl"
}
This adds "Full Control" user policy to all of your web applications for the Super User account and "Full Read" user policy to Super Reader account. You can go back to Web application user policies page to verify that these accounts are added to web applications.
Step 3: Associate super user and super reader accounts to web applications
Once web application policies are created, We've to associate Super User and Super Reader accounts with Web applications either with classic STSADM or using PowerShell commands.
stsadm -o setproperty -propertyname portalsuperuseraccount -propertyvalue Crescent\sps_superuser -url "Web-app-url"
Same can be done with PowerShell as,
$WebApp = Get-SPWebApplication "http://web-app-url/"Lets use PowerShell to Add object cache accounts with all web applications:
$webApp.Properties["portalsuperuseraccount"] = "i:0#.w|Crescent\SPS_superuser"
$webApp.Properties["portalsuperreaderaccount"] = "i:0#.w|Crescent\SPS_superreader"
$WebApp.Update()
Add-PSSnapin Microsoft.SharePoint.PowerShell -ErrorAction SilentlyContinueOn Publishing sites, object cache is turned ON automatically. Once its enabled at web application level, you can adjust object caching settings from "Site collection object cache " link under site collection administration settings .
#Get all Web Applications
$WebAppsColl = Get-SPWebApplication
foreach($webApp in $WebAppsColl)
{
#Update with your SuperUser and Super Reader Ids
$SuperReader = "Crescent\SPS_SuperReader"
#Convert to Claims ID
$SuperReaderID = (New-SPClaimsPrincipal -identity $SuperReader -identitytype 1).ToEncodedString()
$SuperUser = "Crescent\SPS_SuperUser"
$SuperUserID = (New-SPClaimsPrincipal -identity $SuperUser -identitytype 1).ToEncodedString()
#Set Super User and Super Reader accounts
$webApp.Properties["portalsuperreaderaccount"] = $SuperReaderID
$webApp.Properties["portalsuperuseraccount"] = $SuperUserID
$webApp.Update()
Write-host Object cache accounts updated for $WebApp.URL
}
